Setting Up the Bot
In Druid ChatBot Portal:
Step 1: Configure the Bot
To configure the bot for Retail, you need to set Live Chat timeouts and Special Flows, enable the bot for Live Chat integration and configure the connection strings.
Set Live Chat timeouts
In the bot’s Details page, click the General section header. The General settings area expands.
Set the parameters for the Route-to-Human functionality:
- LiveChatQueueWaitingTimeoutMins - The amount of time in minutes that a client could wait until an agent accepts the incoming live chat request. When the time limit is reached, the live-chat-waiting-message-in-the-queue flow is triggered.
- LiveChatConversationIdleTimeoutMins - The idle time limit for which a client can be idle (i.e. does not respond) in an ongoing conversation with an agent. Once the time limit is reached, the dialog times out and the client is automatically returned to bot context.
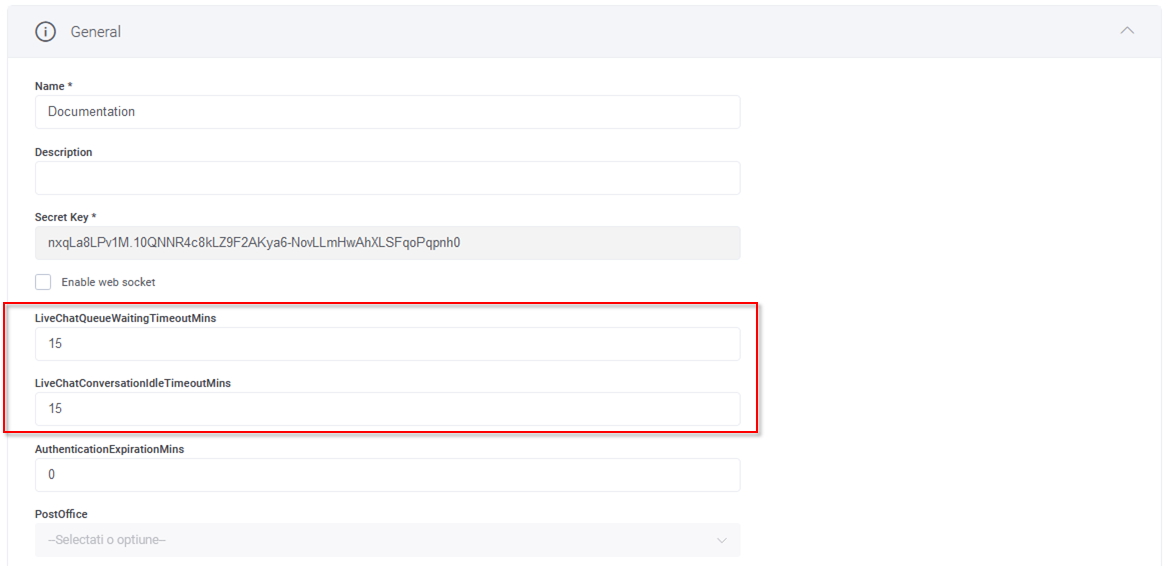
Save the bot. For more information on how it works and how to configure Live Chat, see Live Chat.
Set special flows
Click the Special Flows section header and select the following special flows:
| Special Flow | Select |
|---|---|
| Welcome | first-welcome-flow |
| IntentNotFound | Intent-not-recognized |
| Authentication | web-authentication-customer |
| LiveChatClientDisconnectedFlowId | live-chat-feedback-client |
| LiveChatAgentDisconnectedFlowId | live-chat-agent-disconnect |
| LiveChatClientWaitingInQueueFlowId | live-chat-connect-to-agent |
| LiveChatClientConnectedFlowId | live-chat-client-connected |
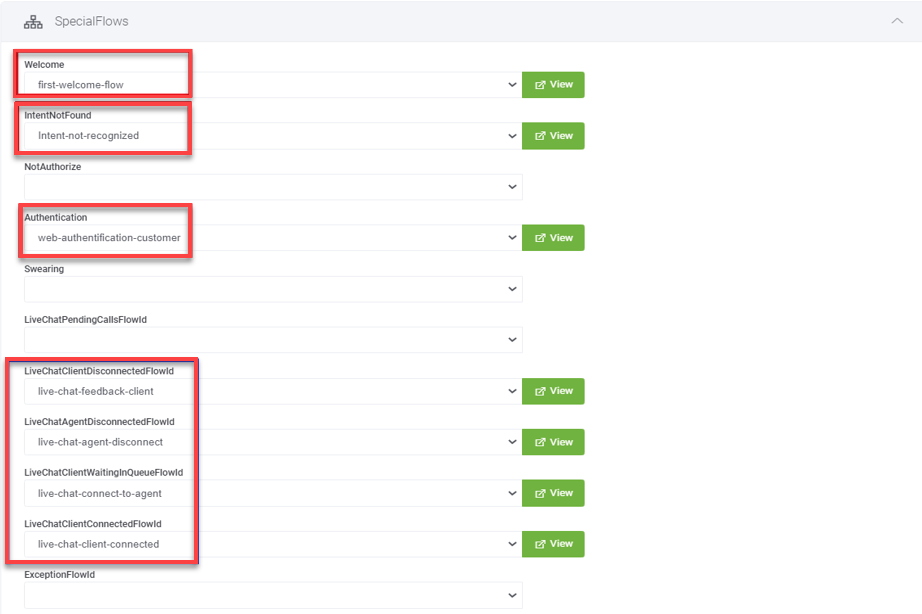
In production, you can configure these flows based on your needs.
Set the Connection Strings (Apps) Details
Retail provides you with a wide range of apps for integration with various systems to demo various processes. Set up only the apps used by your organization or the ones dedicated to the particular processes you want to demo / use.
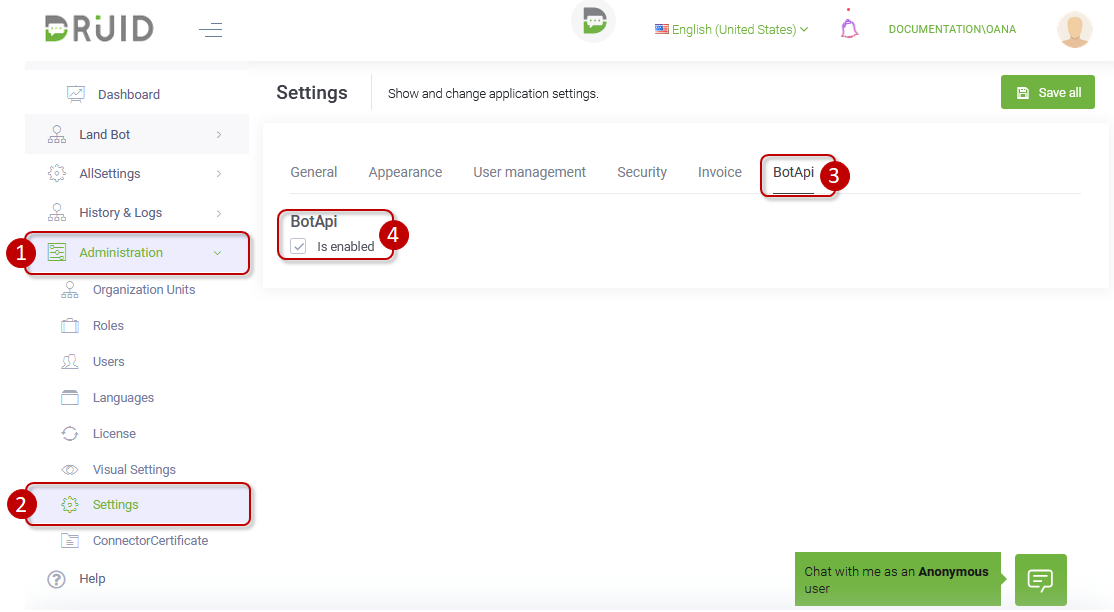
Enable BotApi
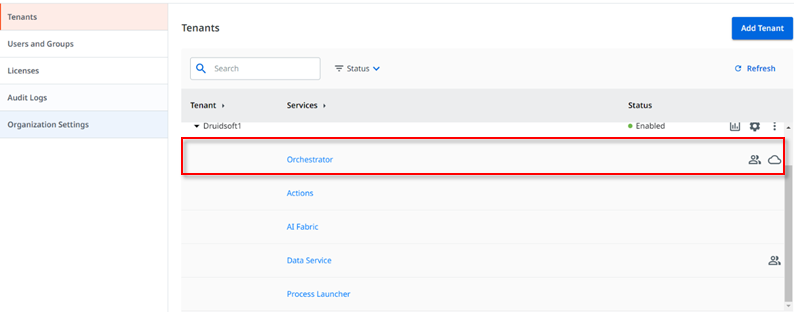
For live chat integration you need to enable BotApi at your tenant level. To do so, on the main menu, click Administration > Settings. Click the BotApi tab and tick the Is enabled check box.
Set the Connection Strings (Apps) Details
Victor provides you with a wide range of apps for integration with various systems to demo various processes. Set up only the apps used by your organization or the ones dedicated to the particular processes you want to demo / use.
| Druid App | App Type | Integrates Druid with | Integration Purpose | Mandatory app |
|---|---|---|---|---|
| SQL-DB | SQL | Your Database. | Connects Druid to your DB. | Yes |
| UiPathDruidsoft1 | UiPath | UiPath robots | Allows the chatbot and UiPath robots to work seamlessly together to fulfill customers service and employee requests. | Yes |
| UiPathOrchApi | REST | UiPath Orchestrator API | Druid integration with UiPath Orchestrator API. | Yes |
For information on how to set the connection strings, click on the configuration section specific to the app you want to set:
Prerequisite
- You need to have a Microsoft Azure SQL subscription. If you do not have one, register for a 12-month free-trial account.
To configure the SQL connector to your DB, from Retail Apps, click SQL-DB. The Edit Connector page appears.
Make the following settings:
| Setting | Description |
|---|---|
| ClientType | Select SqlServer. |
| DataSource | Enter the name of the SQL server. |
| InitialCatalog | Enter the name of the database used by the connection string, which is located on the server that you specified in the DataSource field. |
| UserID and Password | The credentials (user name and password) of your SQL Server account. |
Click Save and Close.
Prerequisites:
- Go to the UiPath Cloud Services Portal (https://cloud.uipath.com/<tenancyName>/portal_/serviceinstances), under Admin > Services, click the API Access option corresponding to the desired service and write down the following details: UserKey, Account Logical Name, Tenant Logical Name and ClientId.
- Set up the retail-case-workflow process.
To configure the UiPath connector, from Retail Apps, click UiPathDruidsoft1. The Edit Connector page appears.
Enter the Cloud Orchestrator details (the ones noted in the prerequisites):
For more information on how to configure the UiPath connector, see Starting UiPath Unattended or Creating the UiPath Connection Strings.
After you finish setting up the UiPath connector, click Save and Close.
Prerequisites:
- You need a UiPath Orchestrator admin account.
- You need to set up the retail-case-workflow process.
- Make sure that you know the following UiPath Orchestrator integration variables: client_id, refresh_token, UiPath_Account and UiPath_Tenant. To find out these variables, access cloud.uipath.com, log in and click Manage.
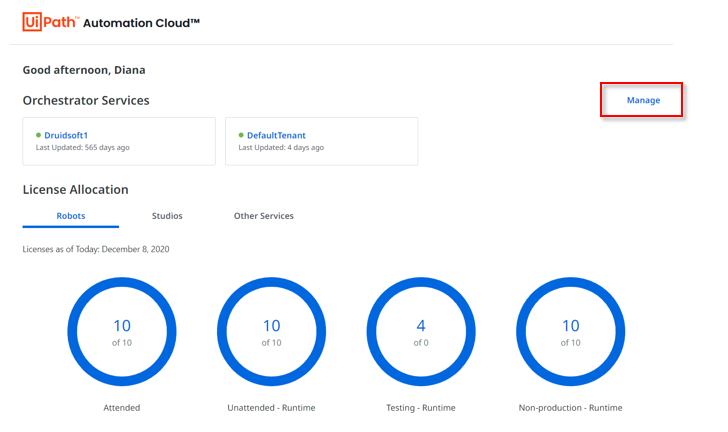
Click on the tenant you are working on.
Click on API Access and write down the client_id (mapped as Client Id), UiPath_Account (mapped as Account Logical Name), UiPath_Tenant and TenantName (both mapped as Tenant Name), refresh_token (mapped as User Key).
To get the OrganizationUnitId, access the process folder in your Orchestrator and write down the FID provided in the URL field.
To configure the REST connector, from Retail Apps, click UiPathOrchApi. The Edit Connector page appears.
Set up the following Custom security details:
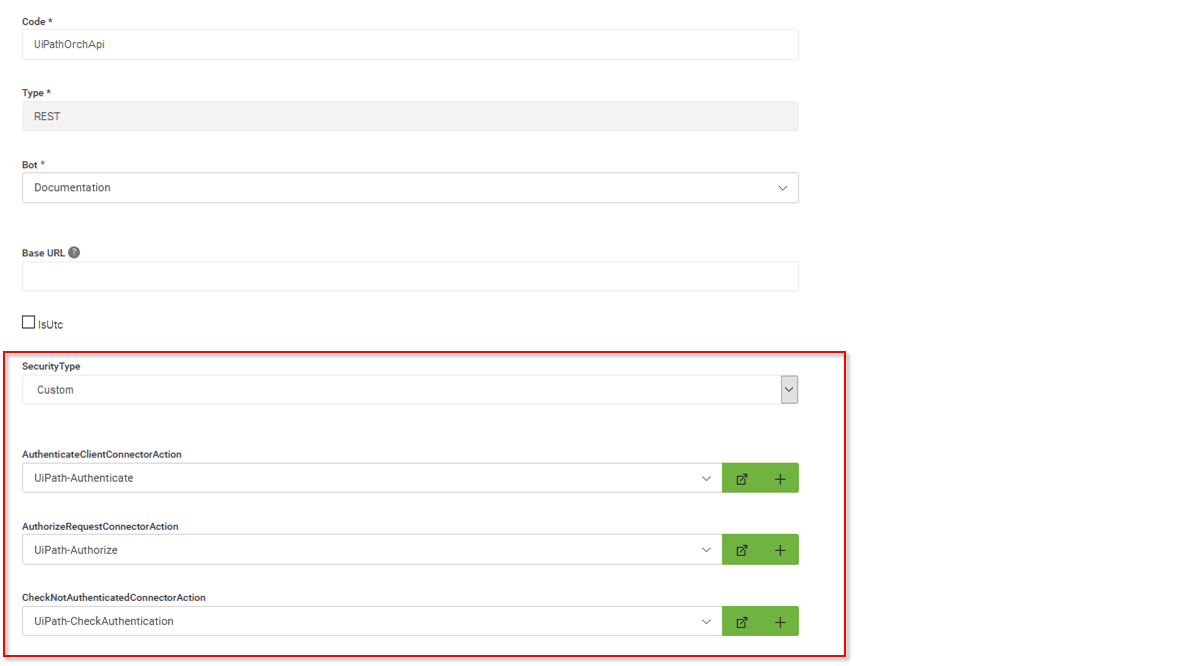
In the Variables section, add the integration context variables as follows:
| Variable | Description |
|---|---|
| UserEmail | The email address associated to a UiPath Orchestrator admin account. The user should have access to both Orchestrator and to the folders in which the UiPath unattended process is configured. |
| client_id | The Client Id from Cloud UiPath Orchestrator. |
| UiPath_Account | The Account Logical Name from Cloud UiPath Orchestrator. |
| UiPath_Tenant | The Tenant Name from Cloud UiPath Orchestrator. |
| refresh_token | The User Key from Cloud UiPath Orchestrator. |
| OrganizationUnitId | The FID in your Orchestrator process folder. |

Click Save and Close.
Step 2: Set Up Druid Users
The user roles that can interact with the retail bot are the following:
- Customer Retail
- Visitor
- Customer Support Agent
- Manager
For production environments, you need to make sure that in the Druid ChatBot Portal you assign the specific security roles to users, as follows:
- For all managers, create Druid users and assign them the Manager role.
- For all agents in your customer support department, create Druid users and assign them the Helpdesk Agent role.
For Druid demo and community environments, assign all roles to your user.
Step 3: Run Setup Flow
Open chat land bot page and send the message “setup-retail-bot”. This command sets up all the DB tables needed in Retail.
Click Done. If the SQL connection strings are properly set, the Retail setup completes successfully.
You can now train the entities and the bot and set up the webchat in HTML page.