ServiceNow Live Chat
Integrate Druid AI Agents with ServiceNow Virtual Agent and ServiceNow live agents so users can continue a conversation with human support through ServiceNow Agent Chat and Advanced Work Assignment (AWA). ServiceNow handles Virtual Agent processing, live-agent routing, and agent responses; Druid provides the user-facing chat experience.
Prerequisites
- An accessible ServiceNow instance with Virtual Agent, Bot-to-Bot integration, Agent Chat/AWA, and a supported agent workspace.
- Administrative permissions for Virtual Agent, Bot Integration, AWA queues, assignment rules, agent users, and REST Message configuration.
- An active Chat service channel, an approved support assignment group, and at least one eligible agent in Service Now.
- The ServiceNow instance URL, provider application/inbound identifier, authentication details, and an approved webhook endpoint for inbound calls.
- Agreed support hours, queue wait behavior, capacity, and security requirements
The precise authentication payload and provider identifiers are deployment-specific and must be supplied by the integration administrator.
How it works
The end-to-end communication between the end user, Druid AI, ServiceNow Virtual Agent, and the live agent routing path follows this sequence:
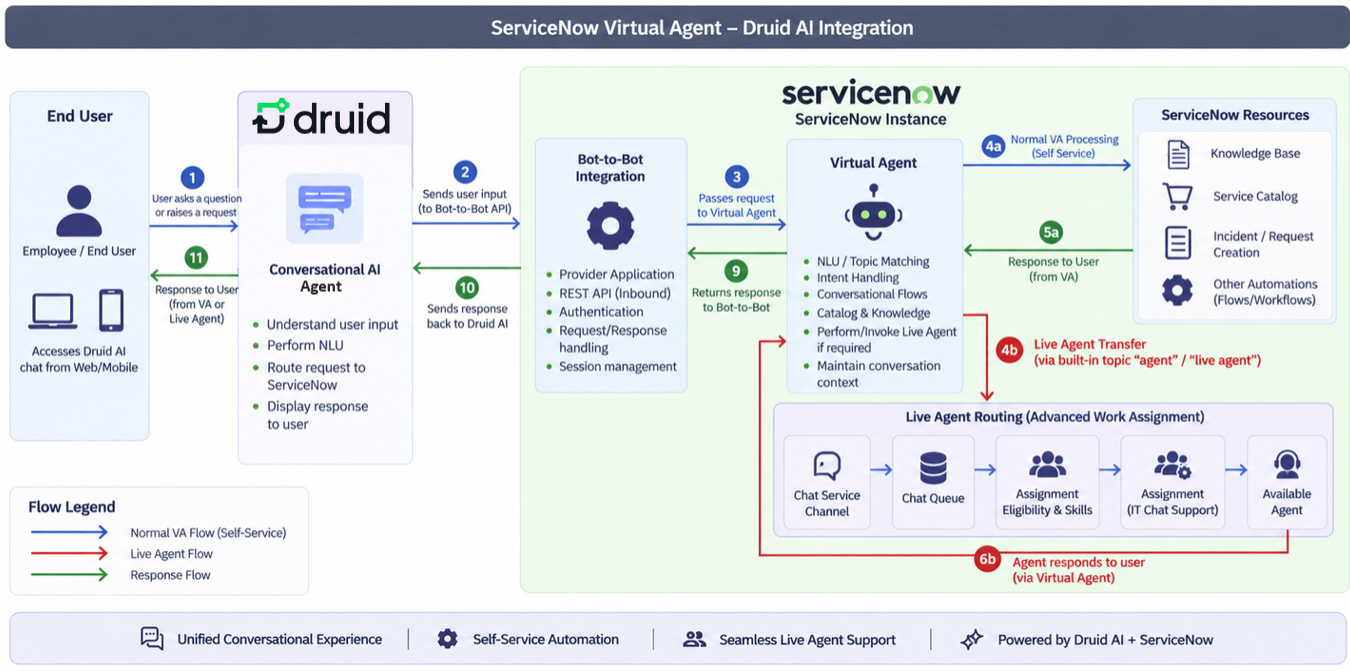
- User Request: The user sends a message to the Druid AI Agent (deployed wither in a website or a mobile app).
- Bot-to-Bot Request: Druid AI processes the user input, performs NLU, and sends the request to the ServiceNow Bot Integration endpoint using the configured provider application and authentication credentials.
- Virtual Agent Hand-off: The ServiceNow Bot-to-Bot integration module receives the request and passes it directly to the ServiceNow Virtual Agent.
- Processing Path (Self-Service vs. Live Agent)
- Normal VA Processing (Self-Service): The Virtual Agent matches the intent or topic, interacting with ServiceNow resources such as the Knowledge Base, Service Catalog, or incident/request creation workflows.
- Live Agent Transfer: If the user requests human assistance (e.g., by typing "agent" or "live agent"), the Virtual Agent flow invokes the Transfer to Agent action/node, directing the interaction into Advanced Work Assignment (AWA).
- Virtual Agent Response (Self-Service): For self-service queries, ServiceNow returns the generated response back to Druid AI, which displays it to the user.
- Live Agent Routing & Agent Response
- Work enters the Chat Service Channel, passes through the designated Chat Queue, evaluates Assignment Eligibility & Skills, and is routed via the Assignment Rule to the IT Chat Support group and an Available Agent.
- The human agent responds to the user via the Virtual Agent / interaction framework.
- AWA Evaluation. AWA checks queue schedules, assignment eligibility, assignment groups, assignment rules, agent presence, chat availability, capacity, and optional skills.
- Agent Engagement. An eligible, available agent receives and opens the interaction through the supported agent experience workspace.
- Response Transmission. ServiceNow returns responses from either the Virtual Agent or the live agent back through the Bot-to-Bot integration layer.
- Druid Delivery. Druid receives the response while maintaining strict session and conversation context.
- The user receives the response seamlessly within the same conversation, ensuring continuous session persistence across self-service and live agent handoffs.
Configuring the integration
This section provides the steps necessary to integrate your Druid AI Agent with ServiceNow.
Step 1. Configure the ServiceNow Virtual Agent transfer flow
The ServiceNow Virtual Agent transfer flow terminates the automated bot path and initiates a human interaction by routing work into the designated chat service channel or AWA path. It allows AWA to evaluate queue eligibility and available agents while maintaining the session context, ensuring the handoff remains part of the continuous user conversation.
To configure the ServiceNow Virtual Agent transfer flow, follow these steps:
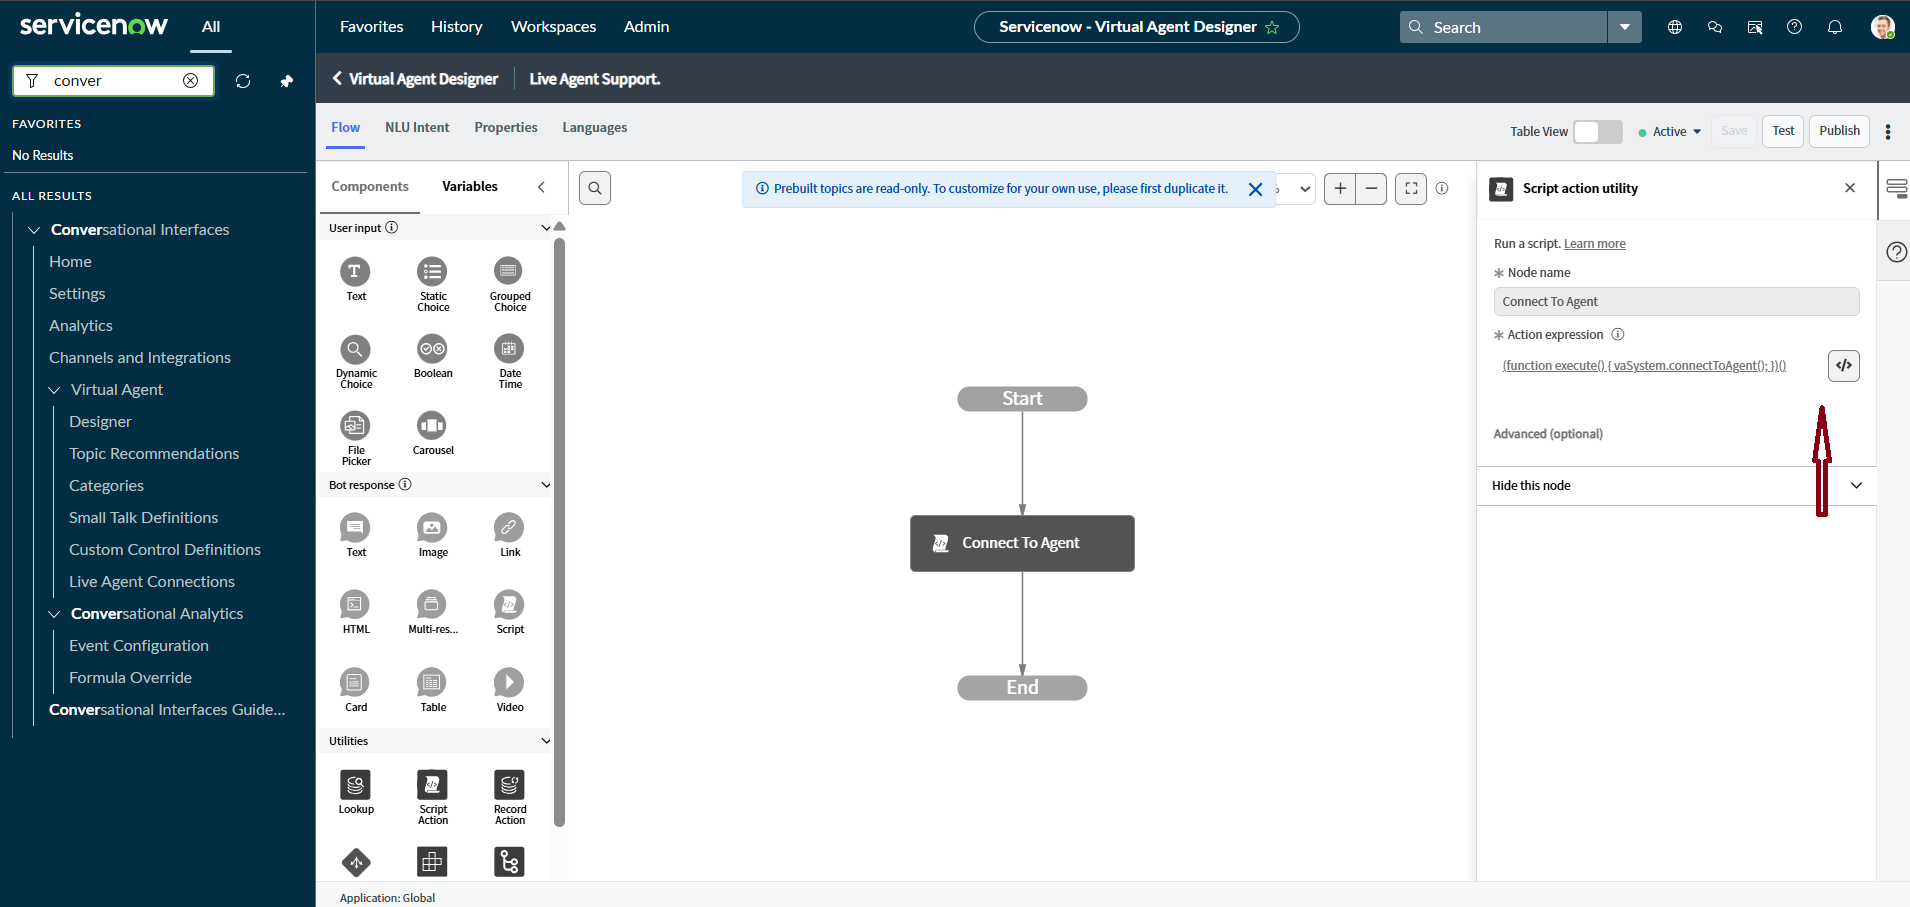
- In ServiceNow, go to Conversational Interfaces > Virtual Agent > Designer.
- Open the approved Live Agent Support topic or equivalent live-agent topic.
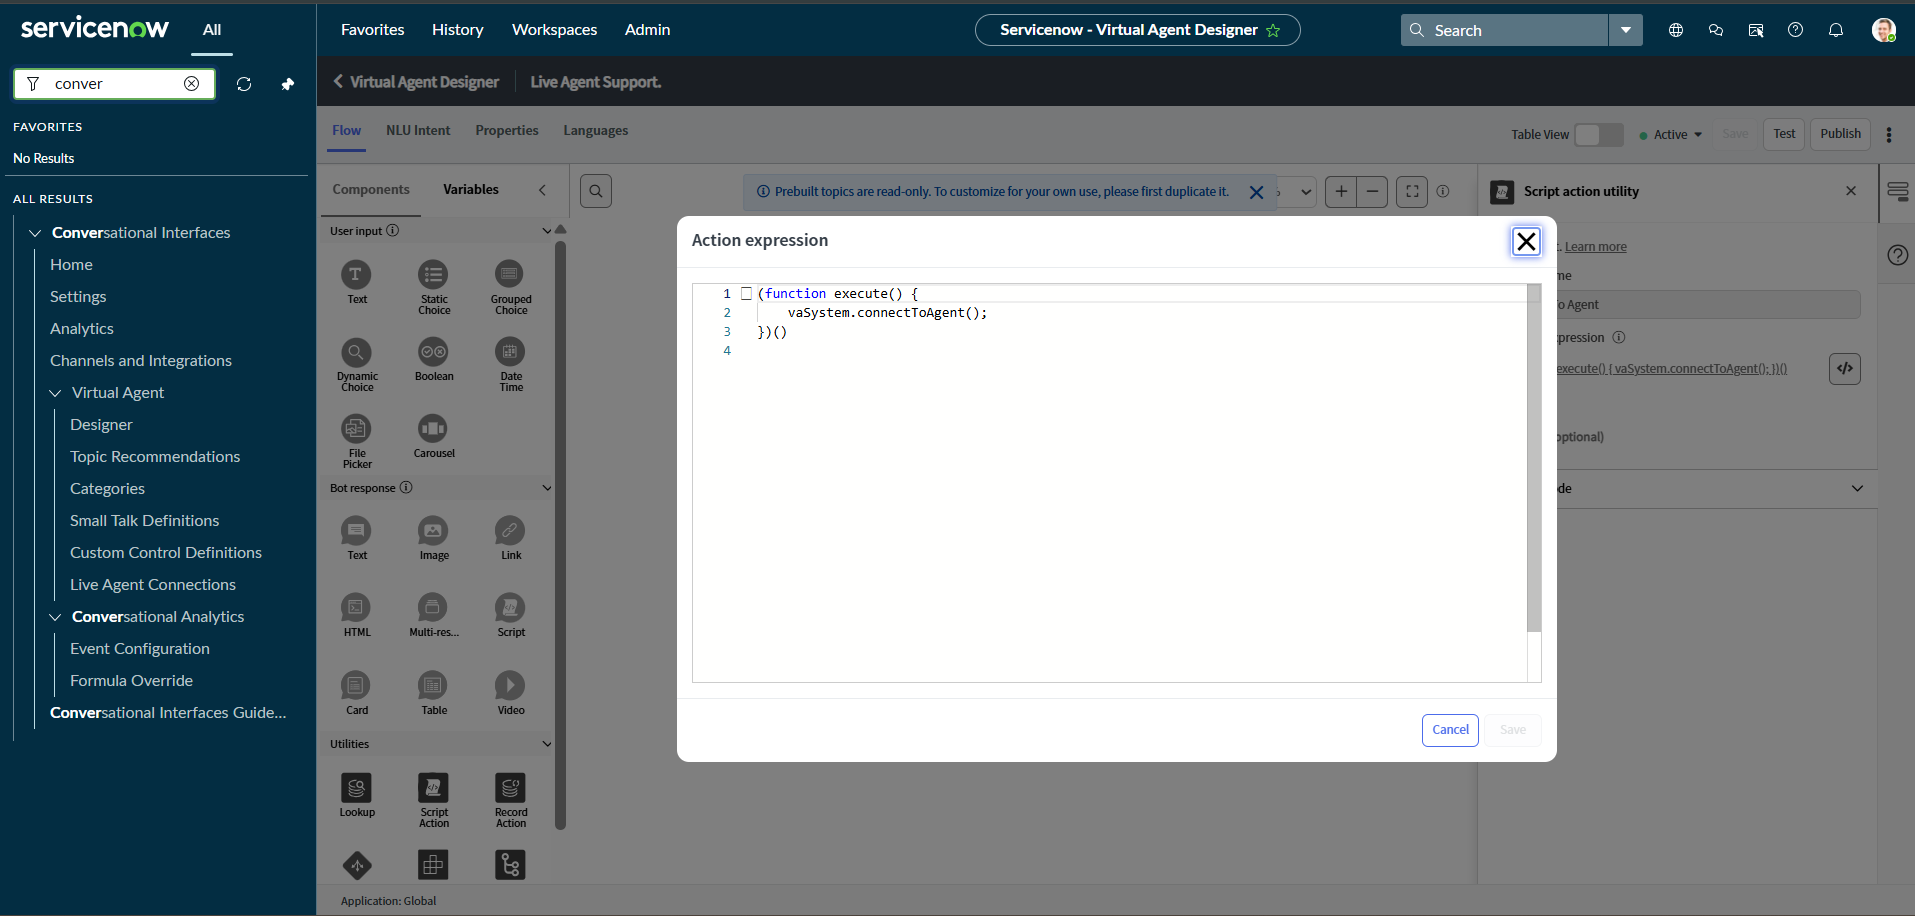
- Verify that the topic is active and contains a Transfer to Agent action/node. Do not deactivate or change unrelated topics.
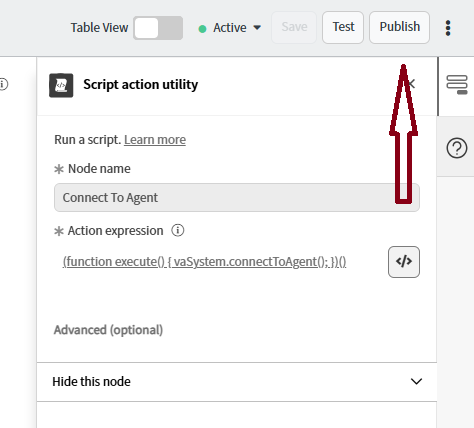
- Locate the Transfer to Agent node/action. Confirm that the flow reaches this supported transfer action rather than using custom hard-coded queue routing.
- Save and publish or activate the topic as required by your ServiceNow release.
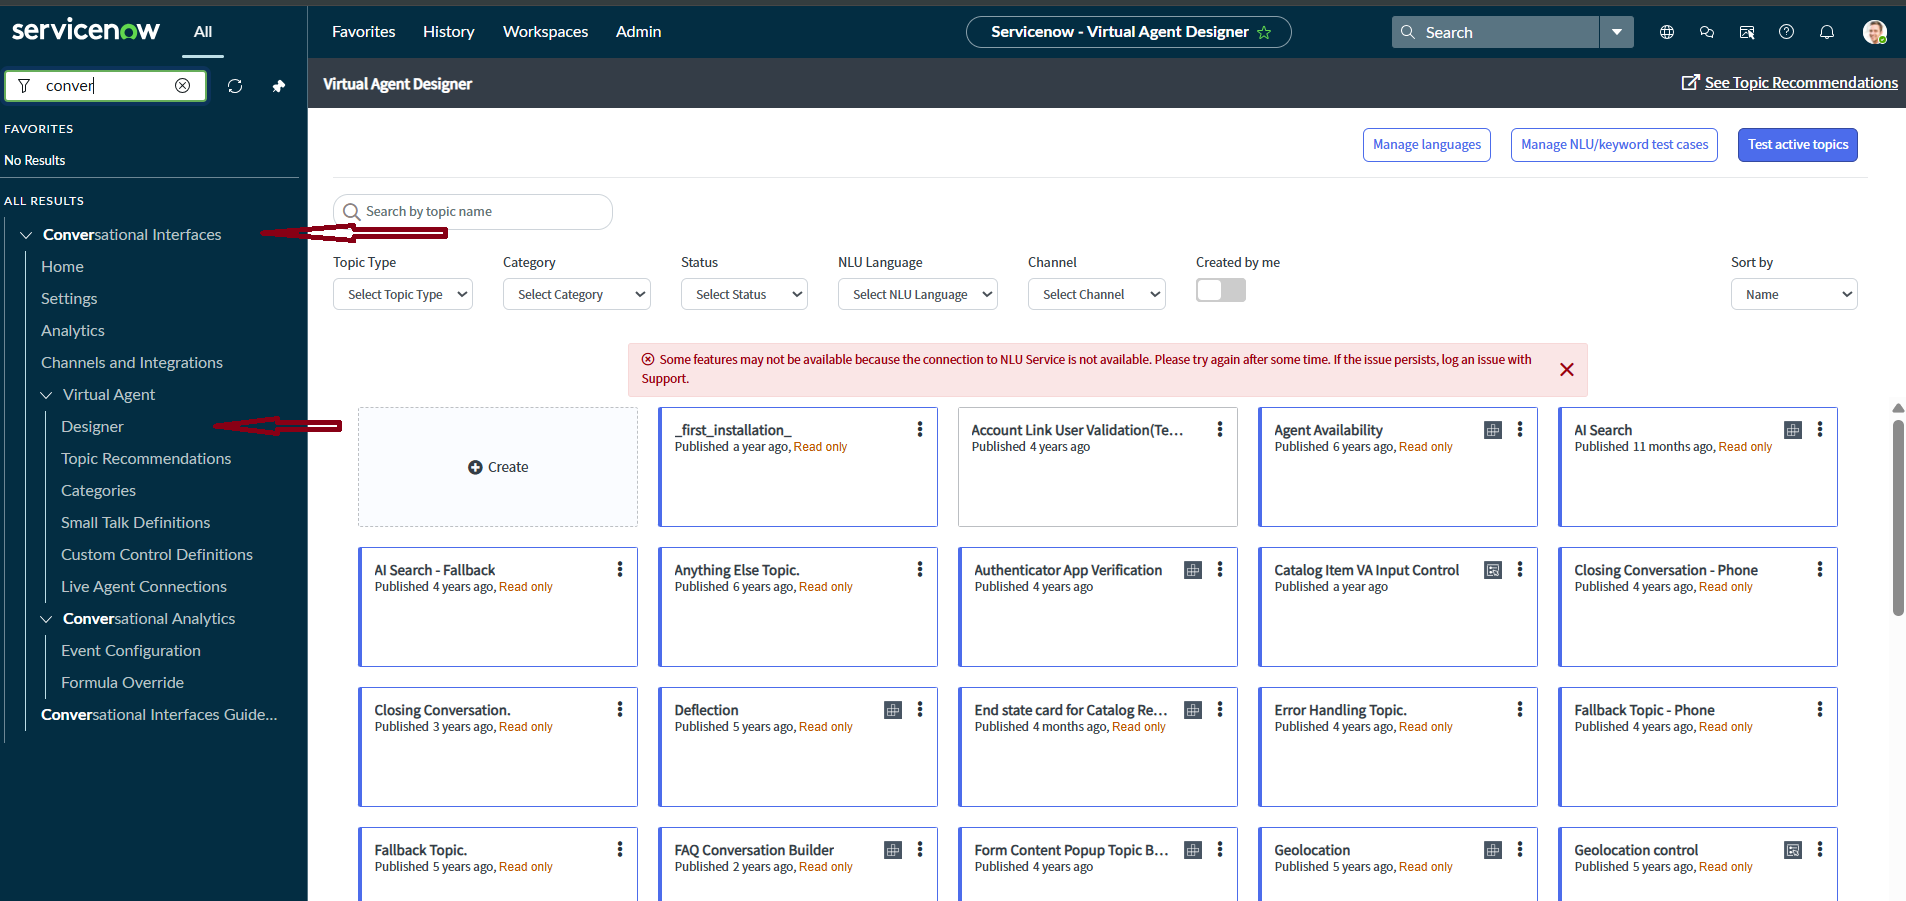
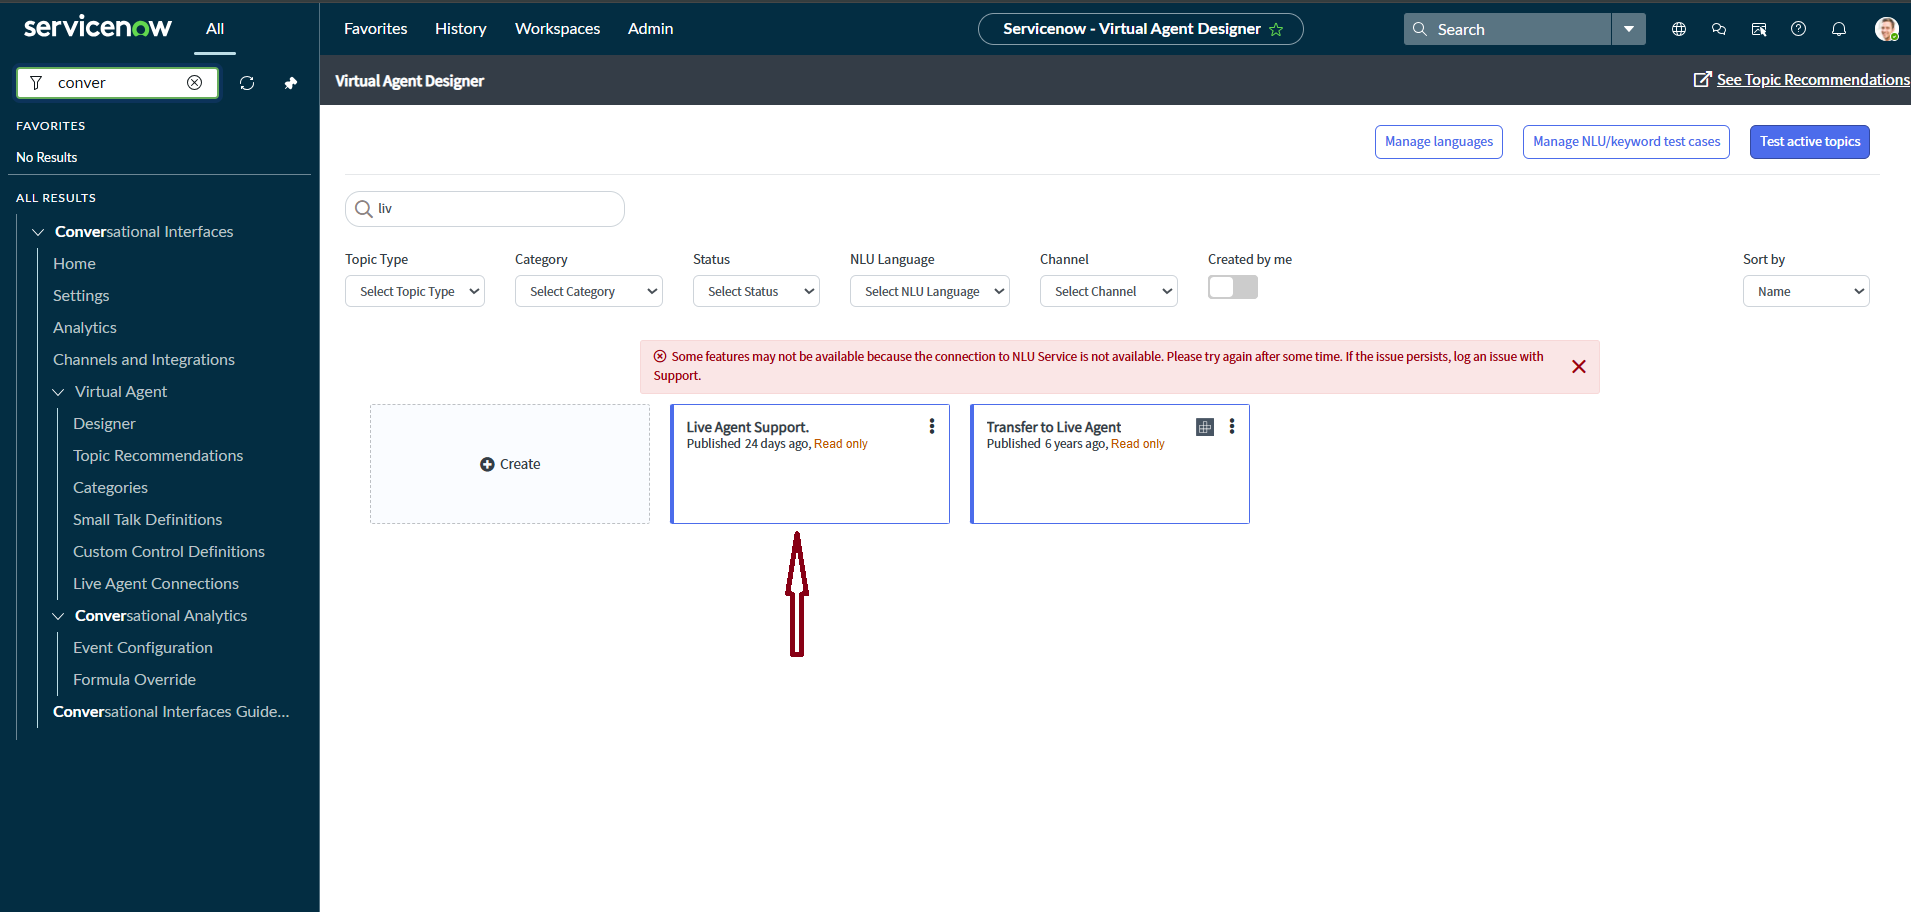
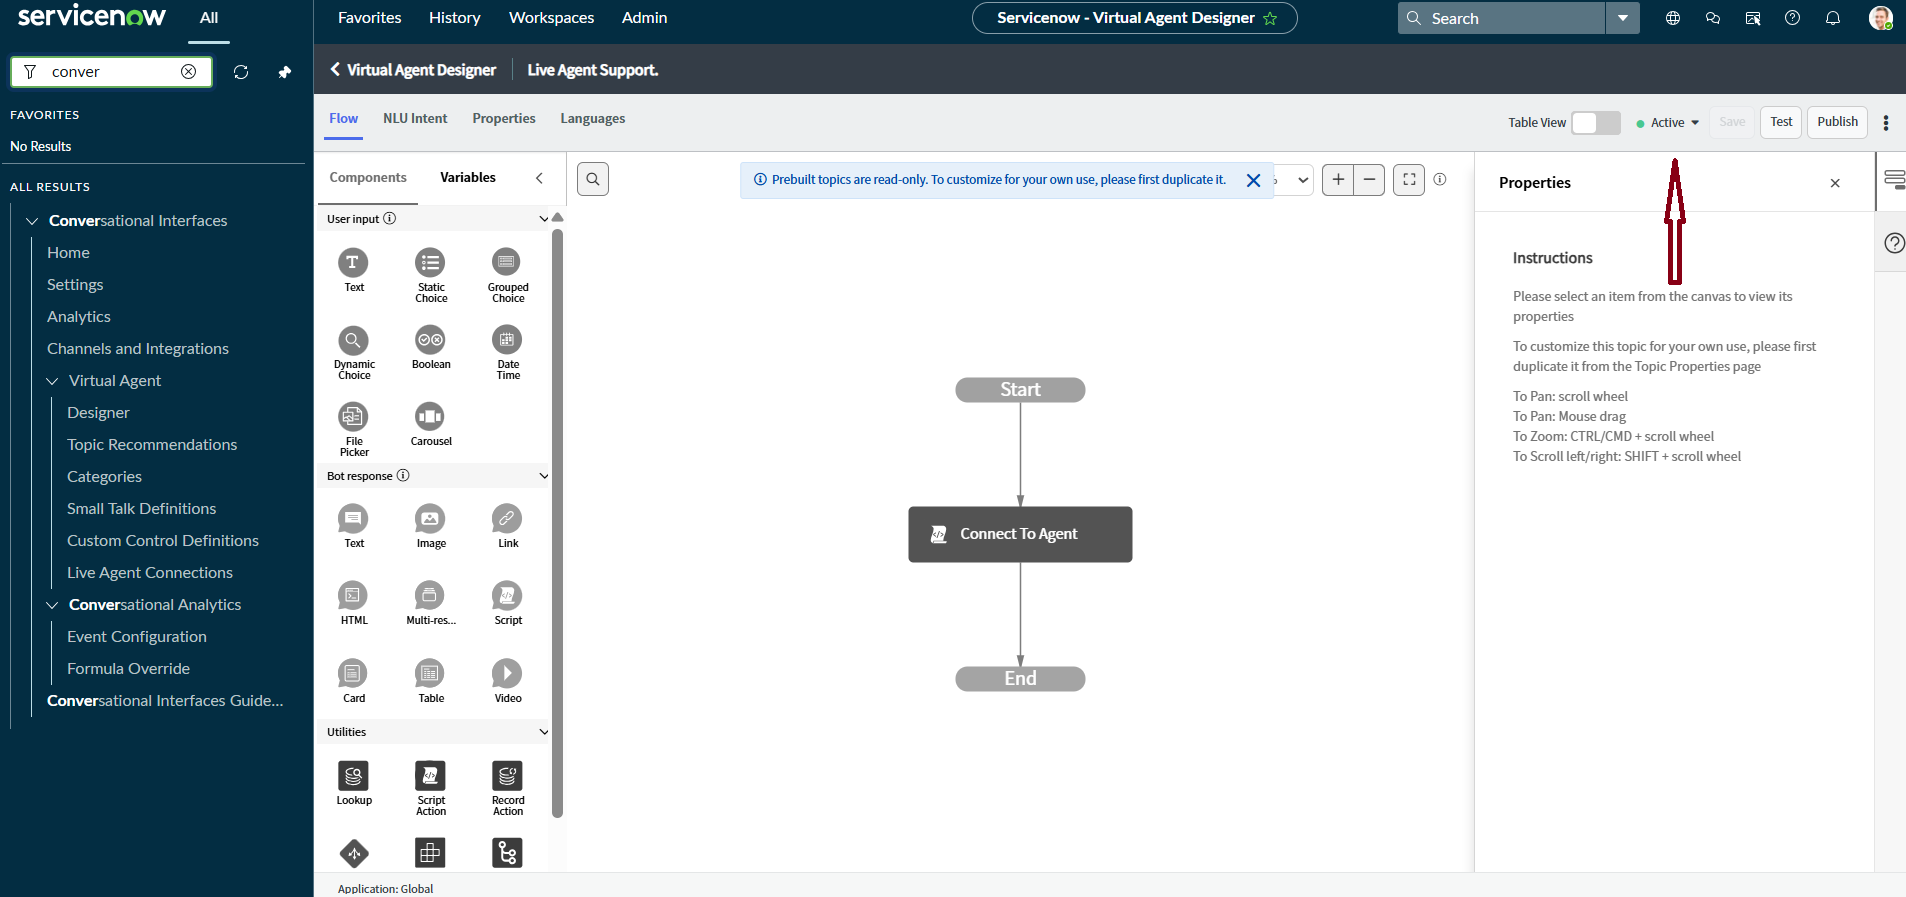
Step 2. Configure the Chat service channel
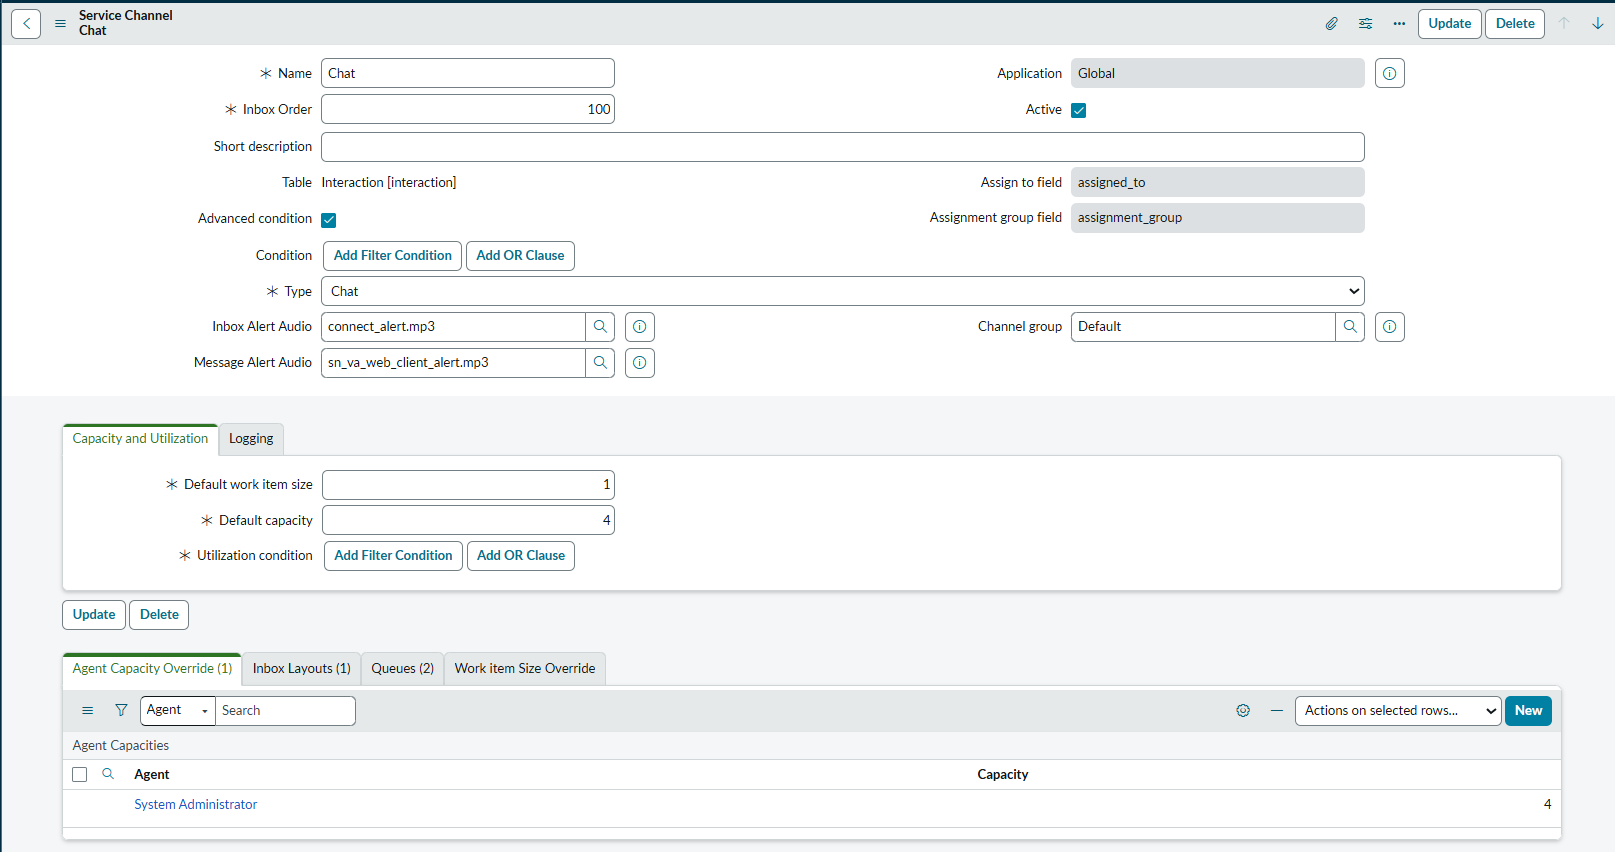
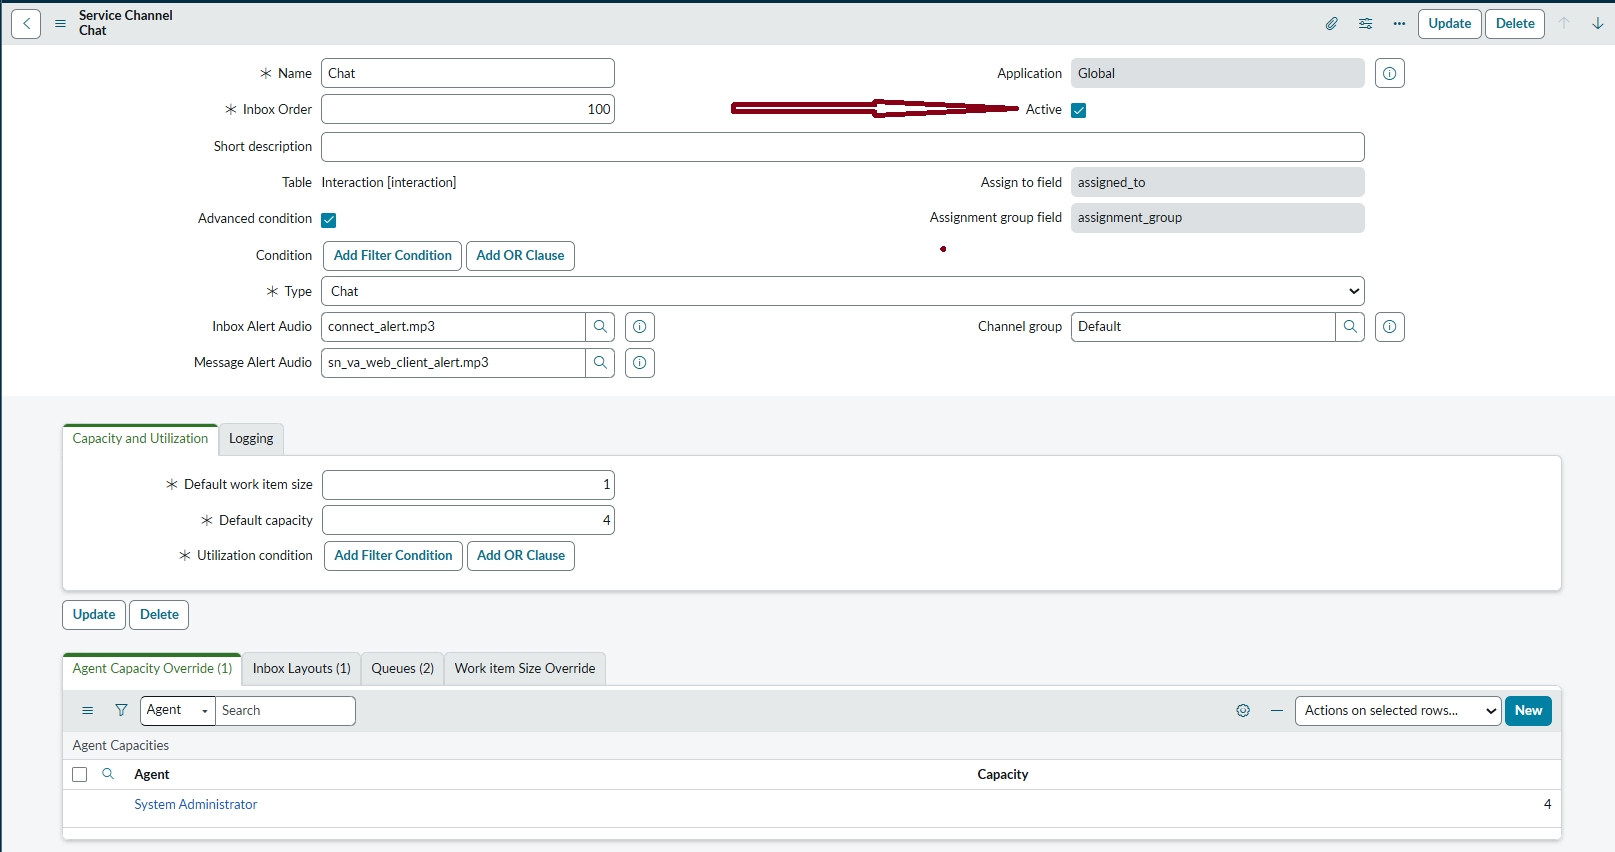
The Chat service channel is the AWA channel used by the Live Agent interaction.
To configure it, follow these steps:
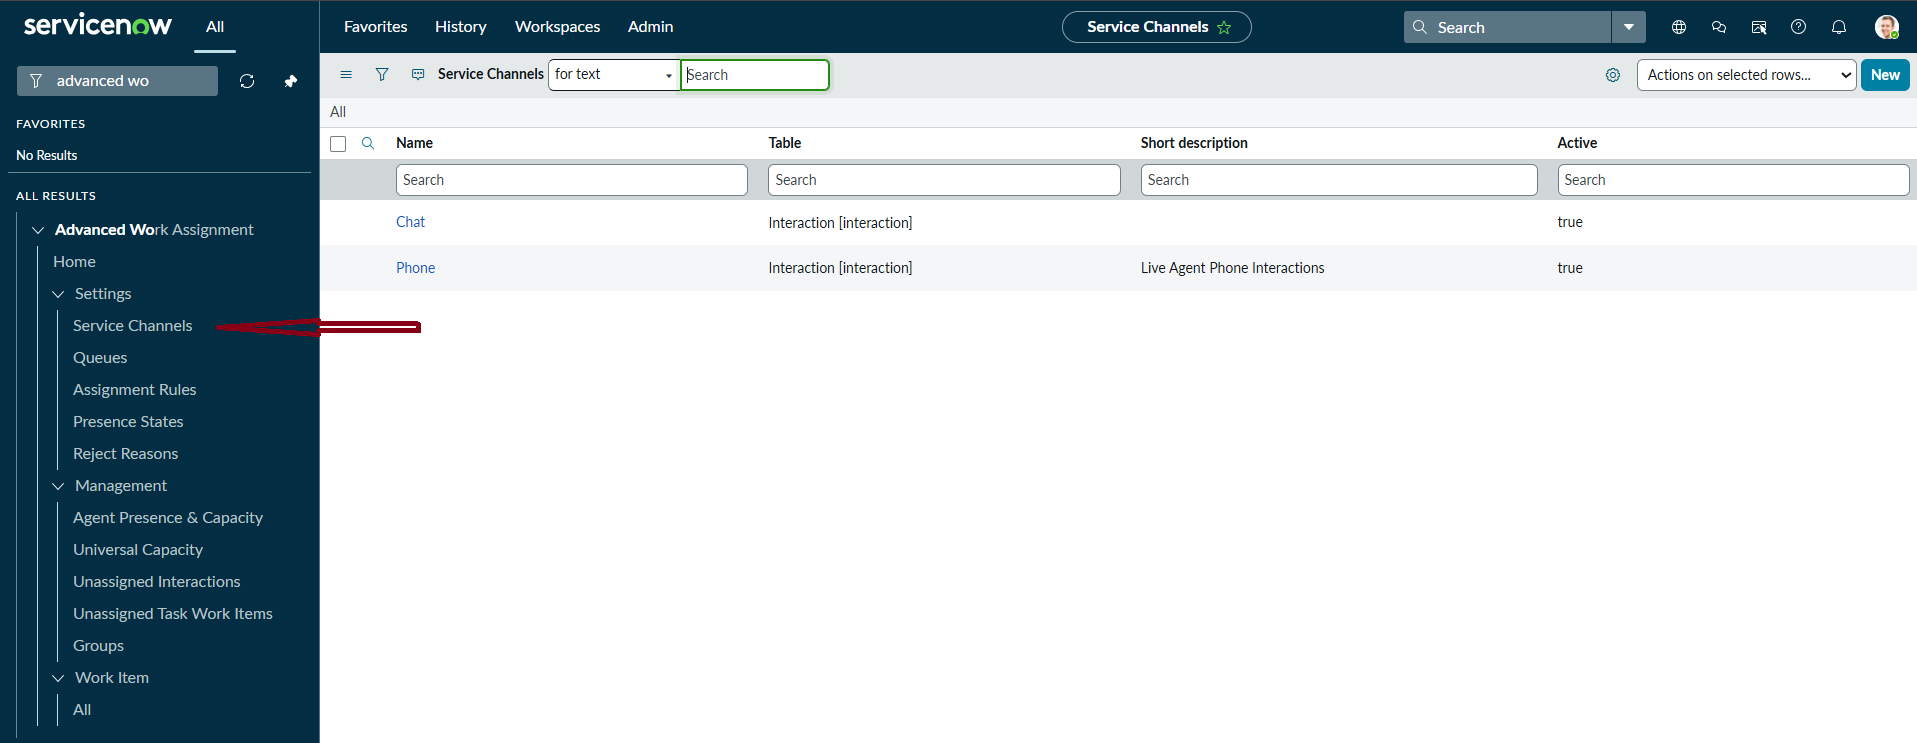
- Go to Advanced Work Assignment > Management > Service Channels. Depending on the release, the menu may be grouped under Advanced Work Assignment > Management/Settings > Service Channels.
- Open the Chat service channel associated with the Interaction record.
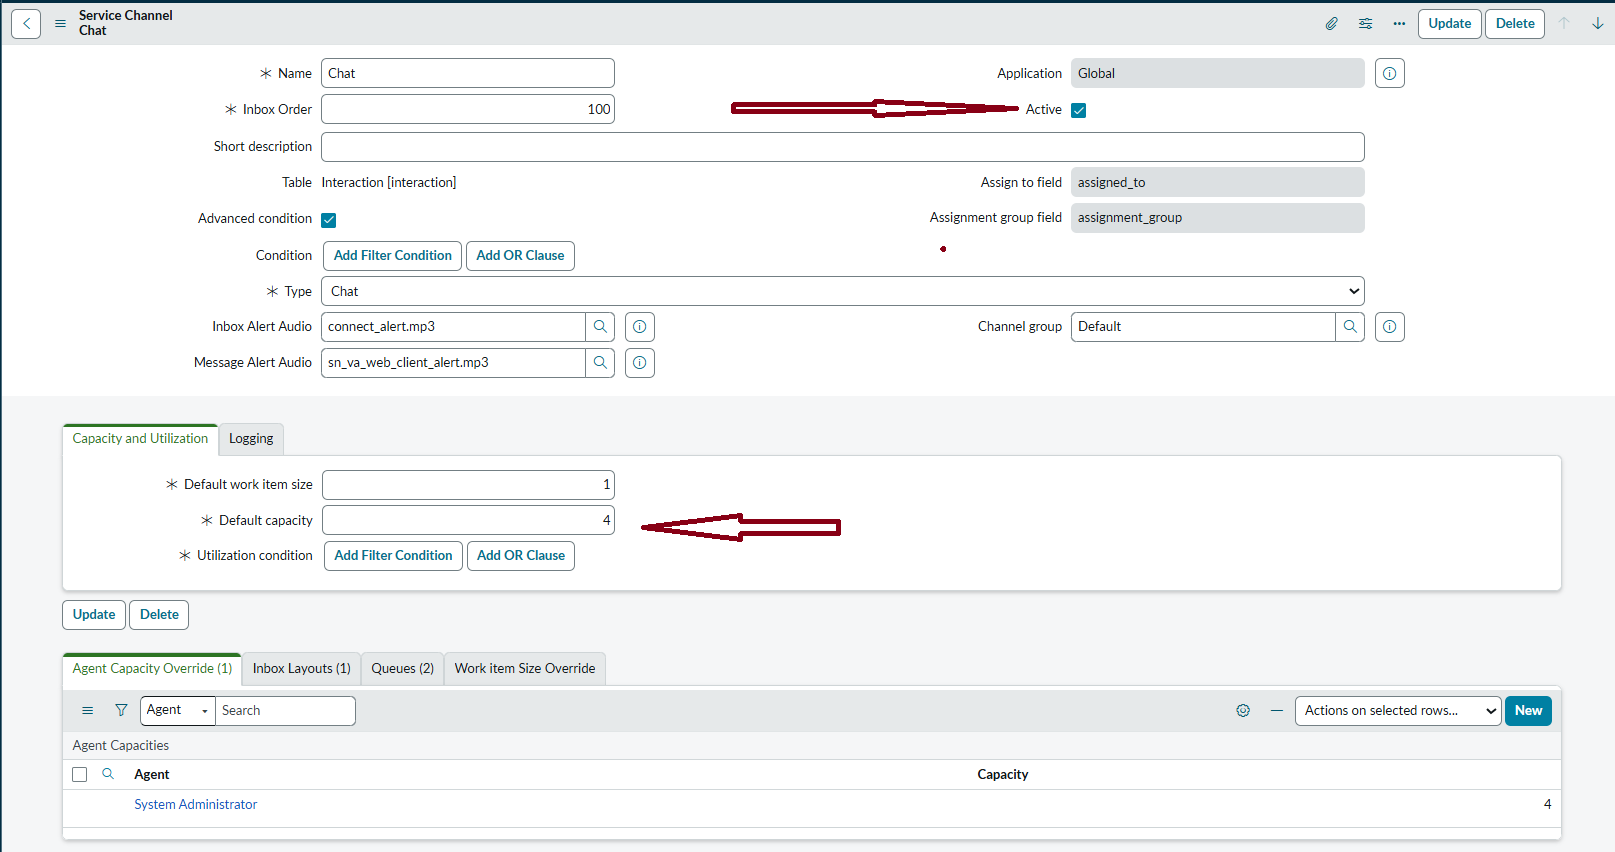
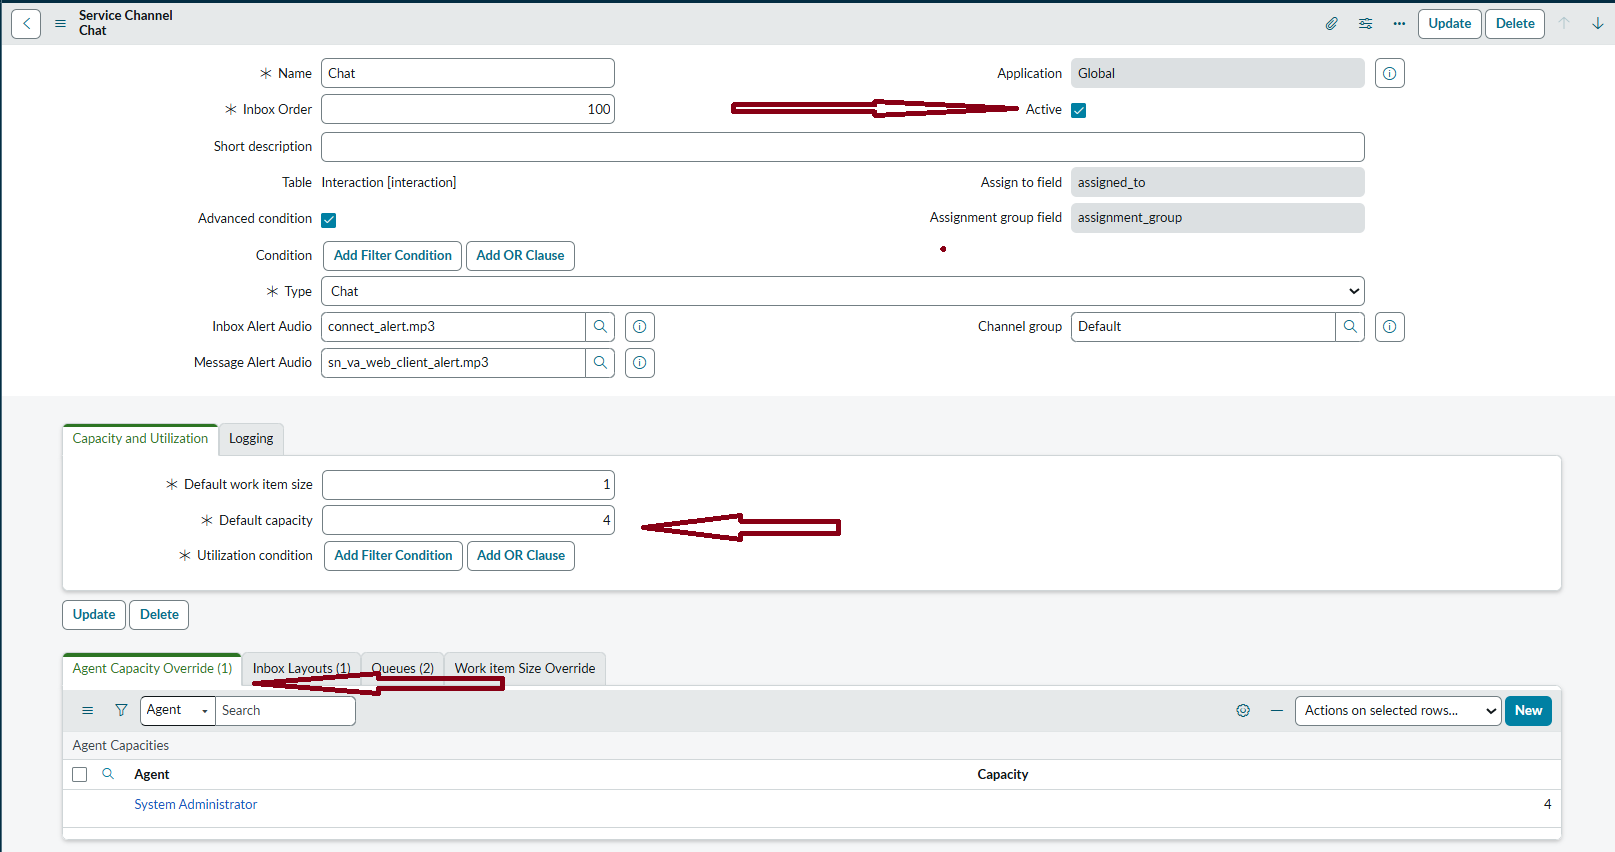
- Verify that Active is enabled and Type is Chat.
- Review default chat capacity and any agent-specific overrides. Set production capacity according to support requirements.
Step 3. Configure the live-agent queue
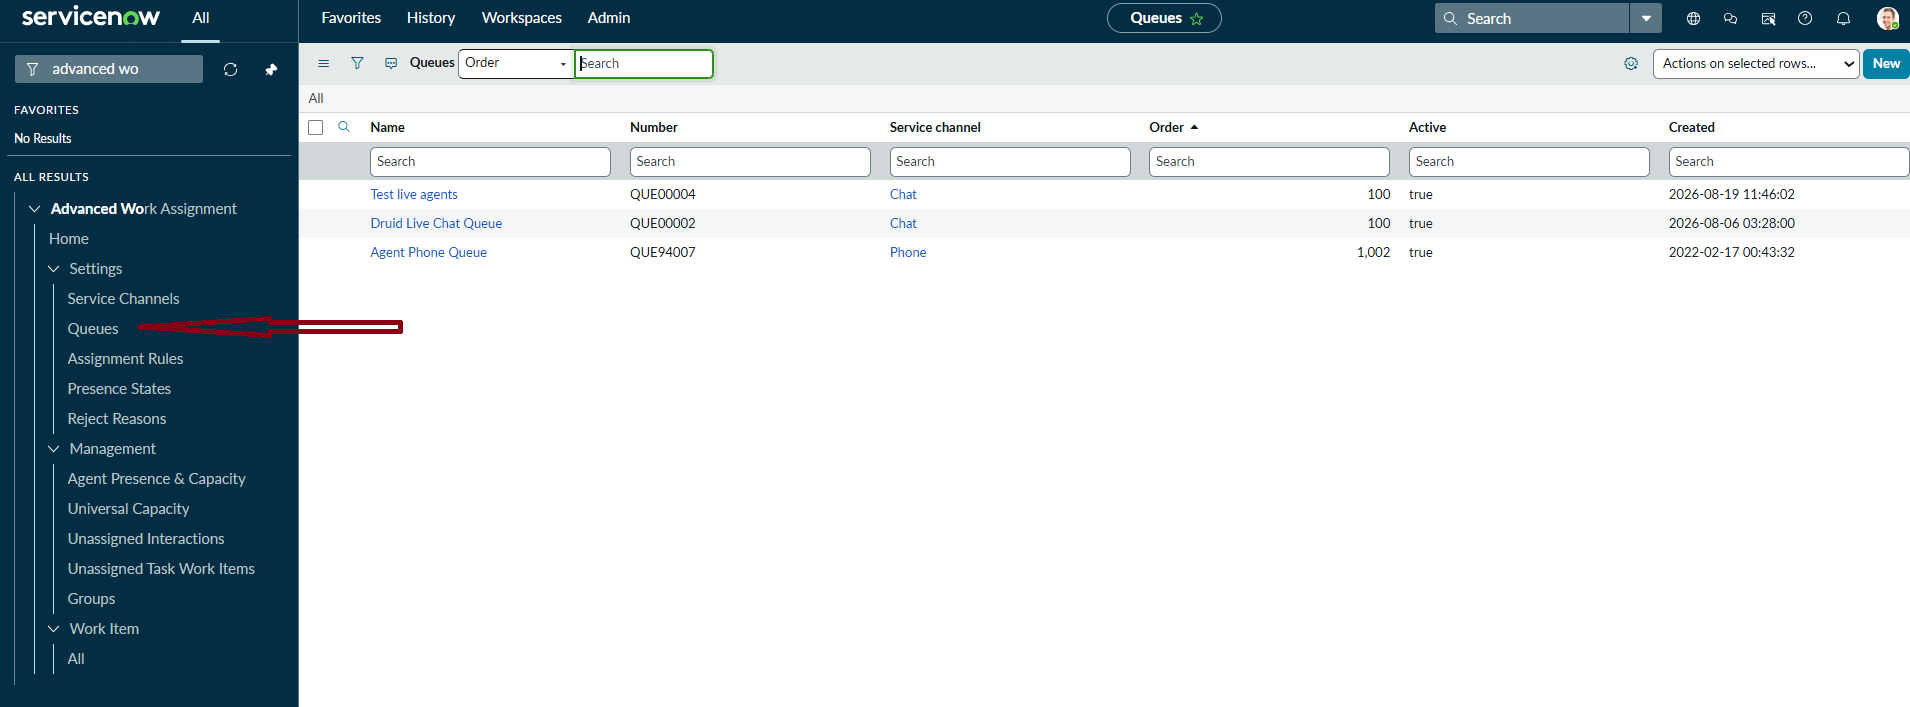
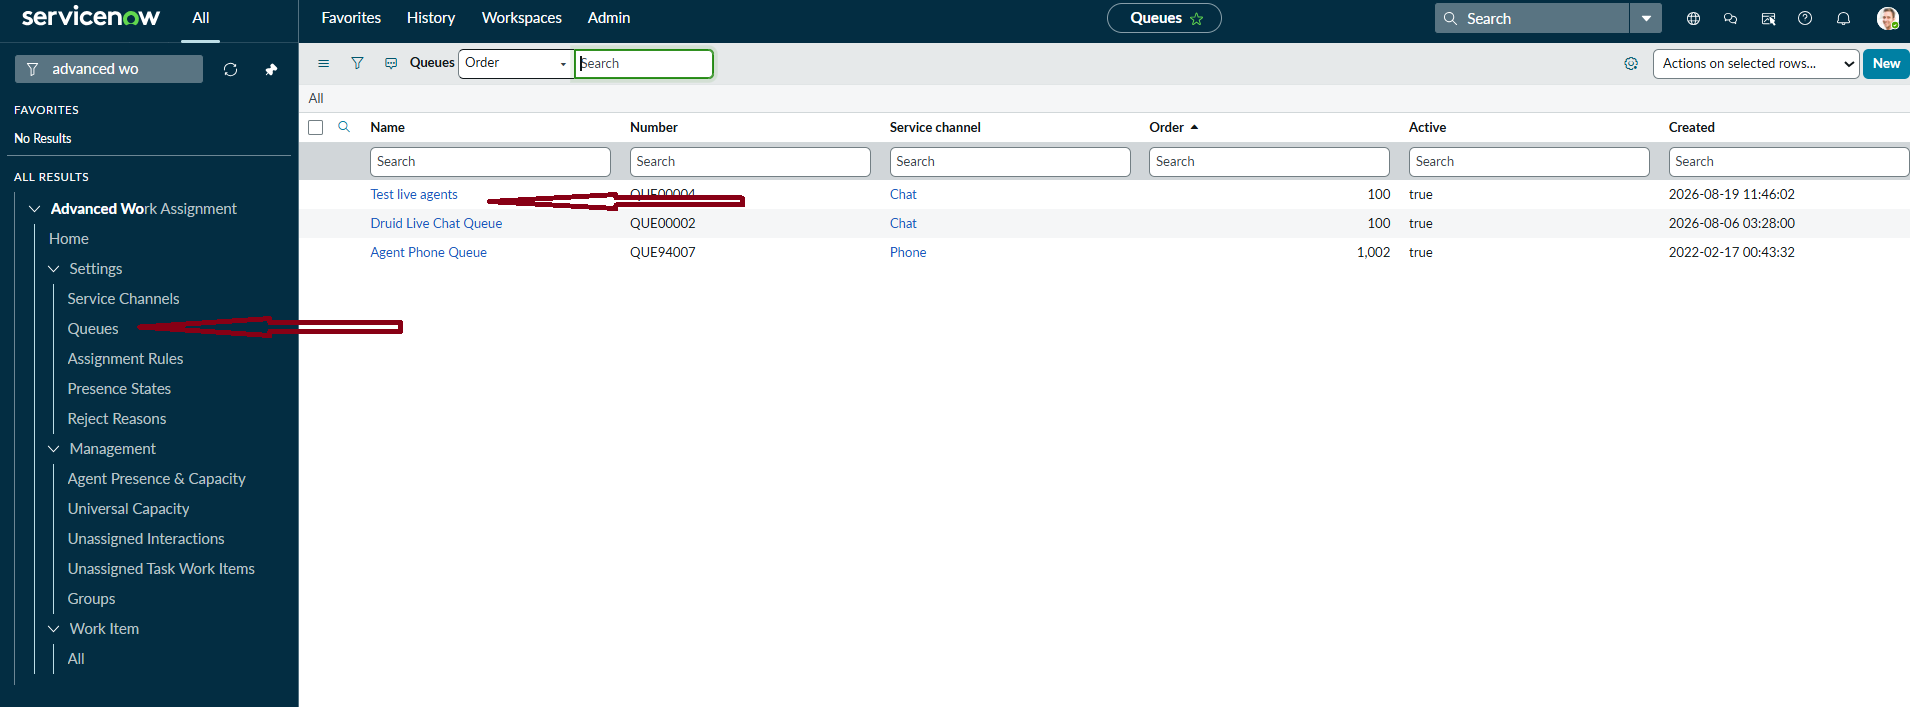
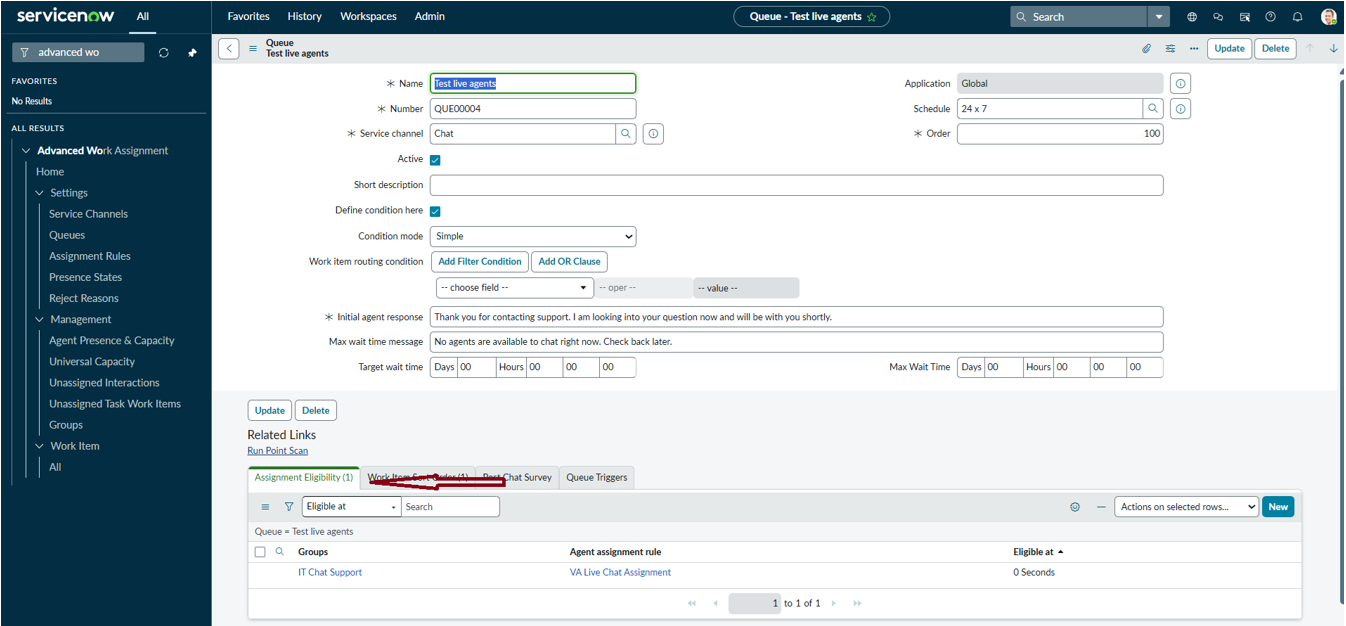
- Go to Advanced Work Assignment > Settings > Queues.
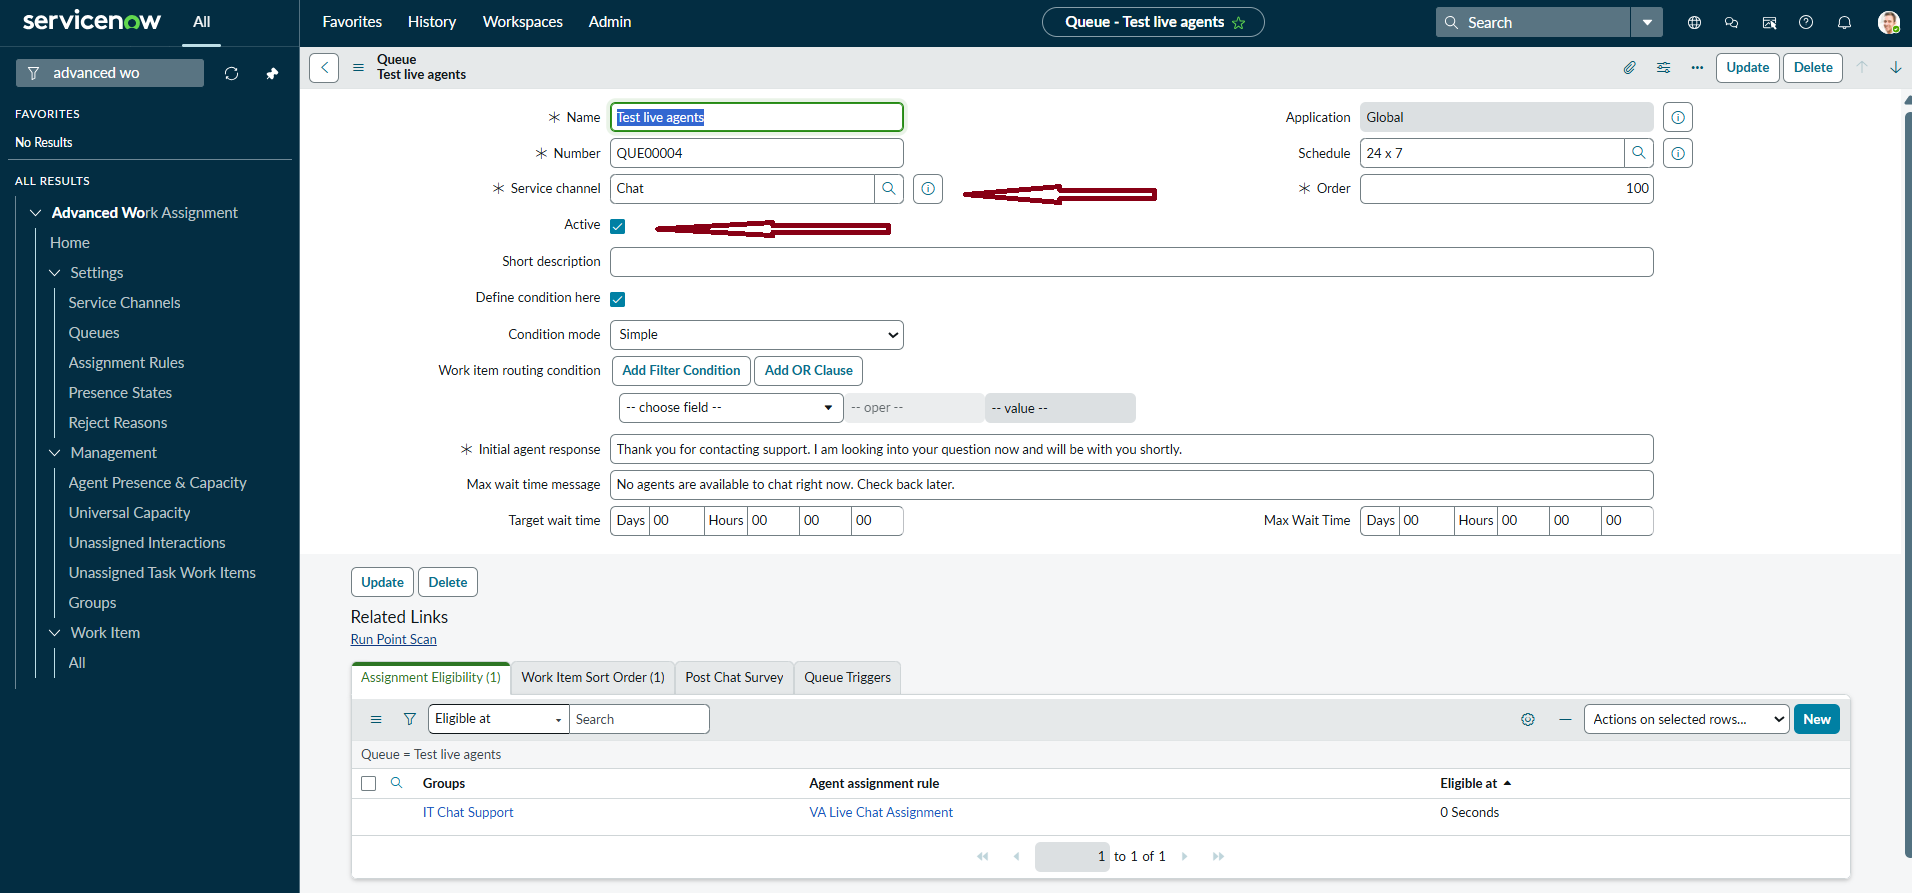
- Create or open the approved live-agent queue.
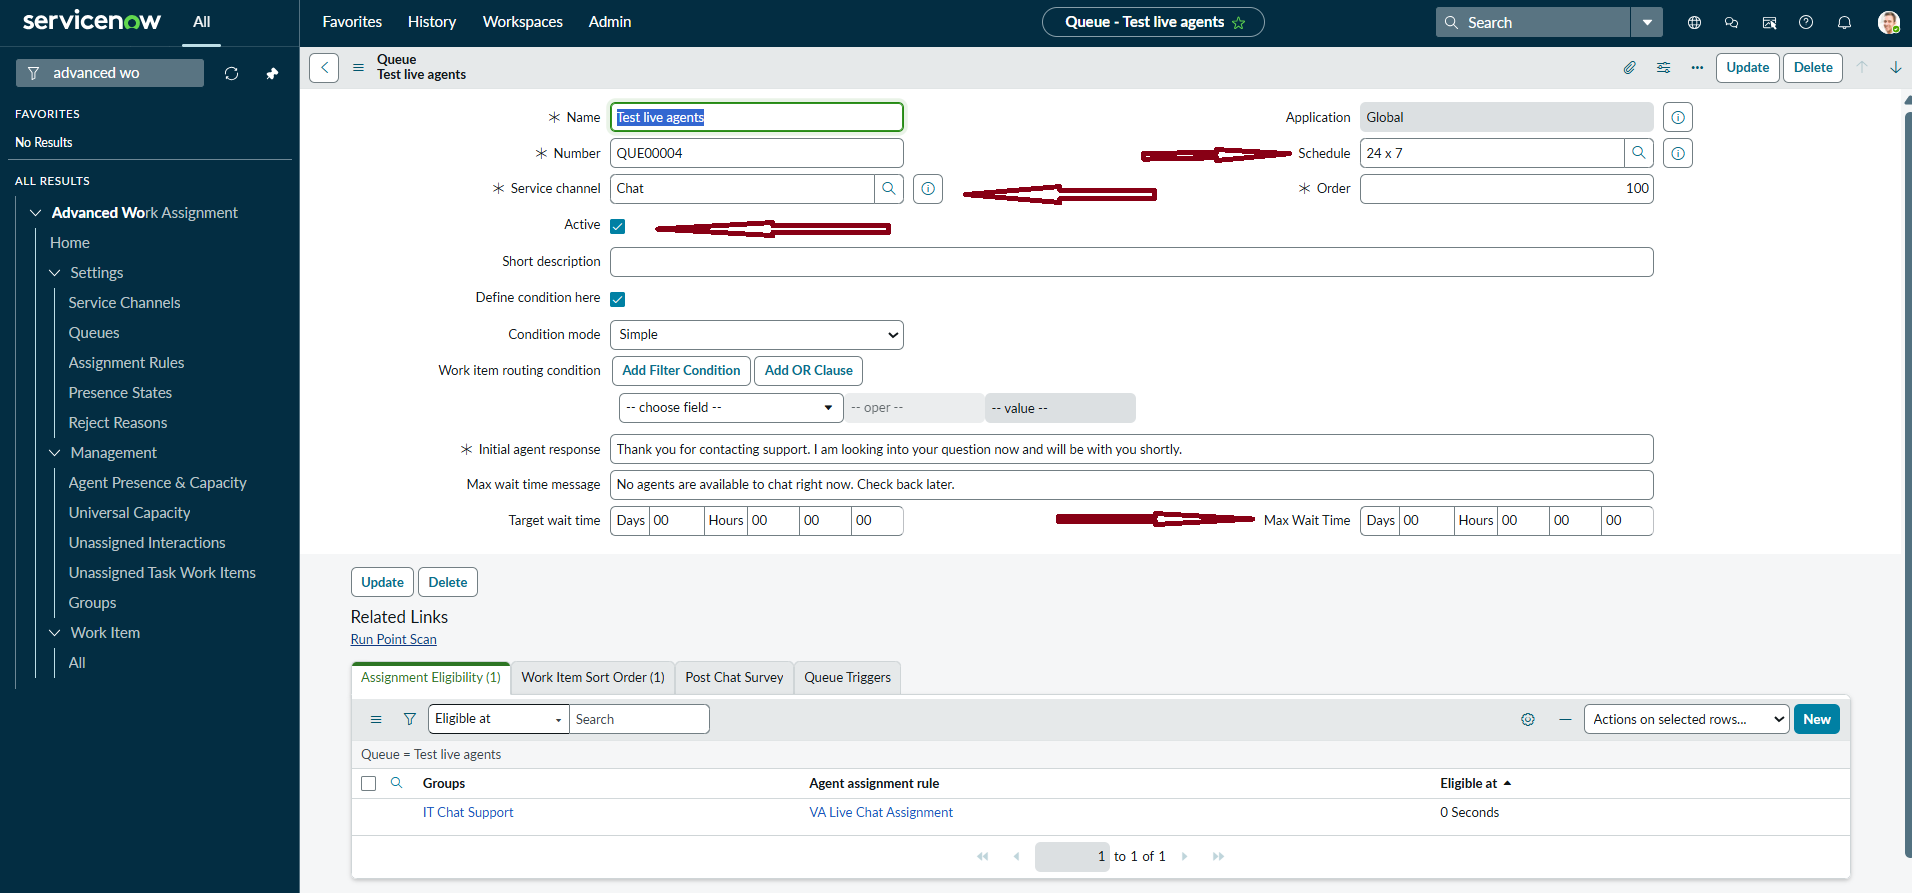
- Active the queue and associate it with the Chat service channel used by the Live Agent transfer.
- Set the queue schedule and maximum wait time according to your support policy, then save the configuration.
During initial testing, keep the behavior simple enough to isolate routing issues.
Step 4. Configure assignment eligibility and agent roles
Assignment Eligibility determines which assignment group(s) and agents can receive work from the queue. The Assignment Rule then determines which eligible agent is selected.
To configure the assignment eligibility and agents, follow these steps:
- Click the Assignment Eligibility tab.
- Click the New button.
- From the Agent assignment rule dropdown, select the intended assignment rule and from the Groups, select the support assignment group, then save the configuration.
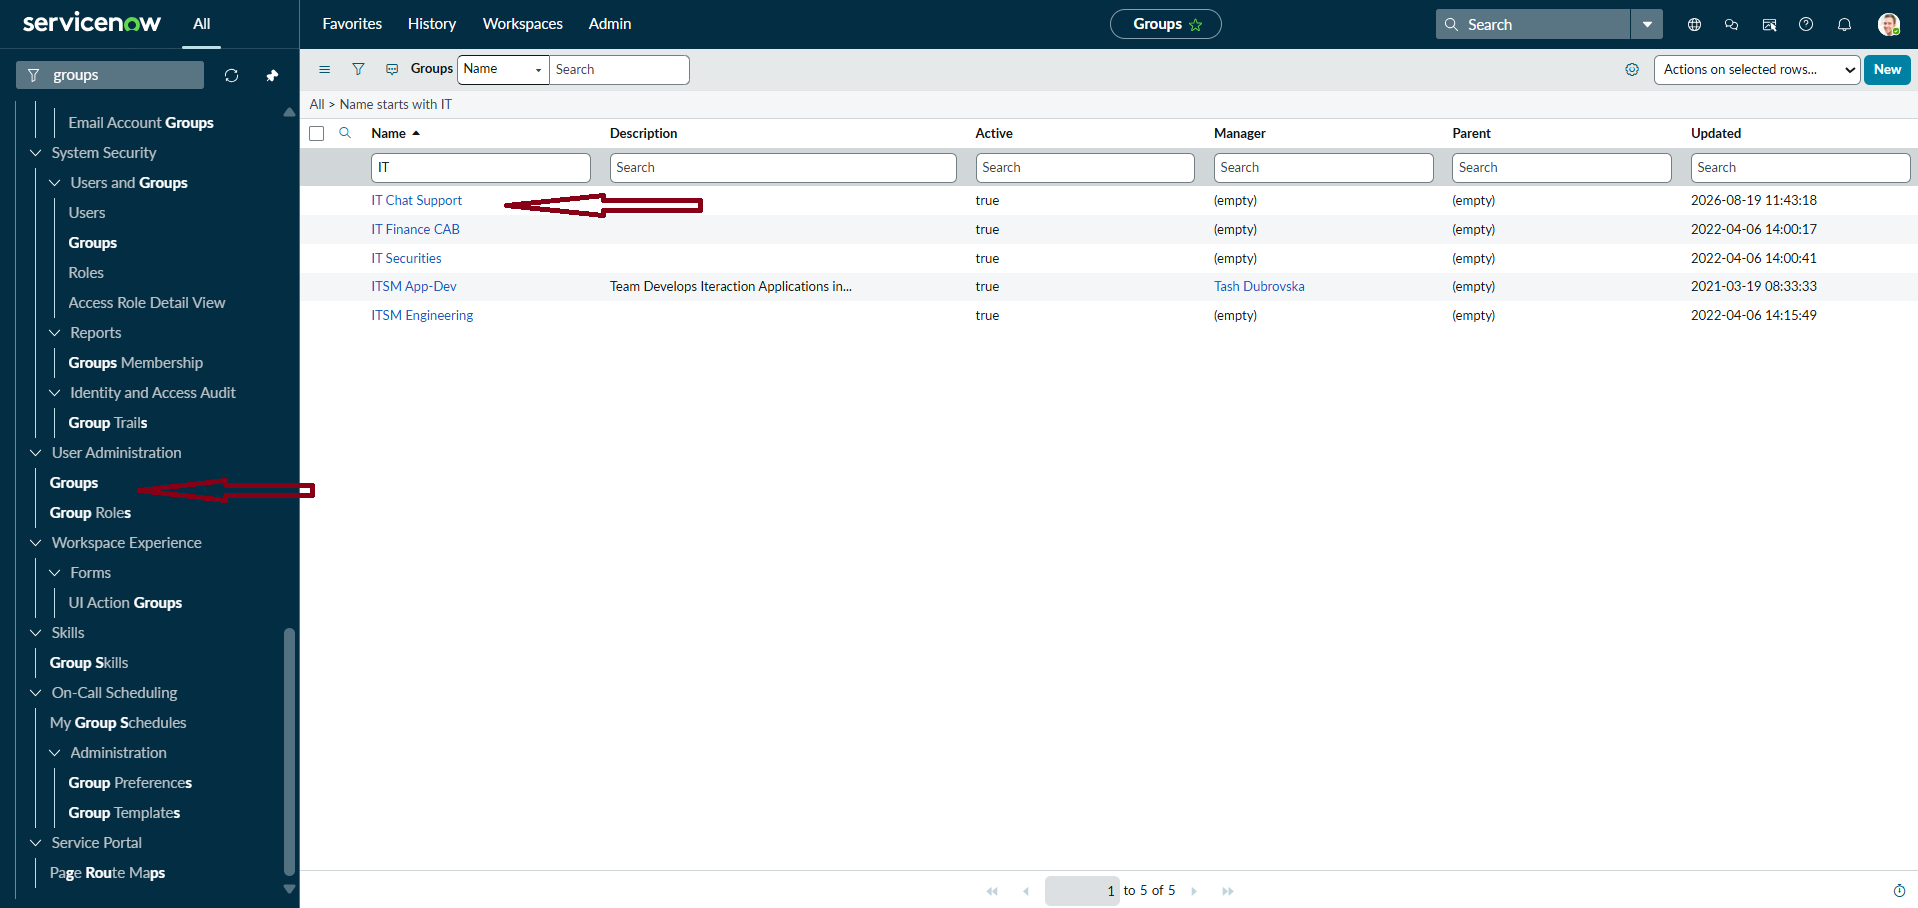
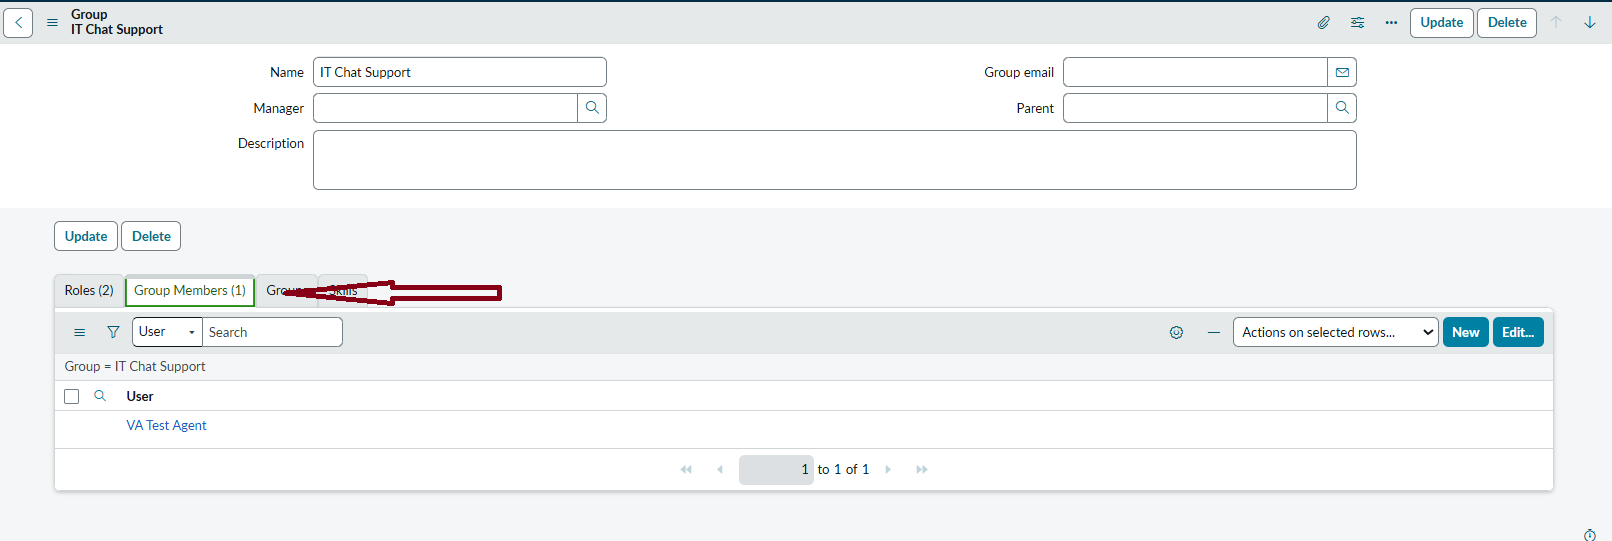
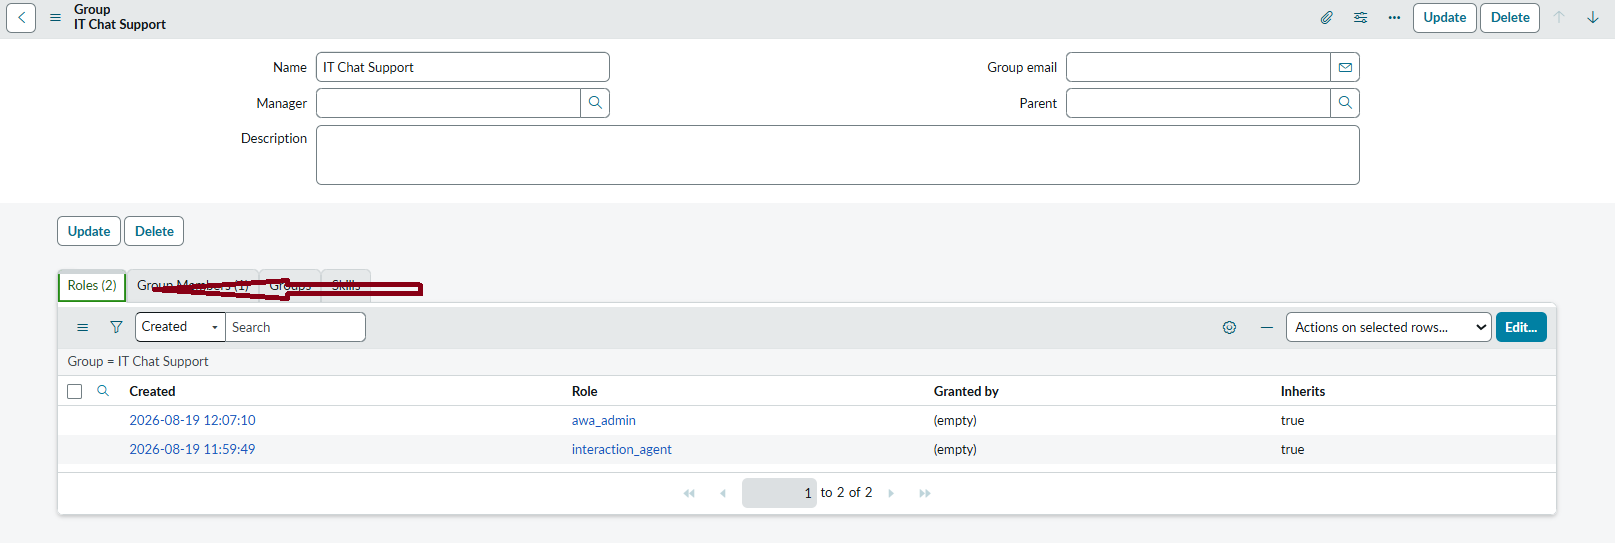
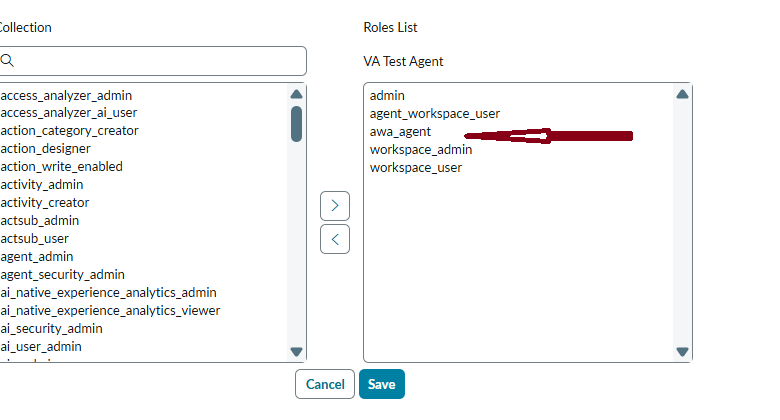
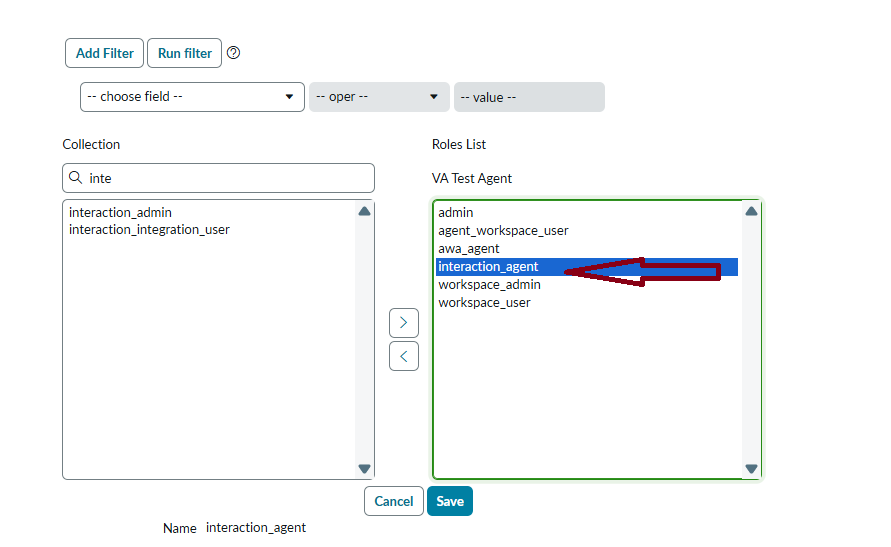
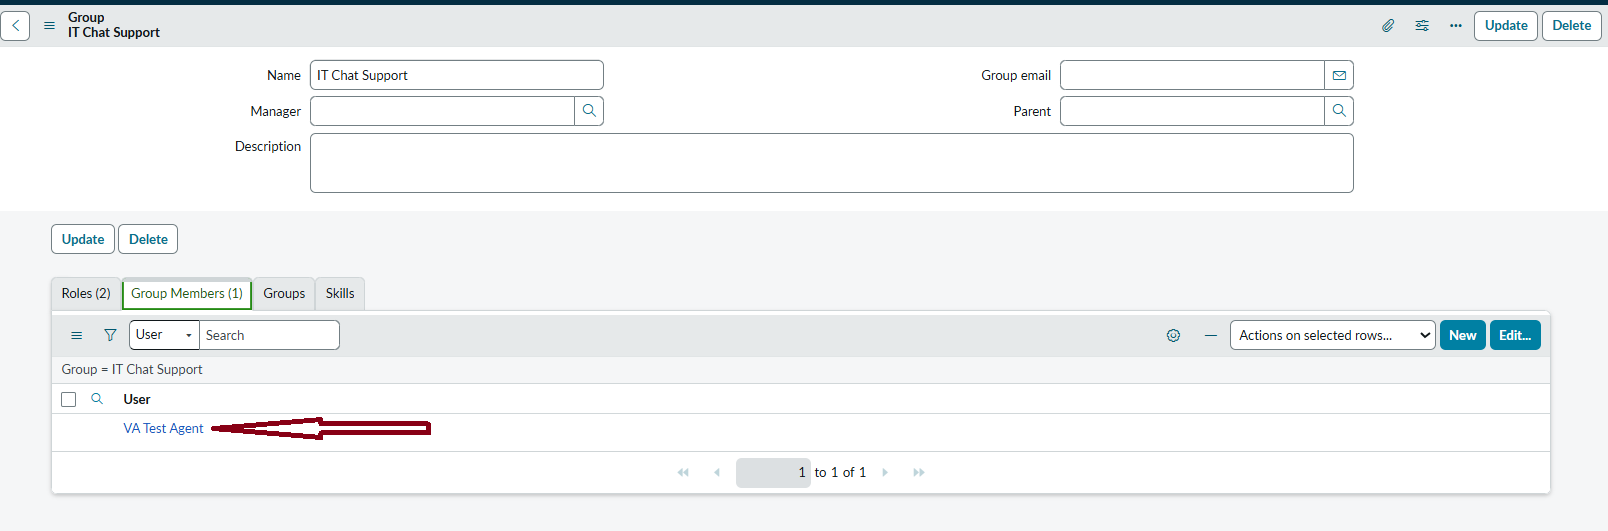
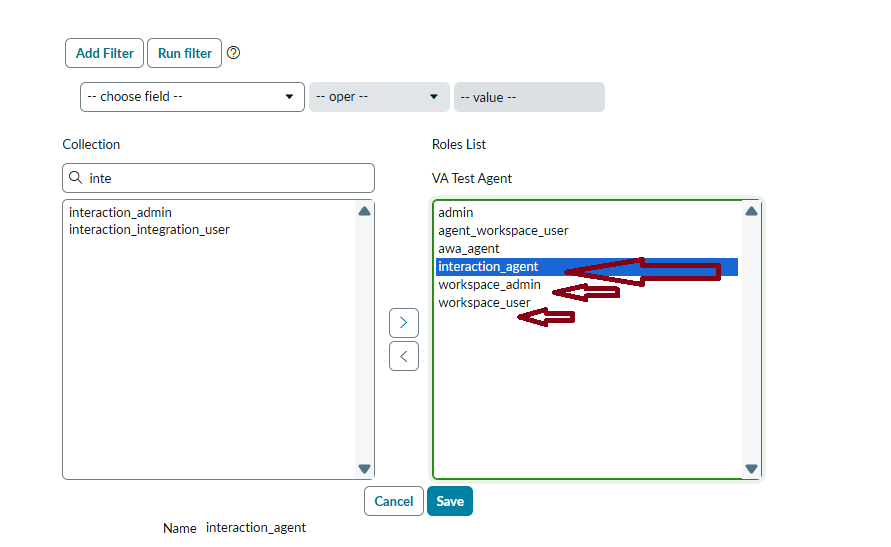
- Go to User Administration > Groups and confirm that each agent belongs to the eligible group and has the awa_agent and interaction_agent roles.
- Optionally, enable skills only if the client intentionally uses skills-based routing. Do not add skills during initial troubleshooting unless required by the business design.

Step 5. Configure agents, set runtime presence and capacity
An AWA agent must be eligible and available at runtime. Creating a user and adding roles is not sufficient. The agent must have an active runtime presence that is available and has Chat available, with remaining capacity.
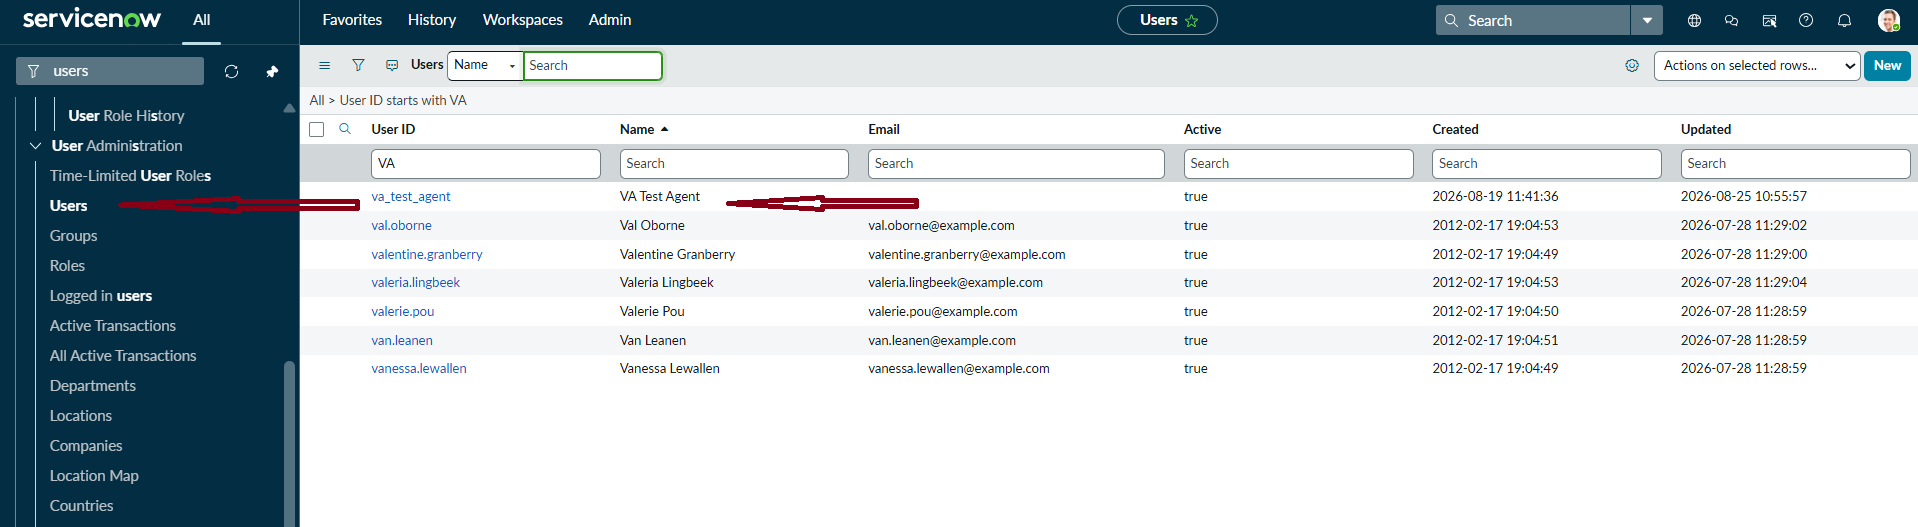
- Go to users User Administration > Users and select the user from the list.
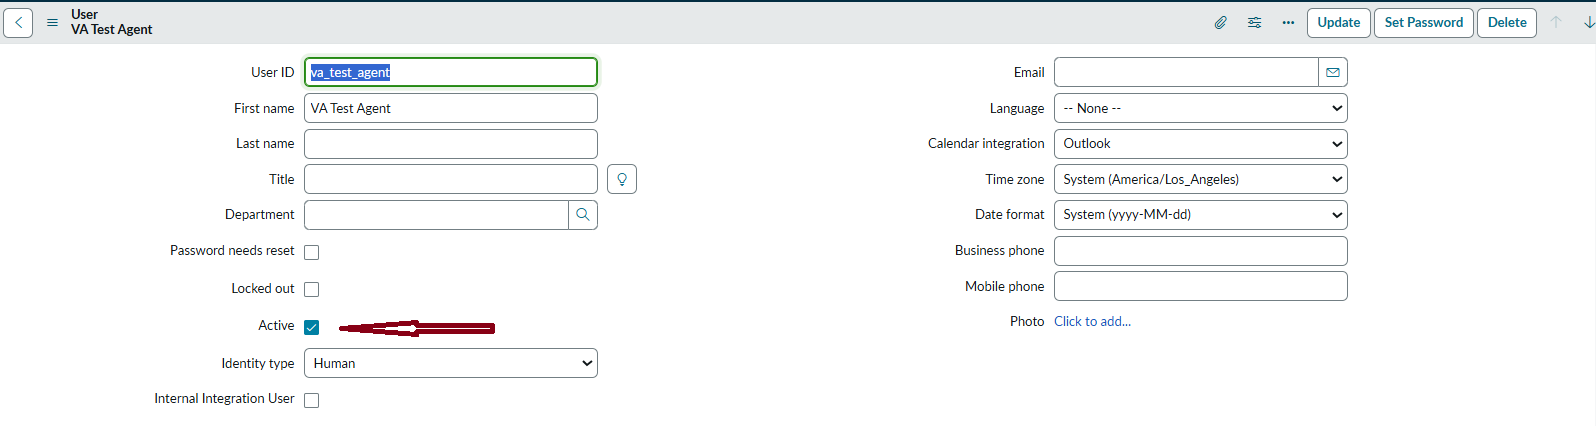
- Confirm the agent account is active.
- Assign the required AWA agent role (awa_agent).
- Assign the required interaction agent role (interaction_agent). Confirm any additional role required by the client workspace.
- Go to Advanced Work Assignment > Queue > Assignment Eligibility and add the user to the assignment group.
- Verify the agent can read and work with Interaction records.
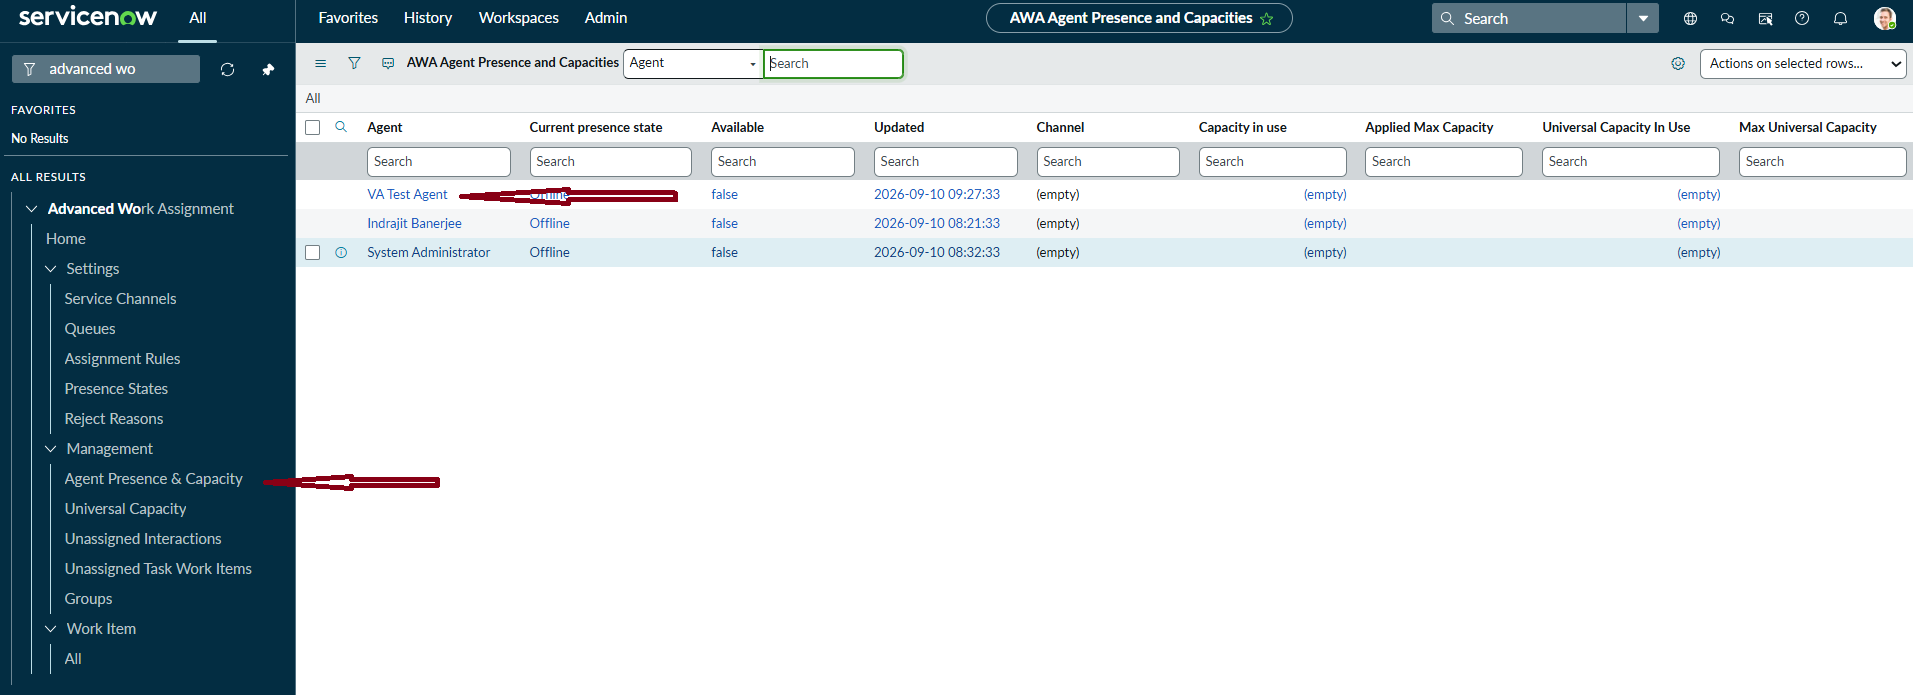
- Go to Advanced Work Assignment > Management > Agent Presence and Capacity.
- Locate the live-agent user.
- Click on the live-agent.
- Confirm that the agent is Available, select Chat as Service channel and Available as Presence state, then submit the changes.
- Verify the agent remaining chat capacity is greater than zero.

Step 6. Configure the agent experience
Routing and workspace access are separate concerns. An agent can be eligible in AWA but still be unable to work the interaction if the supported agent experience is not available or the user cannot read the Interaction record.
- Identify the client-supported agent experience. Confirm which workspace, Agent Inbox, or supported Agent Chat experience the client will use for human agents.
- Provide the live-agent user access to the chosen agent experience.
- Open the agent experience as the agent. Verify the agent can sign in, view the Agent Inbox/Chat experience, and see presence controls.
- Verify assigned interaction visibility. After a test transfer, confirm the assigned interaction appears for the agent.
- Open the interaction and send an agent message. Confirm the user receives the message.
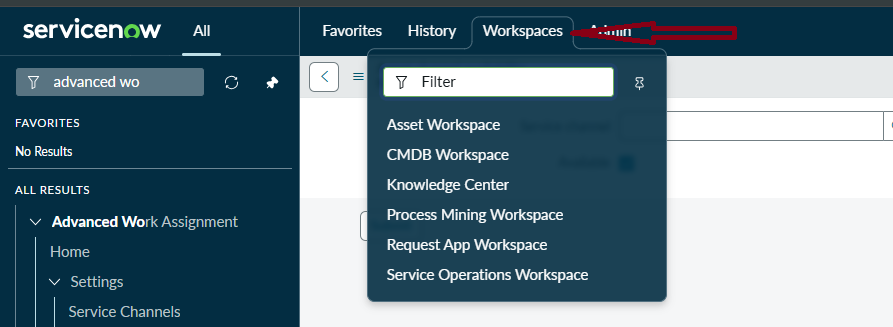
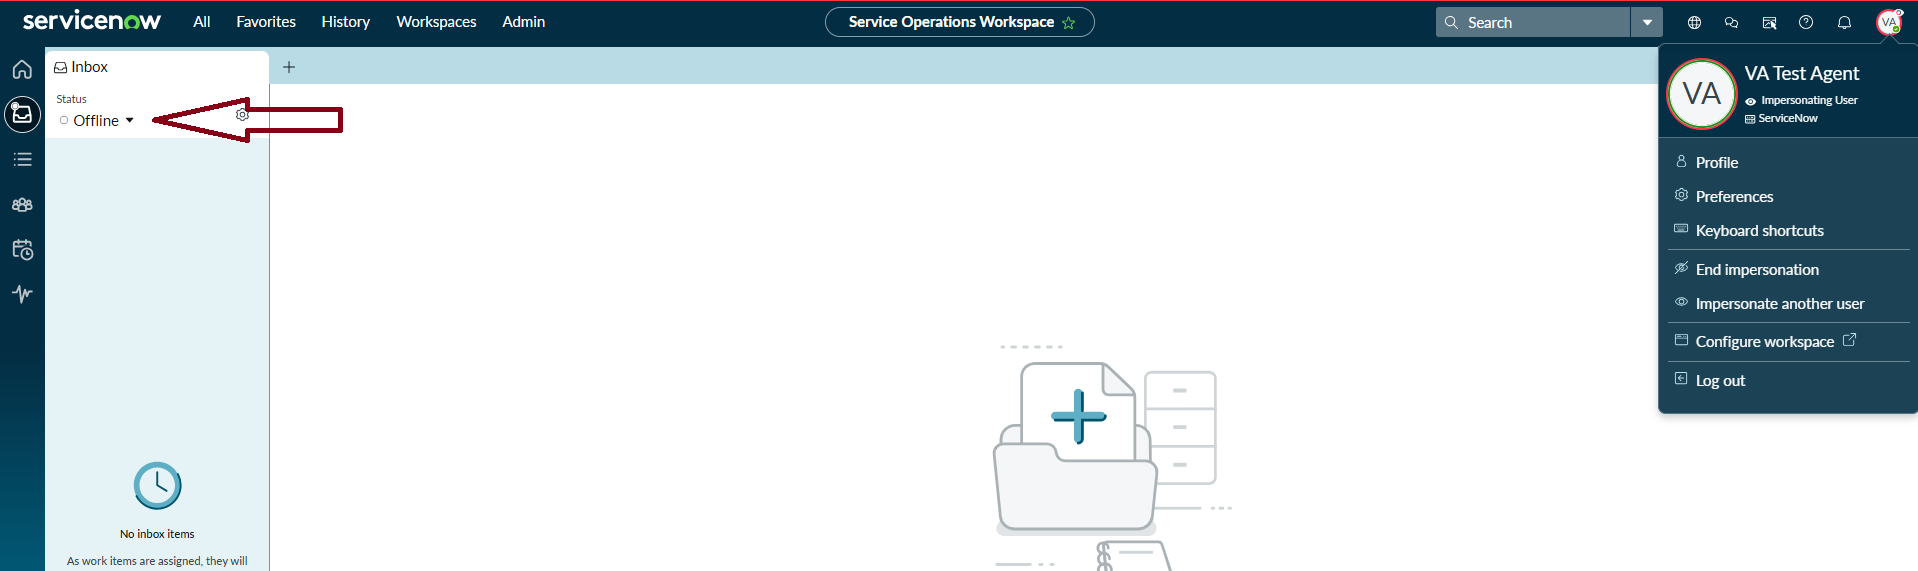
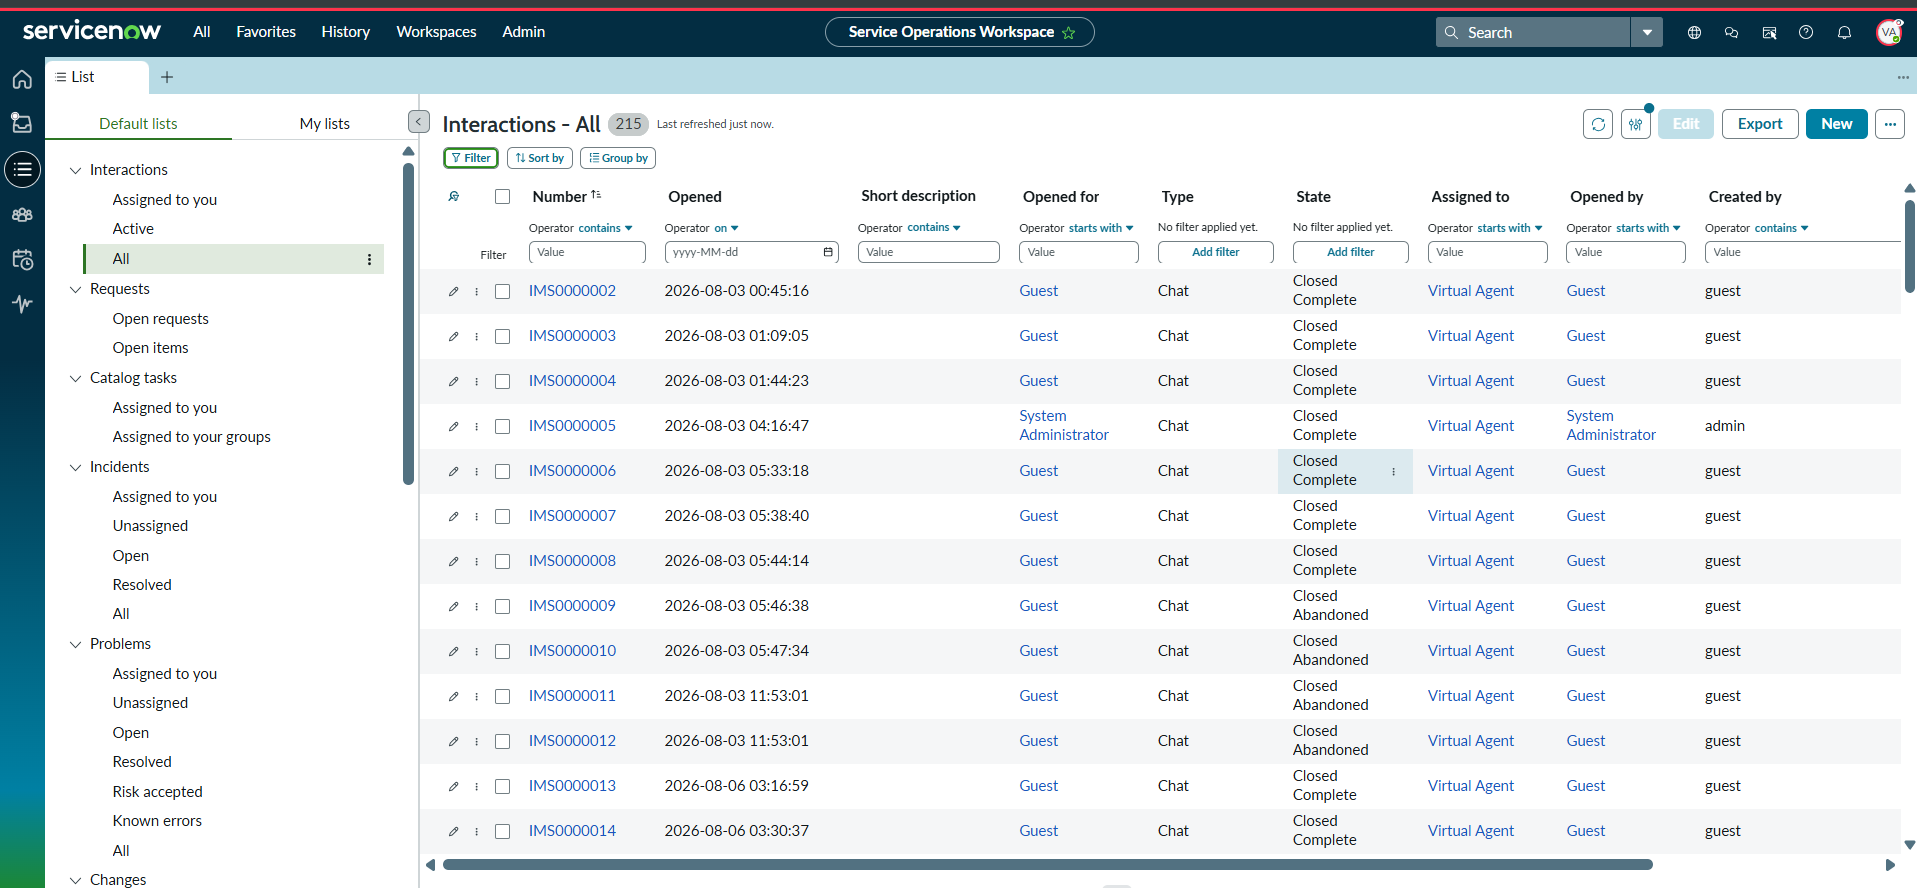
The validated routing path does not require a specific workspace name. Use the supported agent experience provided by the client release and licensed feature set. The critical requirements are interaction visibility, ability to work the chat, and presence control.
Step 7. Configure ServiceNow in Druid Portal
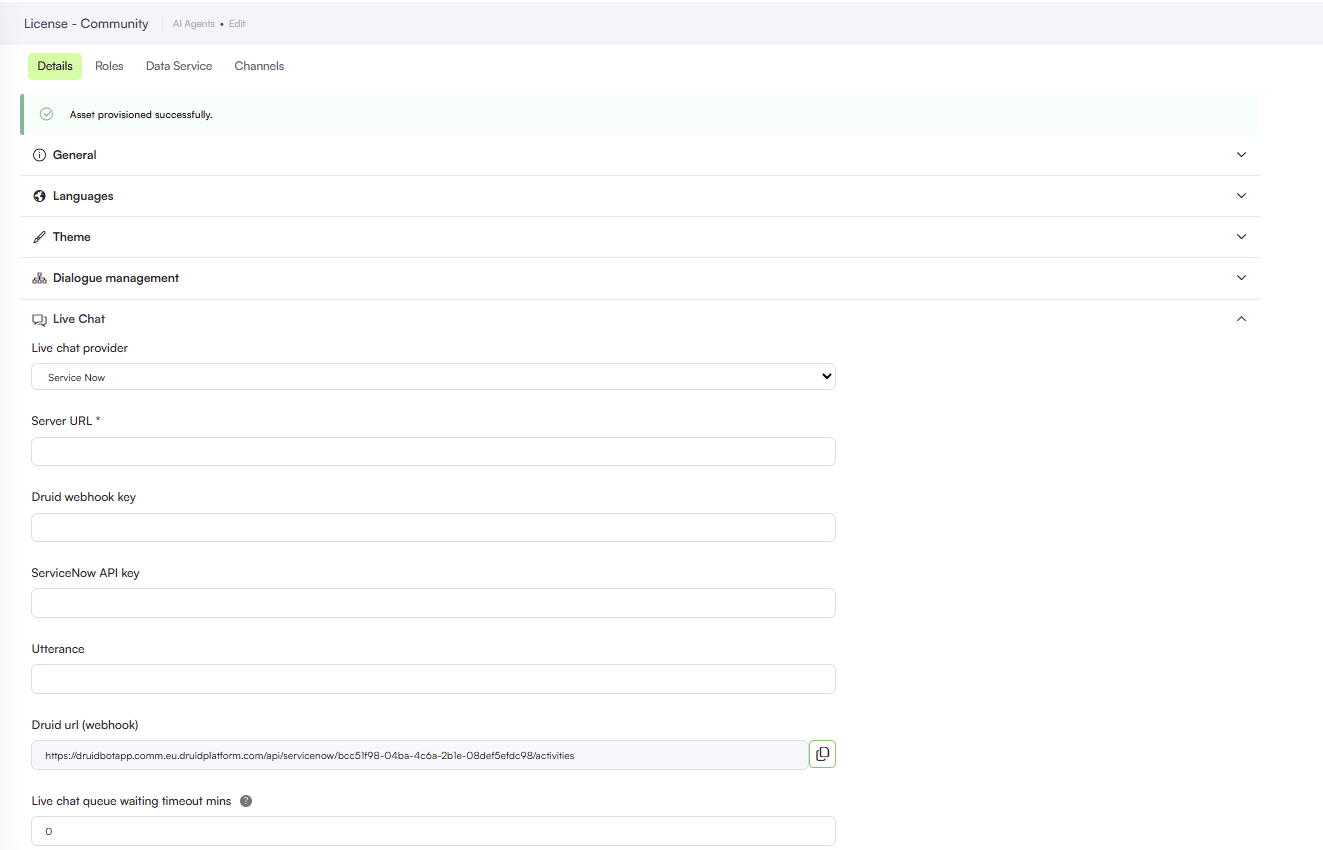
- In the Druid Portal, go to the AI Agent details.
- Click on Live Chat.
- From the Live chat provider dropdown, select Service Now.
- Complete the fields described below using the approved ServiceNow and Druid integration values.
- Save the AI Agent configuration.
| Field | Description |
|---|---|
|
Live chat provider |
Select Service Now. |
|
Server URL |
Enter the ServiceNow server URL supplied for the integration: https://<your-instance-name>.service-now.com |
|
Druid webhook key |
Enter the agreed key used to authenticate ServiceNow inbound calls. |
|
ServiceNow API key |
Enter the ServiceNow API security token or shared secret validated inside your Inbound Scripted REST API script headers to ensure requests originate securely from Druid. |
|
Utterance |
Enter the configured utterance used to request live-agent transfer, if applicable. |
|
Druid url (webhook) |
Read-only callback URL generated by Druid. Copy and configure it as the destination for ServiceNow outbound responses. |
Step 8. Configure the outbound REST message and callback endpoint in ServiceNow
To configure the outbound response endpoint so ServiceNow can send messages back to Druid, you must paste the Druid webhook URL into the designated Outbound REST Message record associated with your integration:
- In ServiceNow, go to System Web Services > Outbound > REST Message.
- Locate and open the specific REST message record created for your bot integration (often named or referenced as your provider application/Bot-to-Bot configuration).
- Under the REST Message Methods related list at the bottom of the form, open the default outbound method (typically named postMessage).
- In the Endpoint field of that HTTP method form, paste the Druid url (webhook) that you copied from the Druid Portal.
- Save the configuration.
Troubleshooting
| Issue | What ti check |
|---|---|
|
No agents available |
Agent runtime presence, Chat availability, remaining capacity, and queue schedule. |
|
Agent not assigned |
Queue Assignment Eligibility, group membership, and assignment rule. |
|
Agent cannot open the chat |
interaction_agent role, Interaction record access, and workspace permissions. |
|
ServiceNow works but Druid does not |
Provider Application inbound ID, authentication, callback endpoint, HTTP status, and session mapping. |
|
Typed “agent” is not recognized |
ServiceNow NLU/topic discoverability or the approved trigger mechanism. NOTE: Recognizing typed phrases such as “agent” or “live agent” depends on the configured ServiceNow topic discovery/NLU or another approved trigger.
|
|
Agent reply does not reach Druid |
ServiceNow outbound REST Message, callback authentication, and conversation/session continuity. |