GPT Agentic HR - Core
GPT Agentic HR - Core is the foundation of a next-gen AI virtual assistant designed for HR processes. This core solution includes the following key components:
- Data Model: Contains all the essential entities required for core functionalities.
- Two workspaces with views and forms:
- Admin Workspace: Used for setting up and managing data lists (e.g., GPT prompts, holiday calendars, certifications, roles, etc.).
- Business Workspace: Manager View to access and manage employee information and leave request data.
- Integrations: Includes all necessary integrations for CBA components.
- Business and Settings Workflows: These workflows support various use cases, such as:
- Setup Fflow: Provisions the database with business data.
- User authentication: Supports both Teams and web channel authentication.
- GPT-enabled Agent Dispatcher: Handles intent rephrasing.
- Leave Request Agent: Assists employees with submitting time-off requests and performs backend validations.
- Knowledge Base with Organizational Chart: Answers questions related to company structure and colleagues’ contact information.
- Small Talk: Supports informal conversations.
- Multilingual Chatbot: Responds in any user language to all queries.
Prerequisites
- Tenant Druid community (open new tenant here) or Druid subscription.
- You should have a Druid bot. For information on how to create a bot, see Creating Druid Bots.
- Enable the API Resources for Druid WebView and Druid Data Service. Then, activate the Druid Data Service in your tenant by navigating to Administration > Settings > Druid Data Service, and selecting Is enabled and clicking the Save all button at the top right of the page.
Configuring the Skill Template
To configure the skill template, follow these steps:
Step 1. Install the solution from the Solutions Library
Go to the Solutions Library, search for solution GPT Agentic HR - Core and import it following the instructions provided in section Installing Solution Templates.
Wait until the import status shows as “Success”.
Once the import is successful, click Save & Close.
Step 2. Configure the app connection
To configure the app connection, follow these steps:
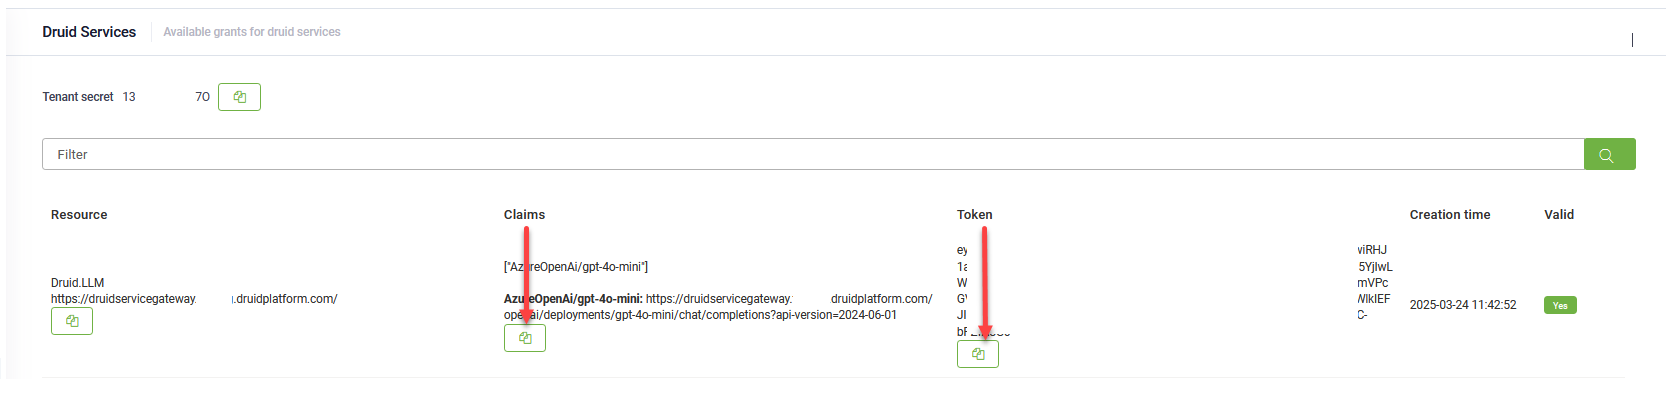
- Go to Administration > Druid Services.
- Copy the claims and token corresponding to the DRUID.LLM resource you want to use — you’ll need them to configure the app connection.
- Go to Solution Content > Apps and select the DRUID-LLM app.
- In the Base URL field, paste the claims value you copied at step 2.
- In the Variables table, enter the token you copied at step 2 as the key.
- Click Save to complete the configuration.
- Once the app is configured, click Publish.
Step 3. Run setup flow
Open the chatbot and type in the chat "DS-setup" to run the flow that loads demo data and add the necessary GPT prompts to the HR DataService backend.
Step 4. Configure the Knowledge Base settings
Go to the Knowledge Base settings and configure the following settings:
- From the Embeddings Model field, select either EnglishV2-v2 or Multilingual-v2.
- Set the Results thresholds to Minimum = 10 and Target = 60.
- Adjust the search balance as follows: Vector = 10, Text = 60, Reranker = 30.
- From the Knowledge Base response flow, select Knowledge-Base-response-flow-refine-question-azure.com and from the Intent rephrase flow field, select Intent rephrase flow_HR.
Click on the Advanced Settings tab and configure the following settings:
- Click on Generative Endpoints > Azure and add the connection and password (Api Url and Api Key) to the Azure Generative Endpoint.
- If you will be using a PDF or Word file for the organizational chart, click on File Extractors and from the Content Chunker field corresponding to the file format you're using, select LLM.
- Click the Save & Close button at the bottom of the page.
Step 5. Create data source and upload organization chart
Add a new data source of type File repository. Upload your organisation chart file to the new data source. For demo purposes, you use the file provided here.
Step 6. Set up the bot
- Go to the bot details page, and in the Languages section, select the default language. Only one language is necessary, since the bot will answer in any user language.
- Click on the Dialogue management section and set the following special flows:
- Click the Save button at the bottom of the page.
- Click on the Roles tab and assign the needed user roles to the bot: User, Admin, Employee, and Manager.
- Click the Save & Close button at the bottom of the page.
| Special Flow | Select |
|---|---|
| Welcome | first-welcome-flow |
| Intend not found flow | small-talk-other-replies |
| Authentication flow | Web_Authentication |
| Exception flow | error-handling |
The bot at runtime
Access the chatbot either from the Landbot page inside the DRUID Portal or from the Teams channel. If the bot is published in Teams, see MS Teams Integration.
When a user first accesses the bot, the Authentication flow triggers, creating an HR record in the Employee table. After authentication, the user can start asking questions about the company’s organizational chart (based on the document in the Knowledge Base) and submit time-off requests.
The Time Off Request workflow is managed by a GPT-enabled agent, which collects the Start Date, End Date, Leave Type, and Replacement before saving the request to the backend system.
To submit a time-off request, the user must be listed in the Organizational Chart Knowledge Base. Edit one of the demo entries with the employee's name and email address. If the user isn’t present in the Knowledge Base, the replacement cannot be validated, as the system checks the Organizational Chart to confirm if the replacement belongs to the same team. Therefore, all employees created in the Employee table must also exist in the Organizational Chart.