DRUID-LLM Ticket Management
DRUID-LLM Ticket Management is a fully agentic business application built entirely on DRUID technology. Powered by DRUID LLM Becus 1.0, this solution delivers end-to-end support ticket creation and management through natural, conversational interactions, without relying on any third-party AI services. This DRUID-native solution showcases our in-house capabilities to orchestrate and complete an entire business process with no external dependencies, offering you complete control and enhanced security.
Key Components
This solution includes:
- A back-end database powered by Druid Data Services.
- A workspace for human agents to review and respond to customer or employee tickets.
- A Knowledge Base with standard responses to common support issues.
- Prebuilt Workflows that power DRUID LLM Becus agents and automate back-end operations.
Business Workflow
- User Interaction – The virtual assistant engages with users seeking support. It first identifies the user by matching them with an existing back-end account or creating a new one if necessary.
- Ticket Creation – The assistant guides the user through the ticket creation process by asking relevant questions to gather necessary details.
- Initial Response – After collecting all information and creating the ticket, the assistant provides a response based on the standard topics from the Knowledge Base.
- Feedback & Final Update – The assistant asks if the provided answer was helpful. It then updates the ticket with a summary of the user interaction, including their feedback.
The assistant can conduct conversations in any language, but all ticket information is stored in English.
All tickets are saved in a back-end database, where human agents can review, provide additional answers, and close cases.
Human Agent Workflow
- Automation Trigger – The agent initiates an automation to review and provide a response.
- Review & Edit – The virtual assistant displays the response it previously sent to the user. The agent can edit or rewrite it.
- Multilingual Delivery – Once the agent submits the edited response, the assistant translates it into the user’s original language and sends it via email.
- Knowledge Base Update – The virtual assistant asks if the agent wants to add the response to the Knowledge Base in a separate data source. If approved, the response becomes part of the assistant’s standard answers for similar future tickets.
Prerequisites
- Tenant Druid community (open new tenant here) or Druid subscription.
- You should have a Druid bot. For information on how to create a bot, see Creating Druid Bots.
- Enable the API Resources for Druid WebView and Druid Data Service. Then, activate the Druid Data Service in your tenant by navigating to Administration > Settings > Druid Data Service, and selecting Is enabled and clicking the Save all button at the top right of the page.
- DRUID LLM API resources must be activated for DRUID Becus 1.0 on your tenant. Contact your DRUID sales representative to enable DRUID-dedicated resources and generate an API token for Druid.LLM.
Configuring the Skill Template
To configure the skill template, follow these steps:
Step 1. Install the solution from the Solutions Library
Go to the Solutions Library, search for solution "DRUID-LLM Ticket Management" and import it following the instructions provided in section Installing Solution Templates.
Wait until the import status shows as “Success”.
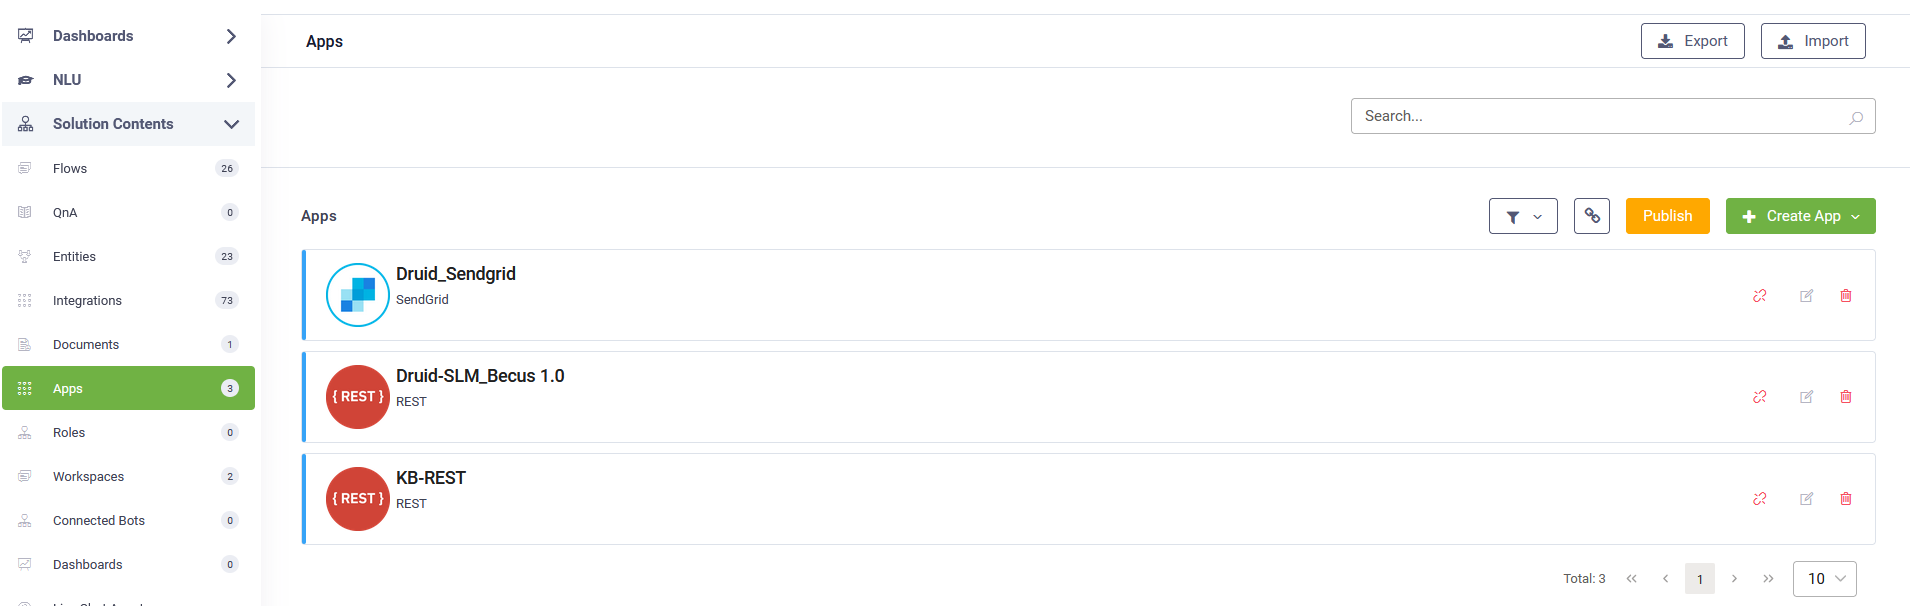
Step 2. Configure apps connections
Go to solution Apps and configure the following three connections with your credentials:
| App | Description | Your details | ||||||||||||
|---|---|---|---|---|---|---|---|---|---|---|---|---|---|---|
| Druid_Sendgrid | Used to send emails to users. | SendGrid API key | ||||||||||||
| Druid-SLM_Becus 1.0 | Used for AI-powered responses. |
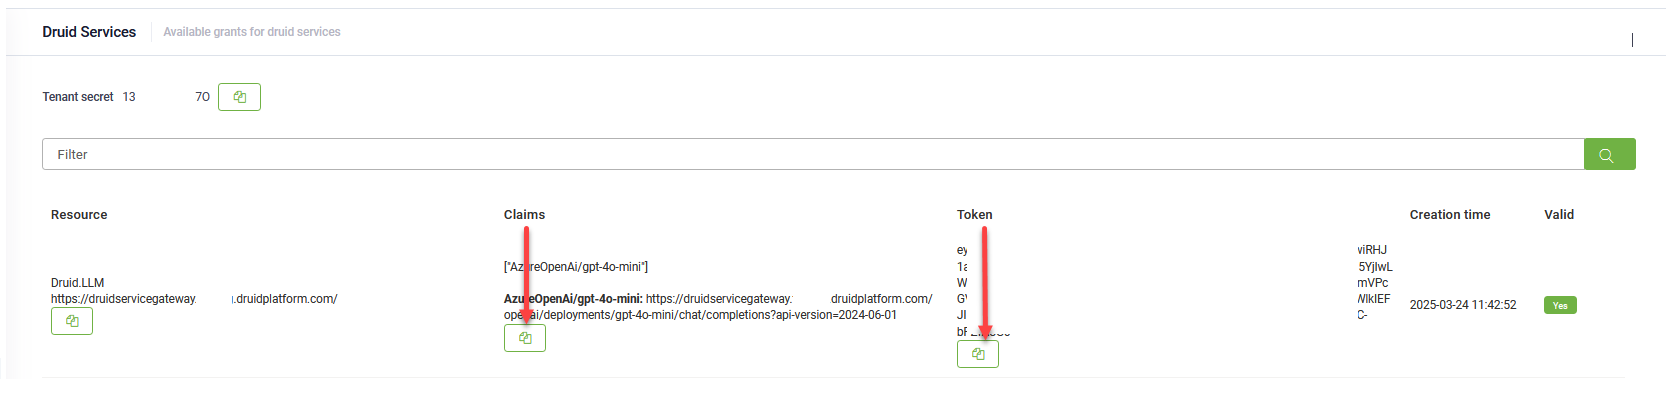
This app uses DRUID-dedicated LLM resources. To get the claims and token for the DRUID-dedicated LLM resource, follow these steps:
Note: If the DRUID.LLM resource does not appear, contact your sales representative to activate DRUID-dedicated resources for Becus 1.0.
Configure the app as follows:
|
||||||||||||
| KB-REST | Allows the virtual assistant to add answers to the Knowledge Base. |
The username and password of a Druid user account created in your tenant. In the Base URL field, enter the url specific to your environment:
|
After you configure the connections, click Publish.
Step 3. Set up the bot special flows and enable KB usage
- Go to the bot settings, Details page.
- Click the Dialog Management section header.
- In the Welcome flow field, select "welcome".
- In the Intent not found flow field, select “trigger-gpt-small-talk-agent”.
- Scroll down to Use Knowledge Base and enable it.
- Save your changes.
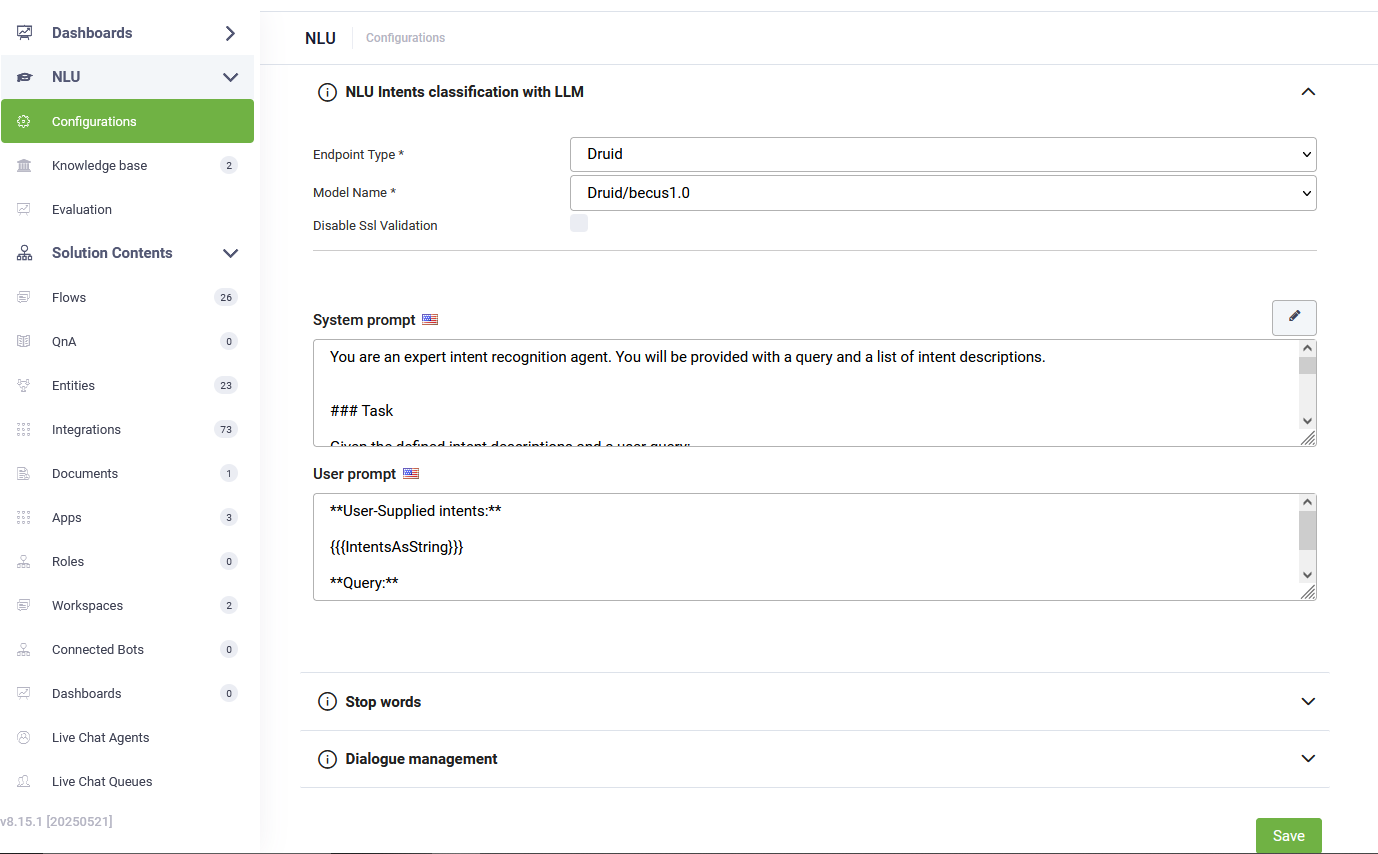
Step 4. Configure NLU Intents Classification with LLM
To configure NLU intents classification with LLM, follow these steps:
- Navigate to NLU > Configurations > Intents tab.
- Click on Thresholds and parameters.
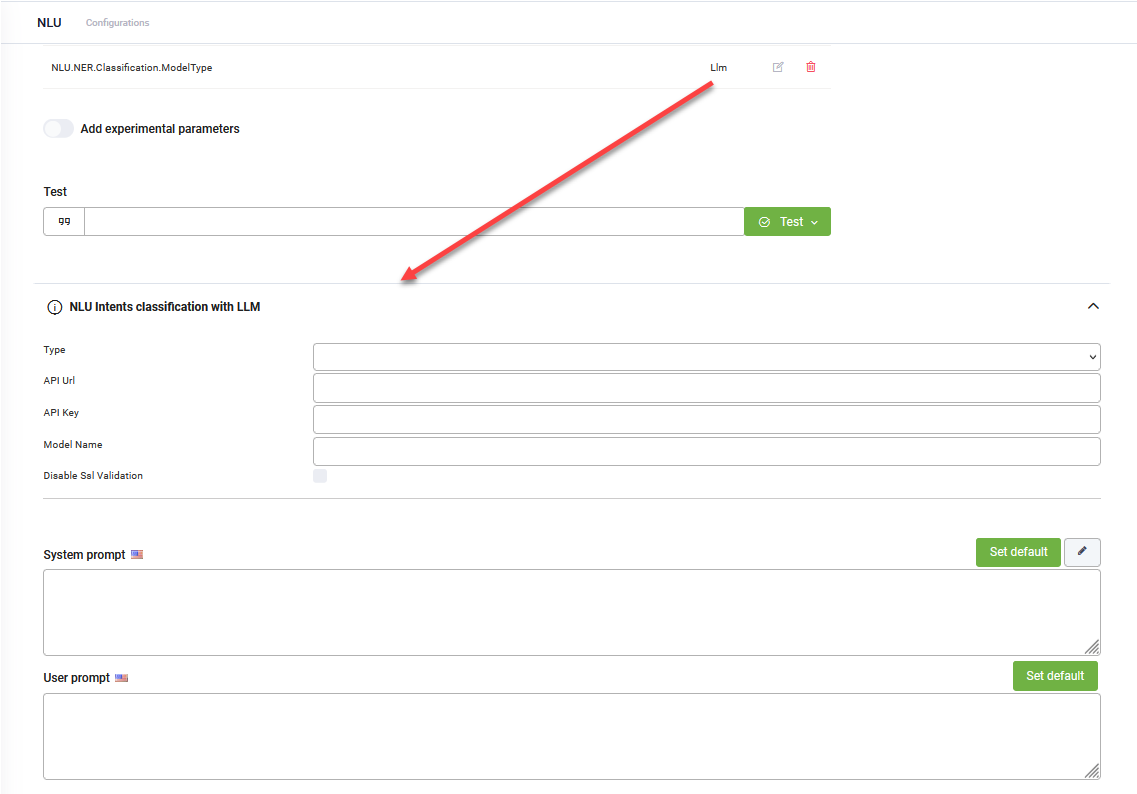
- Add the NLU.NER.Classification.ModelType parameter and set it to LLM.
- From the Endpoint Type field, select Druid.
- From the Model Name field, select Druid/becus1.0.
- For both prompts, click the Set default button. The default DRUID prompts will be automatically filled in.
- Click Save at the bottom of the page to apply the NLU configuration.
- Train the bot.
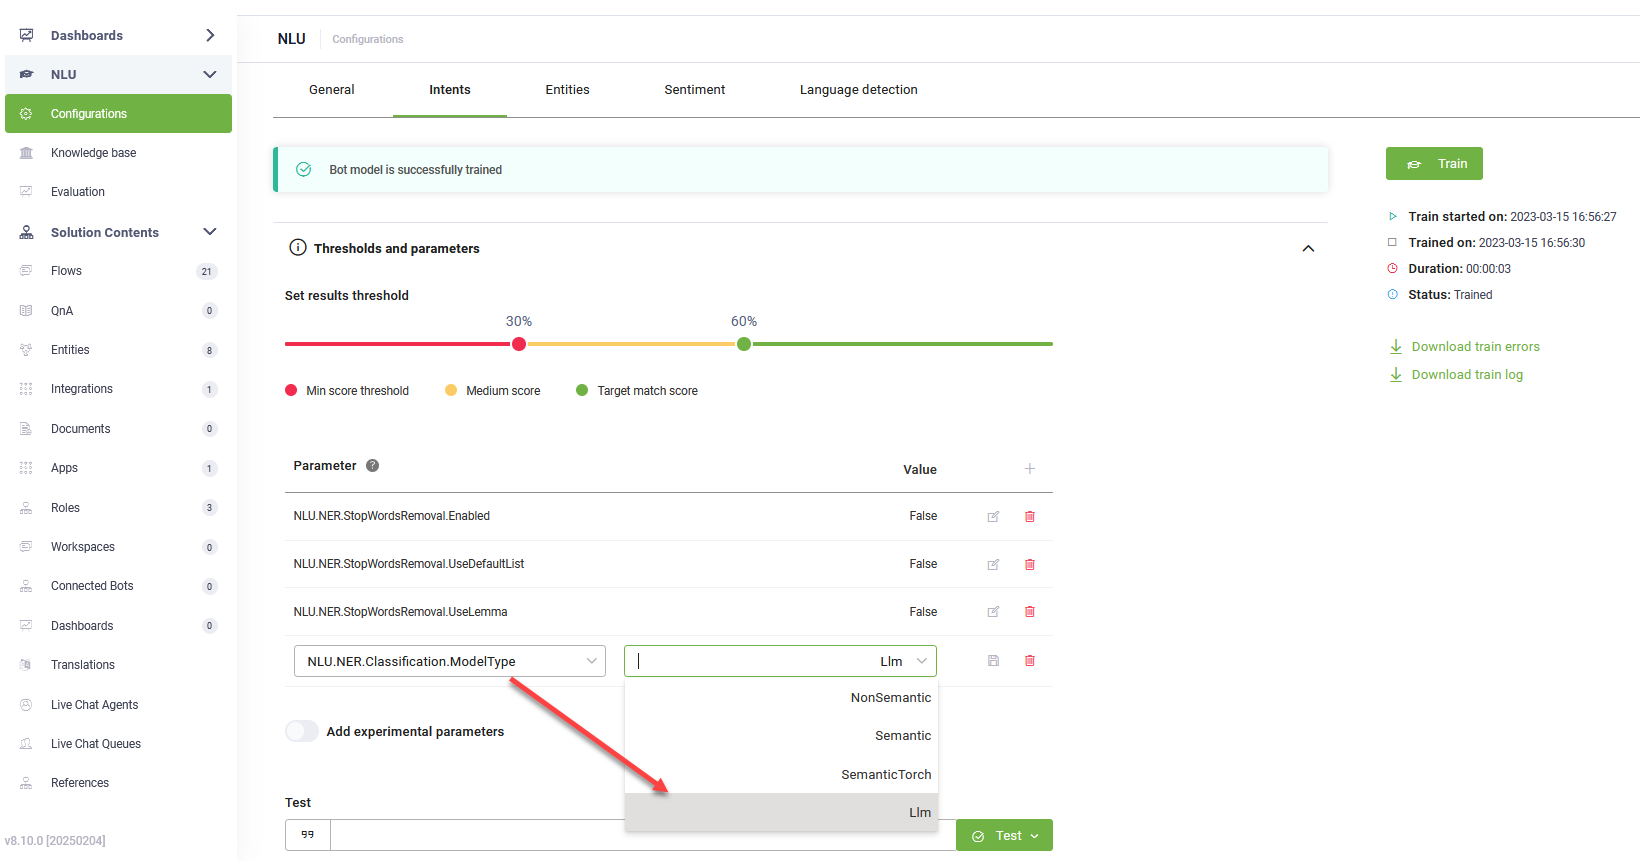
Click the link that appears in the message below the NLP parameters. The NLU Intents Classification with LLM expands.
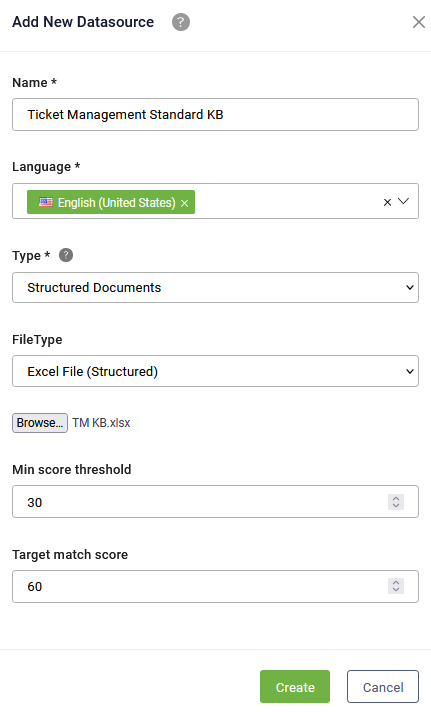
Step 5. Prepare the standard answer Knowledge Base
Follow these steps to configure the Ticket Management Standard KB for storing standard support responses:
- Navigate to NLU > Knowledge Base.
- Click the Add new button in the top-right corner of the page.
- Enter the data source Name exactly as: "Ticket Management Standard KB".
- Choose Structured Documents as the data source Type.
- Upload this sample Excel file or your own set of standard answers.
- Set the Min score threshold to 30.
- Set the Target match score to 60.
- Click Create to add the data source.
- Click on the newly create data source.
- Click Extract to start processing the data from the uploaded Excel template or your standard answers.
- Once the extraction is complete, click Train to finalize the training process.
The Knowledge Base is trained and ready with the standard answers for support tickets.
Step 6. Run database setup workflow
Open a new web chat to trigger the database setup workflow. The virtual assistant will automatically run the workflow, adding all necessary LLM prompts and demo data to the operational database. This ensures your database is properly configured and ready for ticket creation.
Once the workflow is complete, you can start a conversation to create your first ticket.