Talkdesk Live Chat
Integrating Talkdesk as a live chat provider allows your AI Agent to handle initial customer inquiries and, when necessary, transfer the conversation to a human agent within the Talkdesk contact center. This integration ensures that agents have access to chat transcripts and customer context, enabling a more personalized and efficient support experience.
Prerequisites
- You must have an active Talkdesk account with the Digital Connect solution installed.
- Ensure you have the necessary administrative permissions in Talkdesk to generate OAuth credentials and access Touchpoint IDs.
- You have built and published a AI Agent ready for deployment.
Configuring the integration
This section provides instructions for integrating AI Agents with Talkdesk.
Step 1. Create OAuth Client in Talkdesk
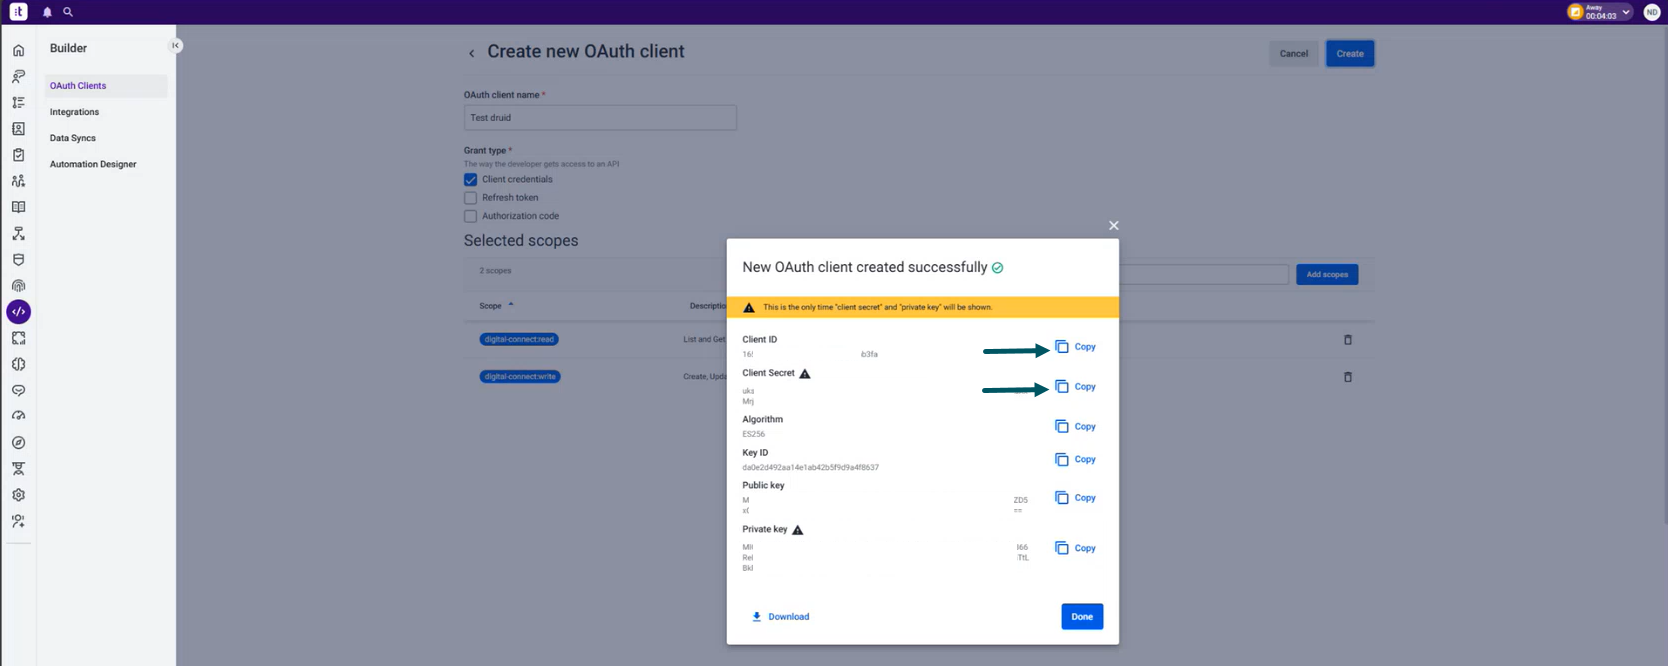
In Talkdesk, create an OAuth Client:
- Go to Builder > OAuth Clients.
- Create an OAuth client with the following scopes:
- Copy the Client ID and Client Secret as you will need them in the Druid Portal.
| Scope | Description |
|---|---|
| digital-connect:read | Required to read digital engagement data. |
| digital-connect:write | Required to send messages and manage sessions. |
| attachments:download |
Required to download file attachments. Supported in Druid 9.19 and higher for file transfer between users and agents. |
| attachments:read |
Required to read file attachment metadata. Supported in Druid 9.19 and higher for file transfer between users and agents. |
| attachments:request |
Required to request file attachment uploads. Supported in Druid 9.19 and higher for file transfer between users and agents. |
| attachments:write |
Required to upload and send file attachments. Supported in Druid 9.19 and higher for file transfer between users and agents. |
Step 2. Create new Touchpoint
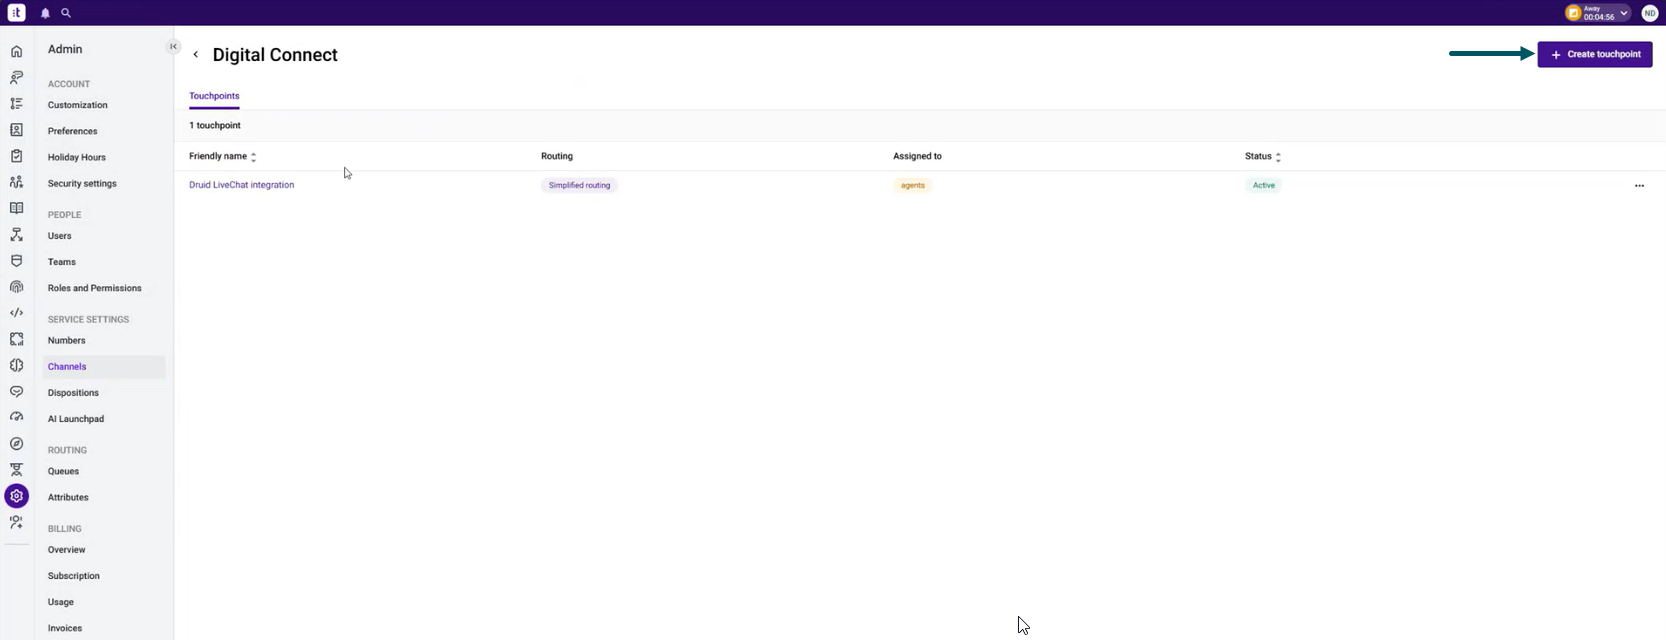
To create a new touchpoint for Druid integration, follow these steps in Talkdesk:
- Go to Admin > Channels and click Digital Connect.
- Click Create touchpoint.
- Enter the mandatory details and save it.
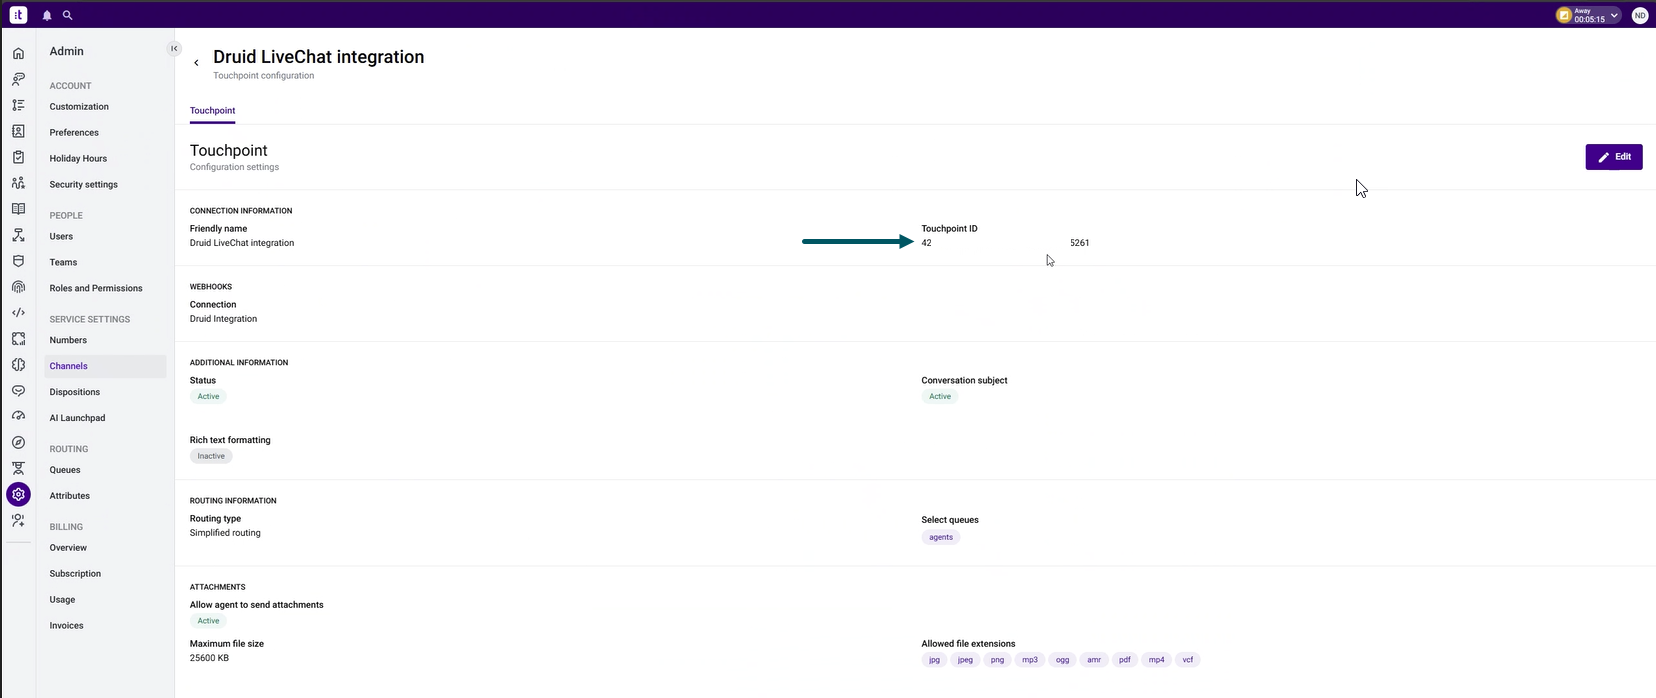
- Click on the touchpoint you created and copy the Touchpoint ID as you will need in the Druid Portal.

Step 3. Configure Talkdesk in the Druid Portal
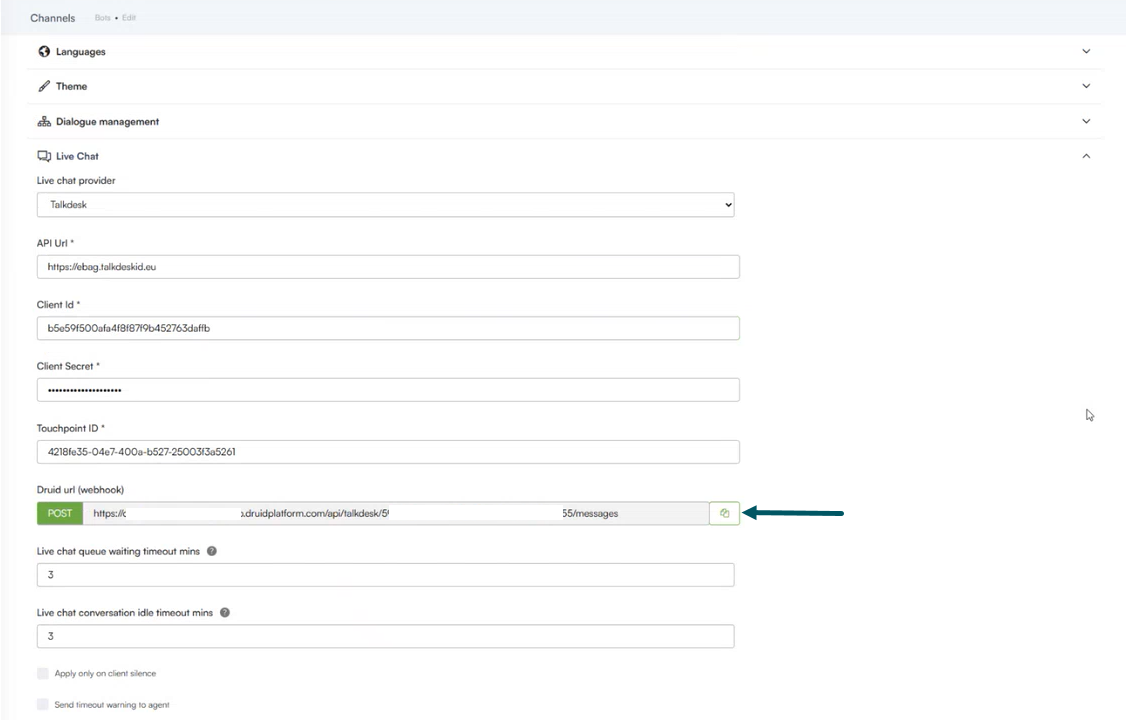
Go to AI Agent details page and click the Live Chat section header. The section expands.
Set the fields as described in the table below:
| Field | Description |
|---|---|
| Live chat provider | Select Talkdesk. |
| API Url |
Enter your Talkdesk API URL (the url you use to access your talkkdesk account). |
| Client Id | Enter the OAuth Client credentials you copied at Step 1. Create OAuth Client in Talkdesk. |
| Client Secret | |
| Touchpoint ID | Enter the value you copied at Step 2. Create new Touchpoint. |
Click Save & Close.
Go to the AI Agent details again, click the Live Chat section and copy the Druid url (webhook). You’ll need this URL when creating a custom integration in Talkdesk.
Configure the Live Chat special flows as needed.
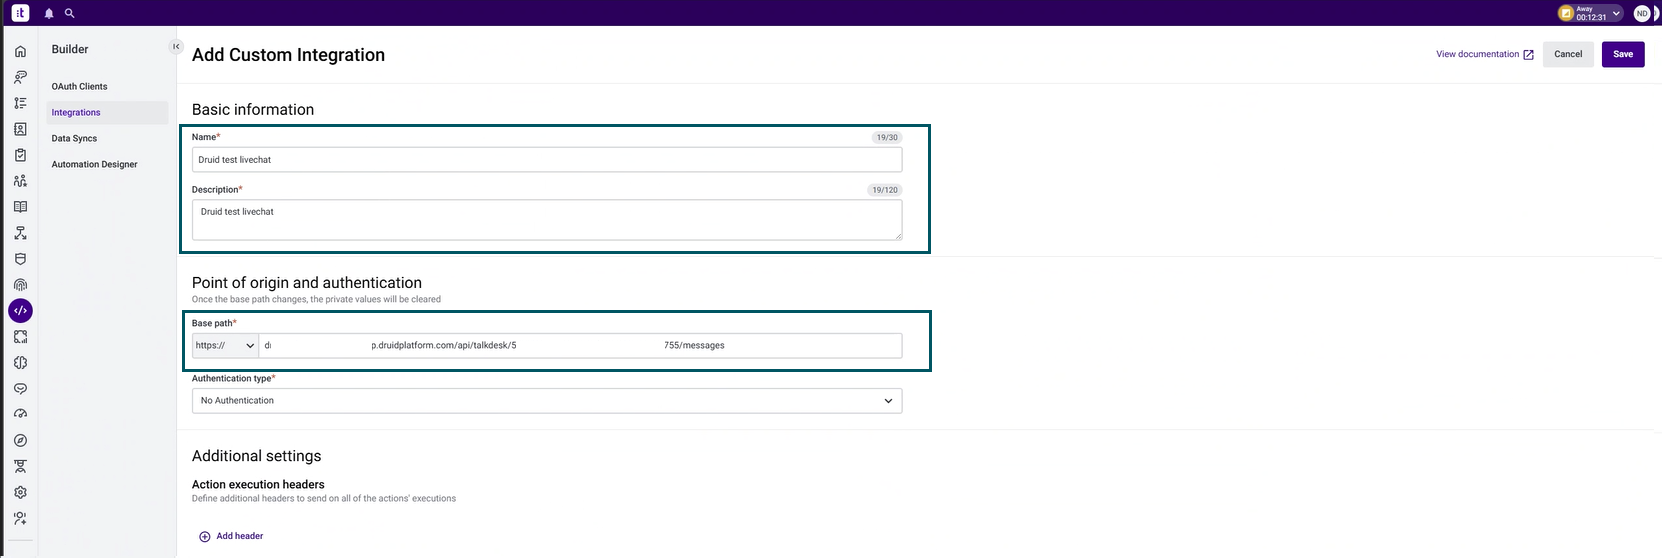
Step 4. Create a custom Talkdesk integration
To create a custom integration, perform the following steps in Talkdesk:
- In Talkdesk, go to Builder > Integrations and create a custom integration as follows:
- Enter a name and description.
- In the Base path field, enter the base domain of the webhook URL you copied from the Druid Portal.
- Save the integration.
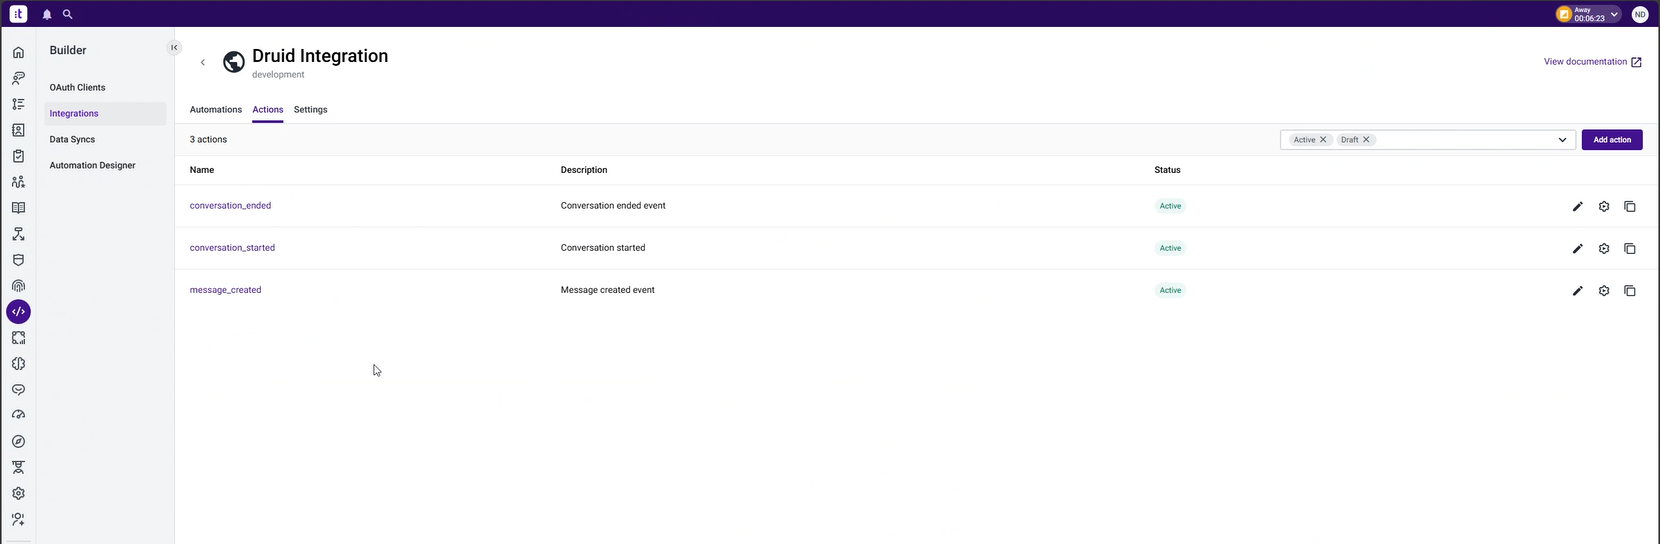
- Click the Actions tab and add the following actions:
- conversation_started
- conversation_ended
- message_created
Enable File Transfer for Existing Talkdesk Integrations
If you integrated Talkdesk Live Chat in a version prior to Druid 9.19, you must edit your existing OAuth client in Talkdesk Builder and manually add these four attachment scopes to enable file transfer support between users and Talkdesk agents:
-
attachments:download
-
attachments:read
-
attachments:request
-
attachments:write

Send the conversation transcript to Talkdesk Agents
To save the conversation transcript and make it available for Talkdesk agents, on the flow that connects the client with the agent, make the following settings:
- On the step where you call the internal action ConnectToHelpdeskAgent(Post Actions section), in the Pre Actions section, call the internal action GetConversationTranscript.
- On the ConnectToHelpdeskAgent internal action add the following:
- Save the step.
{
  "SendConversationTranscript": true
}Send Contact Center Parameters
The table below lists the Contact Center parameters authors can send to Talkdesk.
| Parameter | Data Type | Description |
|---|---|---|
| String | The client's email. | |
| Phone | String | The client's phone number. |
To send Contact Center parameters to Talkdesk, on the ConnectToHelpdeskAgent internal action, provide the desired parameters inside the ContactCenterParameters object in JSON format.
{
     "SendConversationTranscript":true,
     "ContactCenterParameters":
        {
                "emailAddress": "[[ChatUser]].Email",
                "phone": "[[ChatUser]].Phone"
        }
}