Salesforce MIAW Live Chat
Salesforce MIAW enhances pre-chat support by identifying customer needs and accessing records before agents connect in the Service Console. It also enables real-time communication with clients directly within the Service Console.
Integrating AI Agents with Salesforce MIAW Live Chat
Step 1. Prepare a Salesforce Org
- Create a Salesforce org and set up Omni-Channel and Omni-Flow.
- Add your messaging channel and connect to the Service Console.
- Configure routing to ensure the right agent responds to customers.
For detailed instructions, refer to Salesforce's documentation.
Step 2. (Optional) Add User Verification
To enable secure messaging across multiple devices, set up User Verification. For detailed instructions, refer to Salesforce documentation.
Step 3. Enable Digital Experiences
Enable Digital Experiences in your Salesforce org. For guidance, see Salesforce documentation.
Step 4. Publish and Configure a Messaging Deployment
Connect your messaging channel to a website by creating a new embedded deployment. For step-by-step instructions, refer to Salesforce documentation.
For mobile deployment, follow Salesforce's mobile instructions.
Step 5. Get the Deployment Snippet Code
- From the Deployment Settings, select Install Code Snippet.
- Click Copy to Clipboard and paste the code into a text editor.
- Extract the following details for DRUID Live Chat configuration:
- OrganizationId and Url - for DRUID configuration.
- DeveloperName - for sending contact center parameters.
Step 6. Configure Salesforce Live Chat for your AI Agent
In the Druid Portal, go to the AI Agent details, click the Live Chat section header and from the LiveChatProvider field, select Salesforce MIAW.
Configure the Salesforce MIAW Live Chat as follows:
|
Parameter |
Description |
Mandatory |
|---|---|---|
|
Server URL |
The Url you copied from the deployment snippet code at Step 5. |
Yes |
|
Organization id |
The organizationId you copied from the snippet code at Step 5. |
Yes |
|
Deployment name |
The name of your Embedded Service deployment, the one you provided when publishing the deployment at Step 4. |
Yes |
|
Capabilities version |
Enter 1 as Druid currently supports only version 1 of capabilities. |
Yes |
|
Customer identity token |
The token issued by the company’s identity provider, if User identification is set in Salesforce Messaging. |
No |
In order for Live Chat events to be raised, you need to set up on the AI Agent the timeout parameters provided in the table below.
|
Parameter |
Description |
|---|---|
|
Live chat queue waiting timeout mins |
The amount of time in minutes that a client could wait until an agent accepts the incoming live chat request. When the time limit is reached, the flow selected in field Live chat client waiting in queue flow is triggered. |
|
Live chat conversation idle timeout mins |
The idle time limit for which a client can be idle (i.e. does not respond) in an ongoing conversation with an agent. Once the time limit is reached, the dialog times out and the client is automatically returned to AI Agent context. |
From the Live chat client disconnected flow field you can select the flow you designed specifically to capture client's feedback.
After you finish setting up Salesforce Live Chat in DRUID, you need to create a specific flow as described below.
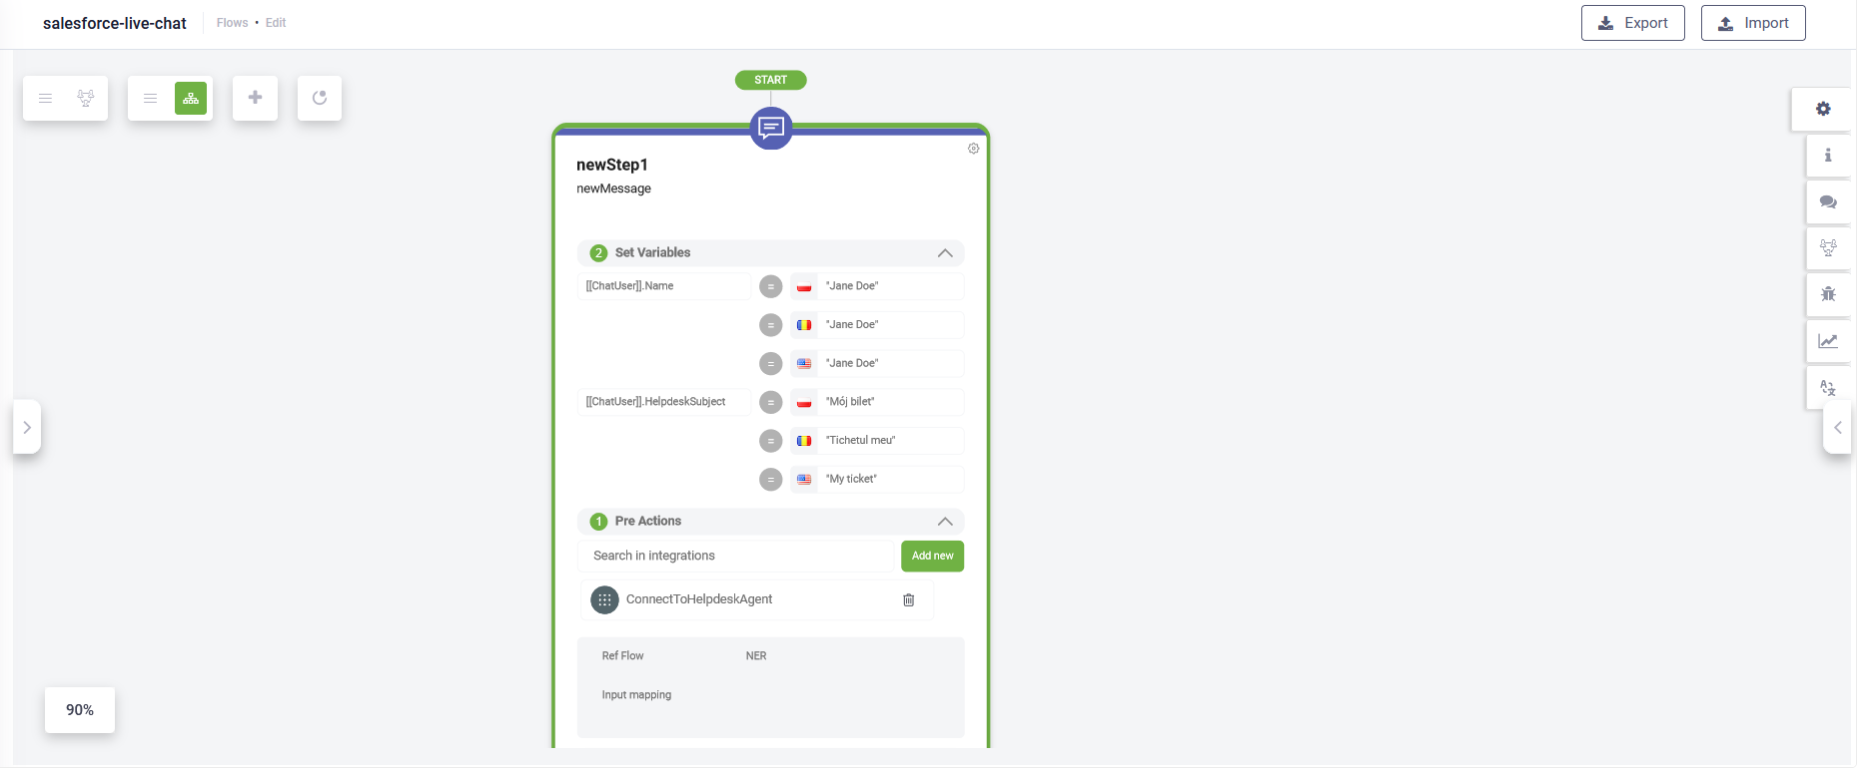
Step 7. Create flow
Create a flow with a step that has as Pre Action the internal action ConnectToHelpdeskAgent.
You can also set [[ChatUser]].Name and [[ChatUser]].HelpdeskSubject as variables that can be sent to Salesforce MIAW.
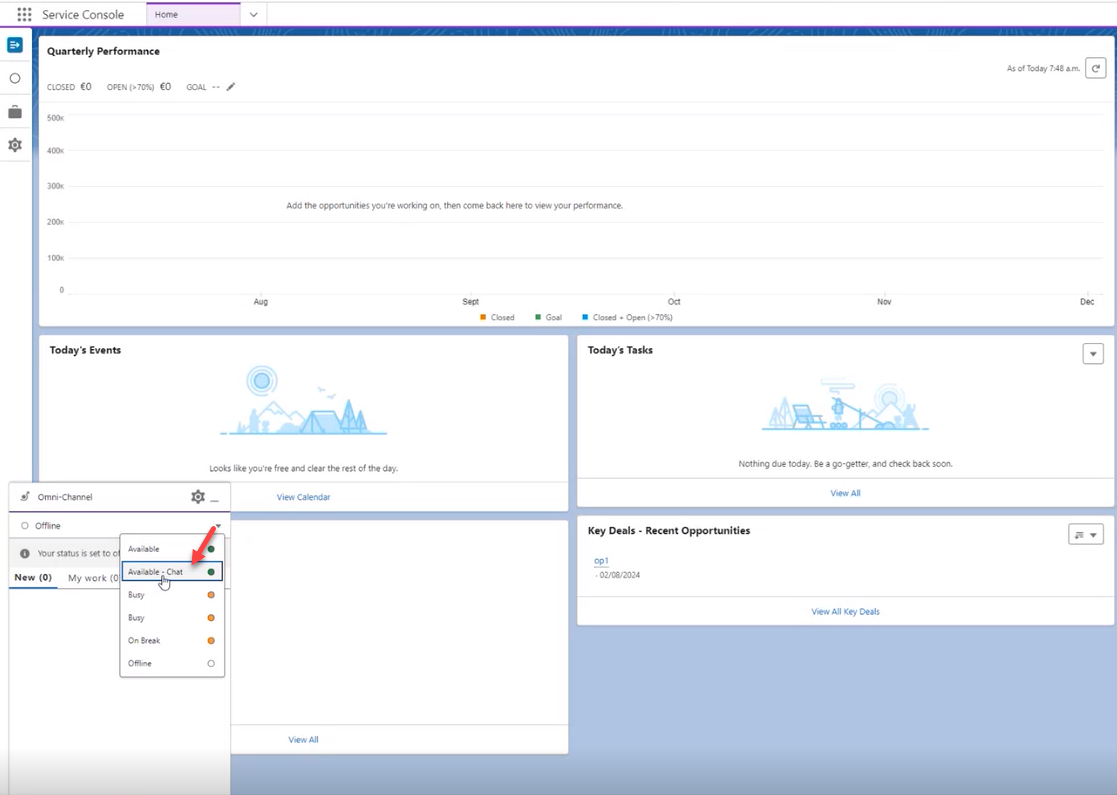
Step 8. Run the flow
Set your status to "Available for Chat" in Salesforce and stay in the Service Console to receive incoming chats.
Open the chat and run the flow you created at Step 7 (entering the flow utterance in the chat).
Sending the conversation transcript to Salesforce Live Chat Agents
Most contact centers want their helpdesk agents to get the transcript of the conversation the client had with the AI Agent prior to being engaged in a live chat session.
In order to save the conversation transcript and make it available for Salesforce Live Chat agents, on the flow that connects the client with the agent, make the following settings:
- On the step where you call the internal action ConnectToHelpdeskAgent(Post Actions section), in the Pre Actions section, call the internal action GetConversationTranscript.
- On the ConnectToHelpdeskAgent internal action add the following:
- Save the step.
{
  "SendConversationTranscript": true
}
Sending Contact Center Parameters
You can send contact center parameters as long as they are created as pre-chat form data and mapped in the Omni-channel flow in Salesforce. For more details, refer to the Salesforce documentation: Customize Pre-Chat for Messaging for In-App and Web and Map Pre-Chat Values in Omni-Channel Flow.
In the ConnectToHelpdeskAgent internal action, in ContactCenterParameters, specify the routing values that will be sent to Salesforce:
{
  "ContactCenterParameters": {
      "<key1>": "<value1>",
      "<key2>": "<value2>"
    },
   "SendConversationTranscript": true
}
{
  "ContactCenterParameters": {
    "firstName": "[[Customer]].FirstName",
    "lastName": "[[Customer]].LastName",
    "email": [[Customer]].Email,
    "queueId": "[[Entity]].QueueId"
    },
  "SendConversationTranscript": true
}Example - Sending Contact Center Parameters
{
  "SendConversationTranscript": true,
  "ContactCenterParameters": {
    "conversationId": "00D2Q223000I0A5",
    "routingAttributes": {
      "firstName": "[[Customer]].FirstName",
      "lastName": "[[Customer]].LastName",
      "email": "[[Customer]].Email",
      "queueId": "[[Entity]].QueueId"
    },
    "esDeveloperName": "MIAW_Deployment"
  }
}