Genesys Live Chat
You can integrate AI Agents with Genesys Contact Center to transfer AI Agent conversations to live agents on Genesys.
You can integrate AI Agents with Genesys Contact Center using either the DRUID Cloud or the DRUID Connector Host.
Genesys Live Chat via DRUID Cloud
The following diagram illustrates how DRUID Cloud integrates with an on-premises Genesys installation.
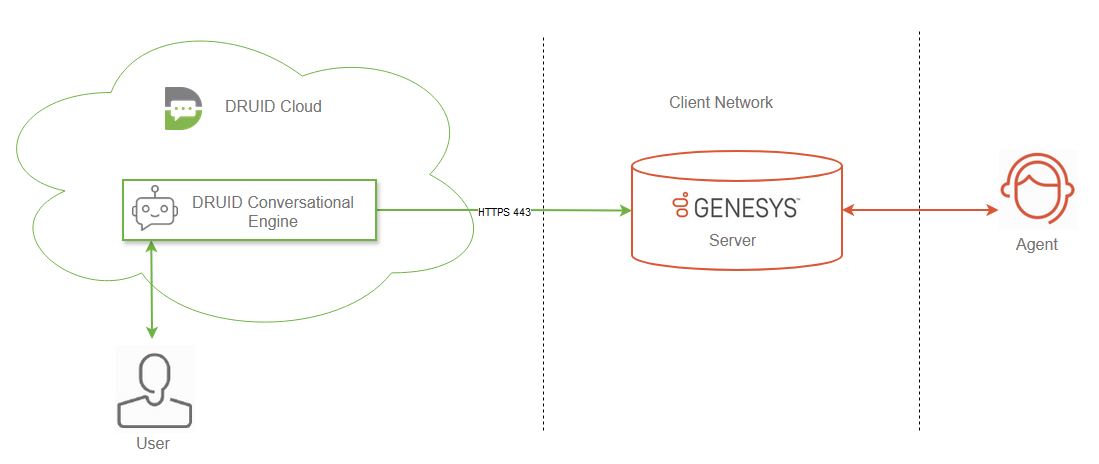
The Genesys Server accepts incoming requests only from the DRUID Conversational Engine. To retrieve agent messages, DRUID Conversational Engine makes a request to the Genesys Server every 5 seconds.
Prerequisites
- Create a service for the chat media in Genesys Mobile Engagement for DRUID integration. In GMS Configuration, add a new service under the chat configuration section. For example, you might name the service webchat. For more information, see Genesys Mobile Engagement documentation.
- Grant access for DRUID server, to the Genesys Mobile Service Chat API Version 2 (DRUID is not compatible with other Chat API versions), by whitelist the IP of the DRUID egress generic service corresponding to the DRUID Cloud environment you're using:
|
DRUID Cloud Environment |
egress generic service IP |
|---|---|
|
Community |
20.126.205.196 |
|
PROD AU |
20.92.210.91 |
|
PROD US |
52.226.239.127 |
|
PROD EU |
20.31.251.4 20.82.33.99 |
Integration Steps
To integrate Genesys Live Chat with AI Agents via DRUID Cloud, follow these steps:
- In the Druid Portal, go to Solution Library and import the solution Genesys Live Chat.
- Go to the AI Agent Details page and click on the Live Chat section.
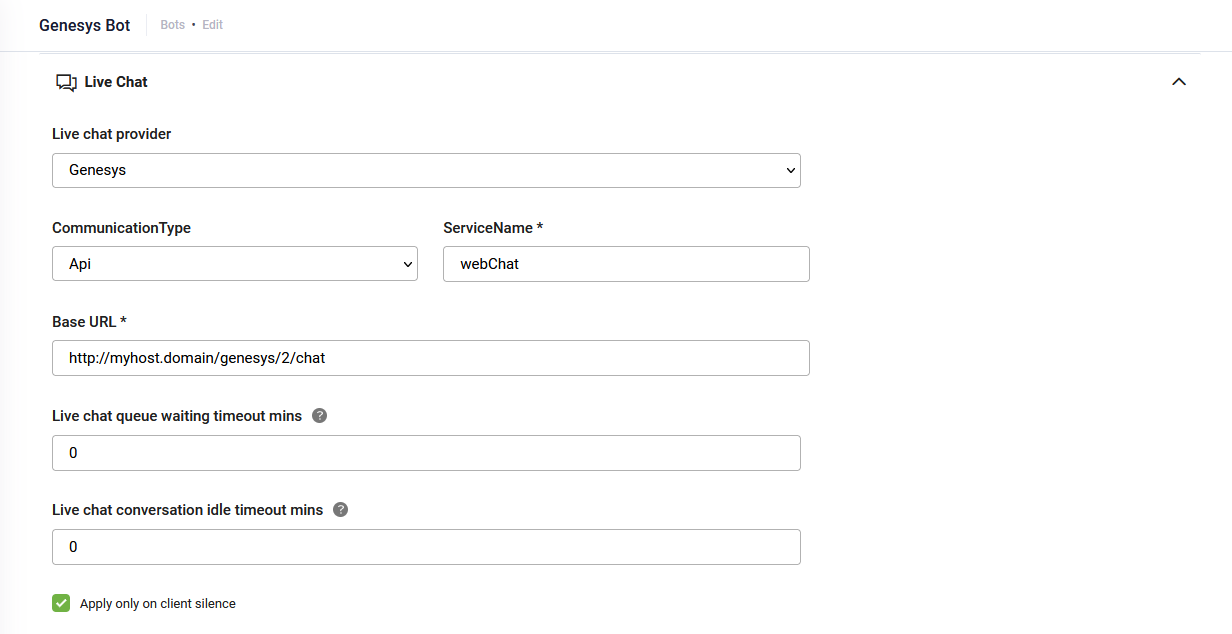
- In the Live chat provider field, select Genesys.
- In the Communication type field, select API.
- In the Base URL field, enter the public address of the Genesys Server. E.g. https:// myhost.domain:8443.
- In the Service name field, enter the name of the service you created for the DRUID integration.
- Click Save & Close to save your configuration.
Genesys Live Chat via DRUID Connector Host
This diagram illustrates how the DRUID Connector Host integrates with an on-premises Genesys installation.

Both the DRUID Connector Host and Genesys Server are installed on client premises. They may be located on different DMZs within the client’s network. The Genesys Server only accepts incoming requests from the DRUID Connector Host. To retrieve agent messages, DRUID Conversational Engine makes a request to the Genesys Server through the DRUID Connector Host every 5 seconds.
Prerequisites
-
Create a service for the chat media in Genesys Mobile Engagement for DRUID integration. In GMS Configuration, add a new service under the chat configuration section. For example, you might name the service webchat. For more information, see Genesys Mobile Engagement documentation.
Info: Write down the service name, you’ll need the service name in DRUID later.
Integration Steps
To integrate Genesys Live Chat with AI Agents via the DRUID Connector Host, follow these steps:
- In the Druid Portal, go to Solution Library and import the solution Genesys Live Chat.
- Open the AI Agent Details page and click on the Live Chat section.
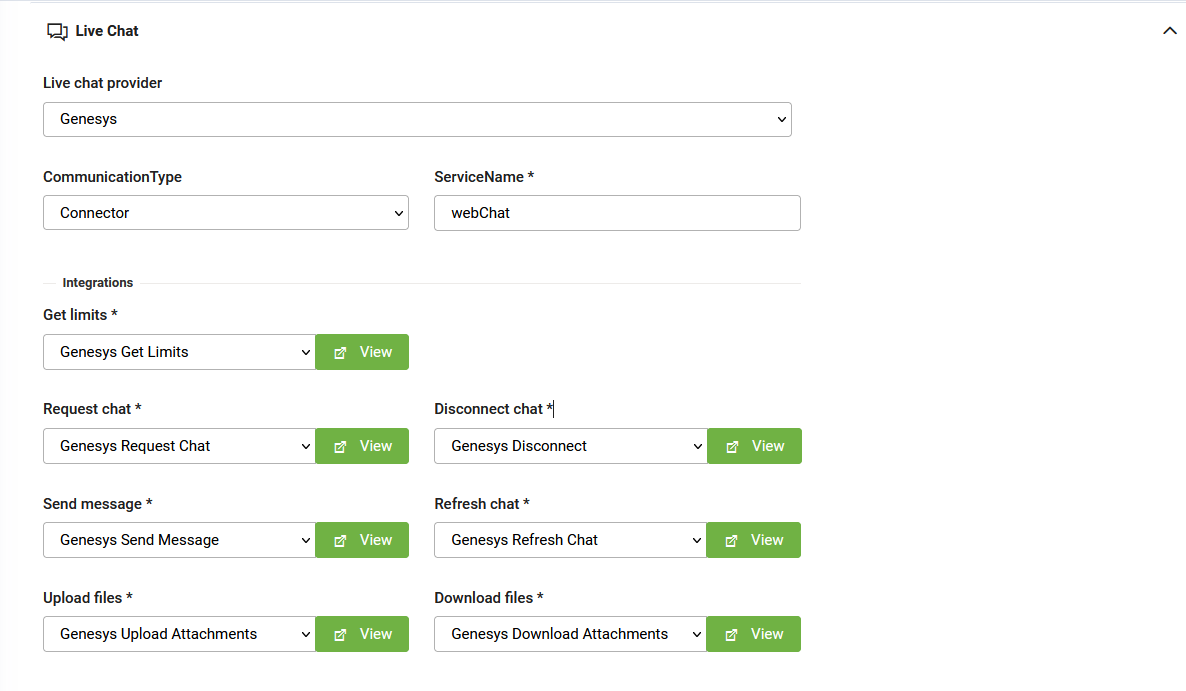
- In the Live chat provider field, select Genesys.
- In the Communication type field, select Connector.>
- In the Service name field, enter the service name created for DRUID integration.
- In the Integrations section, select the Genesys-dedicated integrations.
- Click Save & Close to save the AI Agent configuration.
- Select the Genesys Live Chat solution, then click Apps under Solution Contents.
- Open the GenesysServer app and enter the internal address of the Genesys Server in the Base URL field.
- Click Save & Close to save the app configuration.
- Click Publish to apply your changes.
Sending the conversation transcript to Genesys Live Chat Agents
To ensure agents receive the conversation transcript from the AI Agent before engaging in live chat, follow these steps:
- On the step where you call the ConnectToHelpdeskAgent internal action, in the Pre Actions section, call the GetConversationTranscript internal action.
- On the ConnectToHelpdeskAgent internal action, add the following:
- Save the step.
{
  "SendConversationTranscript": true
}Sending Contact Center Parameters
You can send the following Contact Center parameters to Genesys Live Chat:
|
Parameter |
Data Type |
Description |
Required/Optional |
|---|---|---|---|
|
nickname |
String |
The client’s nickname. |
Required |
|
firstName |
String |
The client’s first name. |
Required |
|
lastName |
String |
The client’s last name. |
Required |
|
emailAddress |
String |
The client’s email address. |
Optional |
|
subject |
String |
The subject as entered by the client. |
Optional |
You can also send other parameters as long as they match the names in Genesys.
How to send Contact Center parameters
On the ConnectToHelpdeskAgent internal action, provide the desired parameters inside the ContactCenterParameters object in JSON format.
Example - Send Contact Center parameters
{
  "SendConversationTranscript": true,
  "ContactCenterParameters": {
      "firstName": "[[ChatUser]].FirstName",
      "lastName": "[[ChatUser]].LastName",
      "nickname":"[[ChatUser]].Name",
      "subject":"[[ChatUser]].HelpdeskSubject",
      "emailAddress":"[[ChatUser]].Email"
   }
}