Freshchat Integration
Freshchat is a modern messaging app for sales and customer engagement teams.
This section provides information on how to integrate AI Agents with Freshchat tool. It does not cover Live Chat specific configuration within the conversational flow design but it provides configuration information related to troubleshooting and sending conversation transcript to Freshchat.
If you’re using DRUID on premise deployment, the Freshchat integration is scalable for high loads.
For technical details about the integration solution between DRUID and Freshchat, see the specific Freshchat documentation.
How the integration works
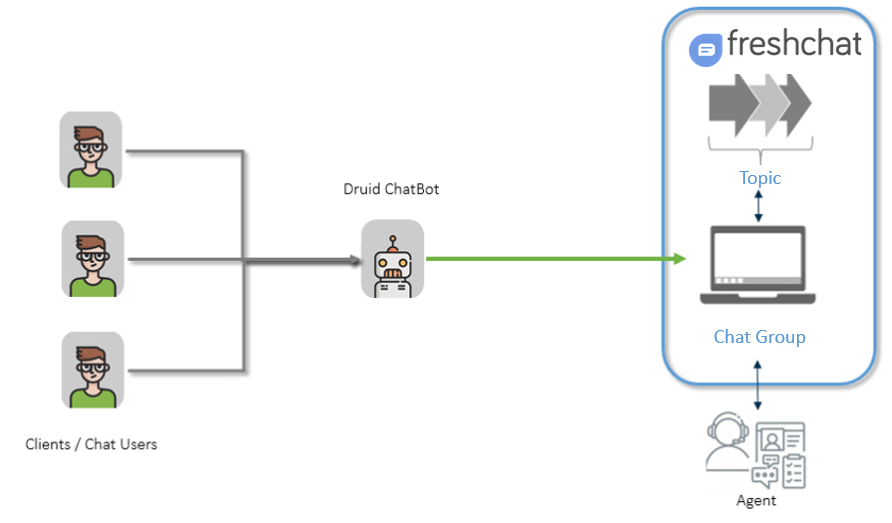
- The users chat with the AI Agent.
- If the AI Agent determines that the user wants to talk to a human, it transfers the chat session to Freshchat.
- Freshchat routes the user request to the group associated to that user request-specific topic.
- An agent in the group to which the live call is routed, accepts the live chat request and provides support to the user. The agents are not using DRUID native live agent.
- When the live chat session ends, the chat session returns to the AI Agent.
Prerequisites
- You should have a Freshchat administrator account.
- You should have at least one group and one topic assigned to that group. Whenever a message is received under the topic, it is automatically assigned to the group. The Freshchat web messenger displayed on the organization’s web pages can be customized to display the topics created in the Freshchat system.
- In the Druid Portal, from Solutions Library download the Freshchat Integration solution template. This template has been designed to provide you with a smooth way to connect users to Freshchat agents.
To integrate a AI Agent with Freshchat, follow these steps:
Step 1. Get Freshchat API details
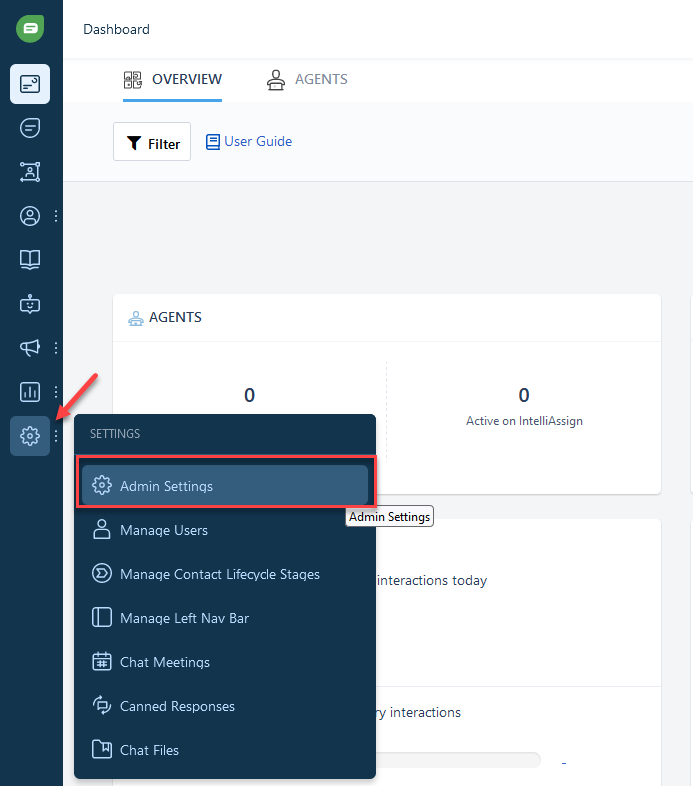
- Log in Freshchat using your admin account.
- On the menu, click Admin Settings.
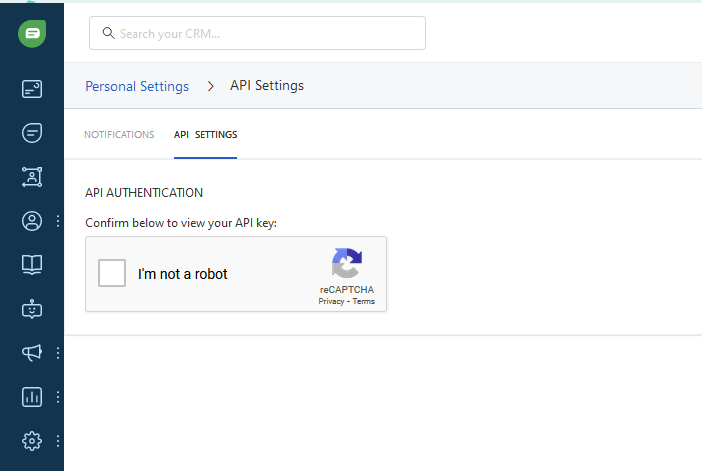
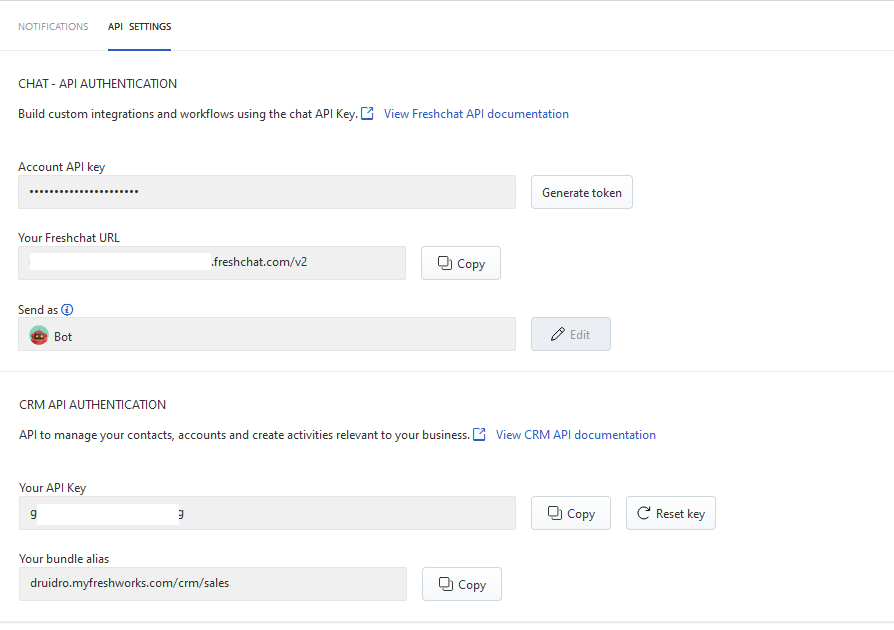
- In the Admin Settings page, scroll down to section Website Tracking, Integrations, and APIs and click on API Settings. You will be prompted to confirm that you are not a bot.
- Confirm that you are not a bot to view your API key by checking the check box and passing the verification.
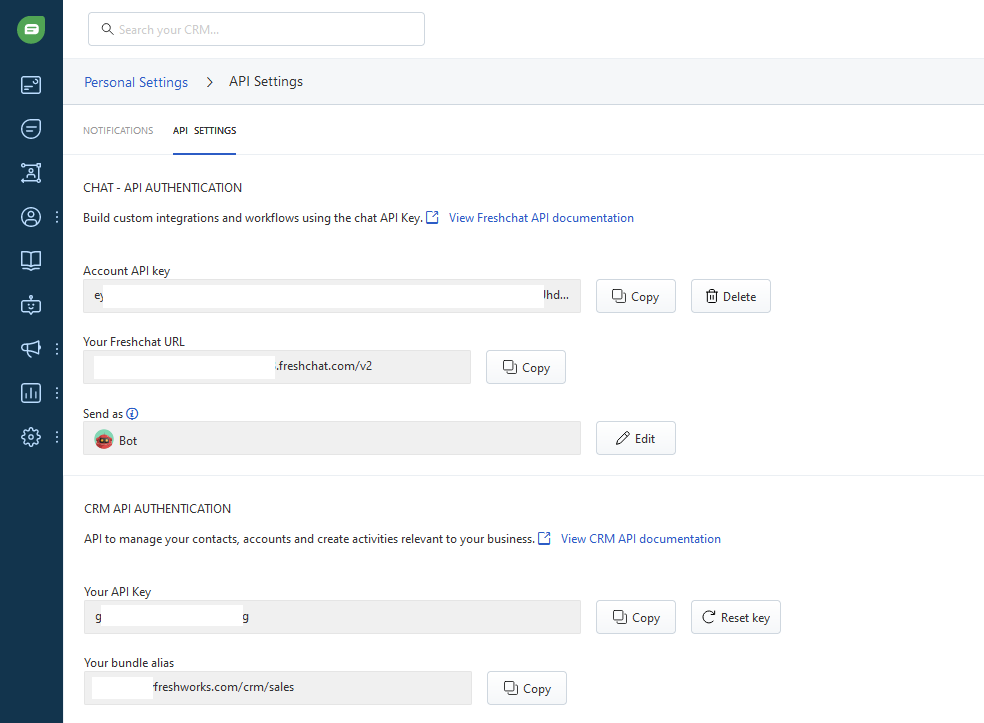
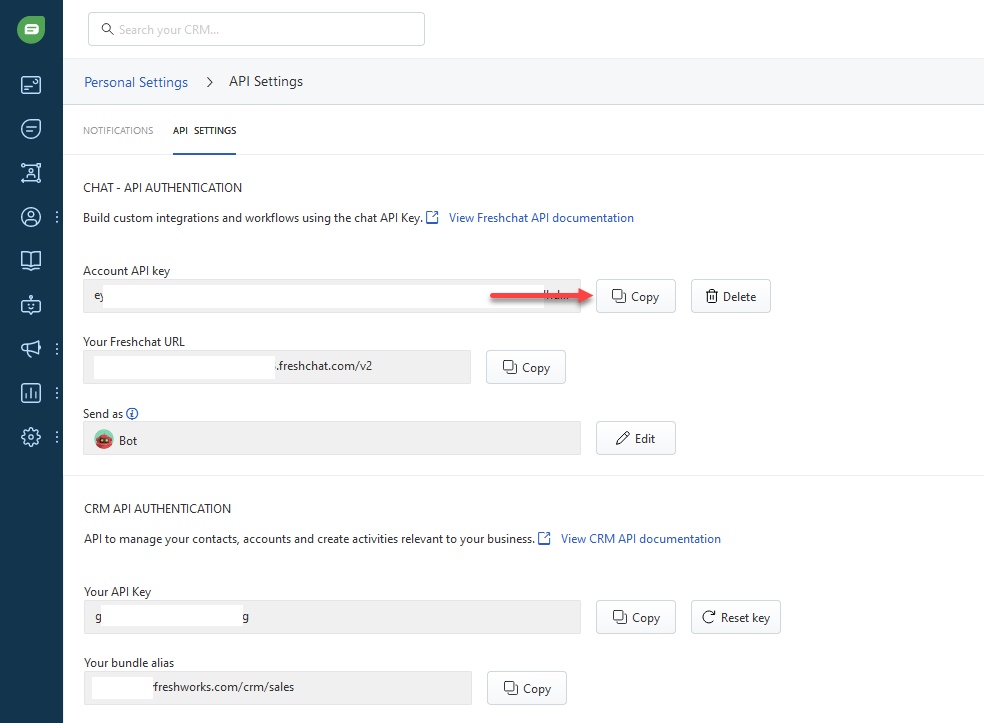
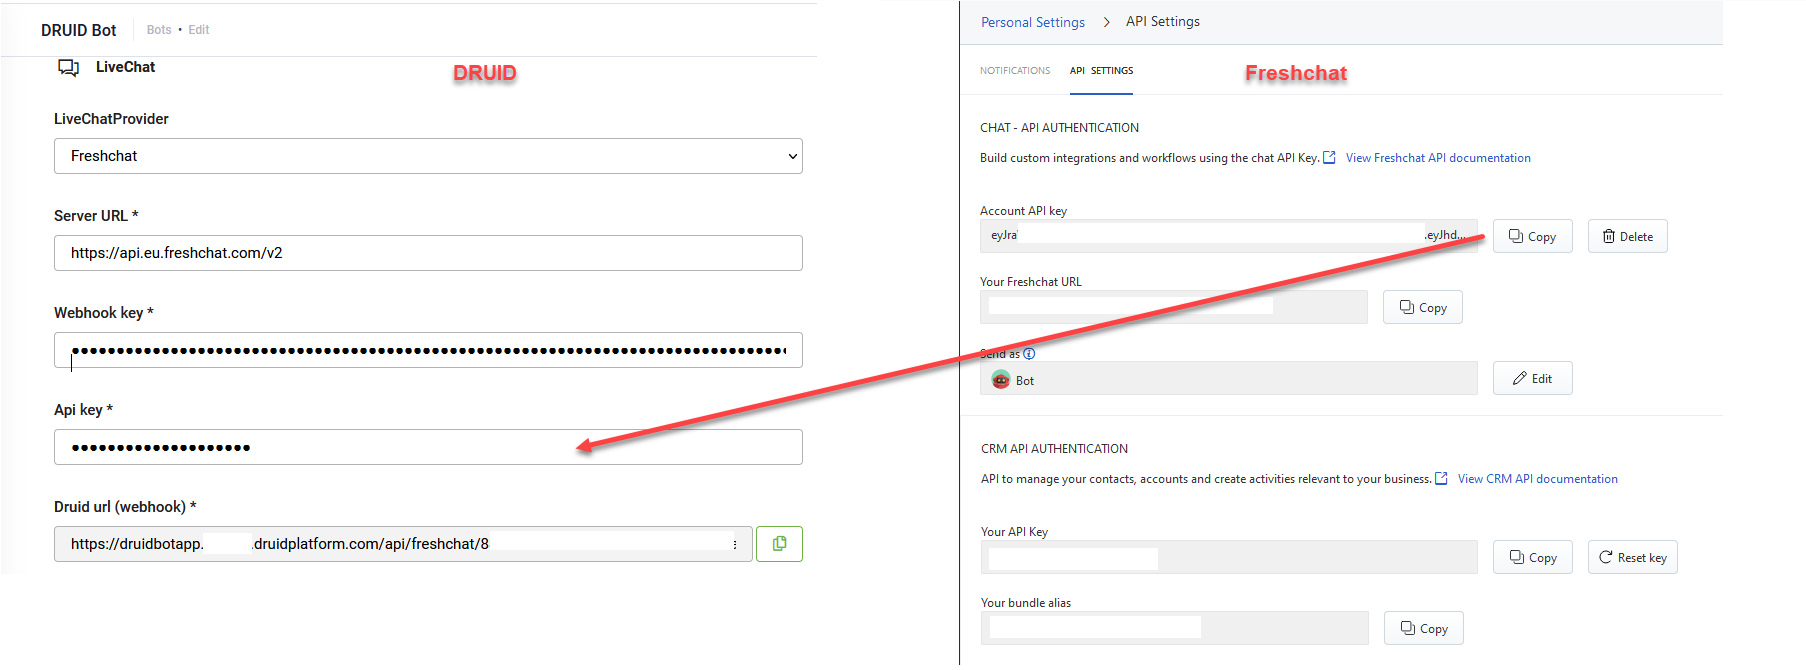
- Click Generate token. The Account API key is generated.
- Copy the value from the Account API key field and save the value as you will it to configure your AI Agent.
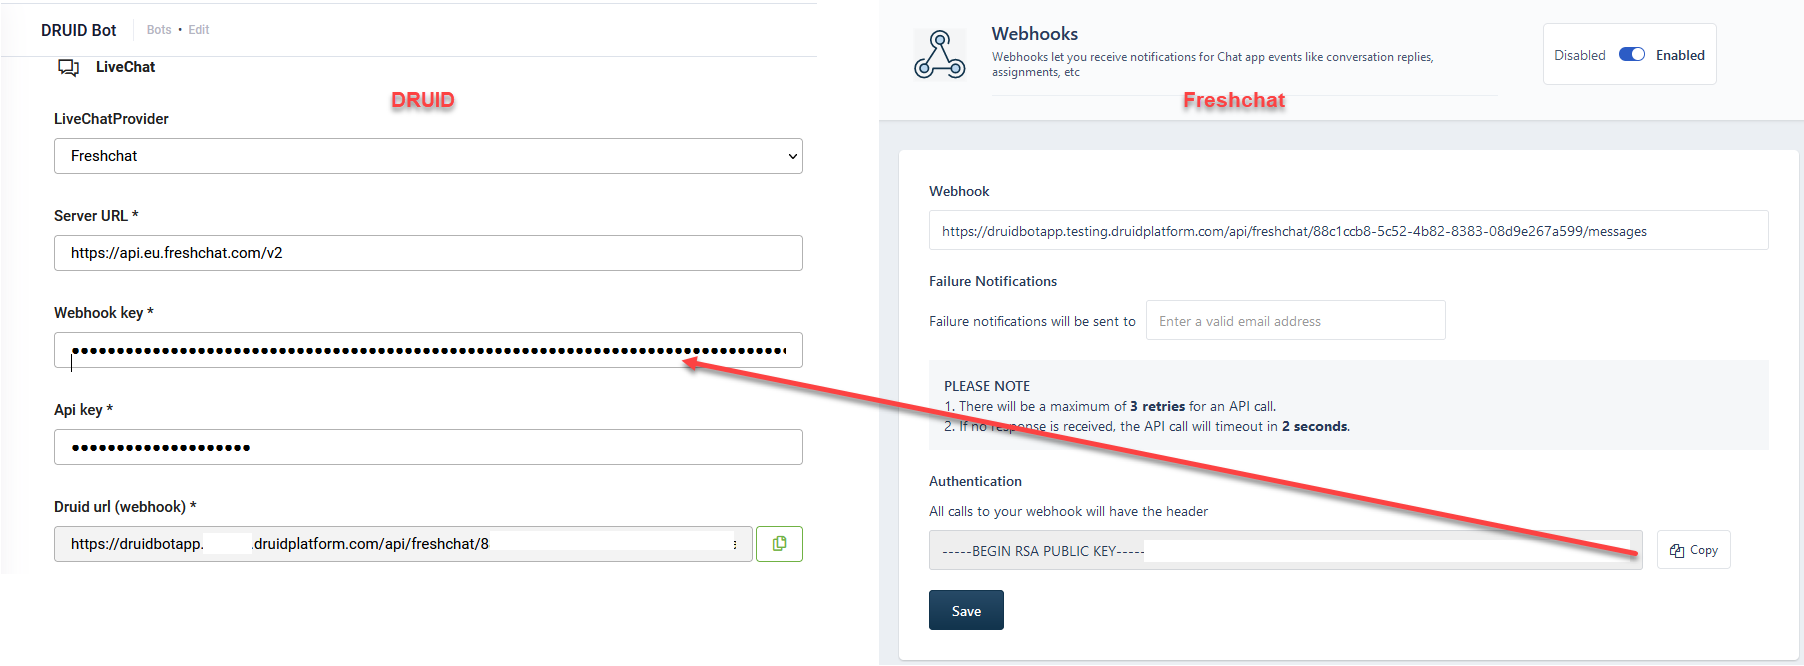
Step 2. Set up Freshchat Webhook
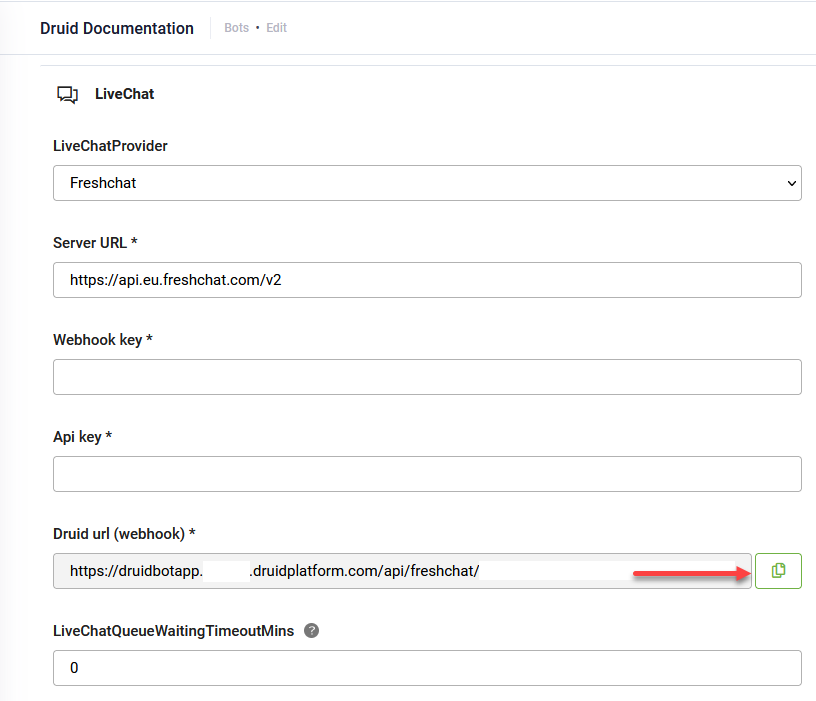
- In the Druid Portal, go to the AI Agent settings and click the LiveChat section header.
- From the LiveChatProvider field, select Freshchat and save the AI Agent.
- The Druid url (webhook) field is automatically filled in. Copy its value as you will need it to set up the Freshchat webhook.
- Log in to the Freshchat portal as an administrator and on the menu, click Admin Settings.
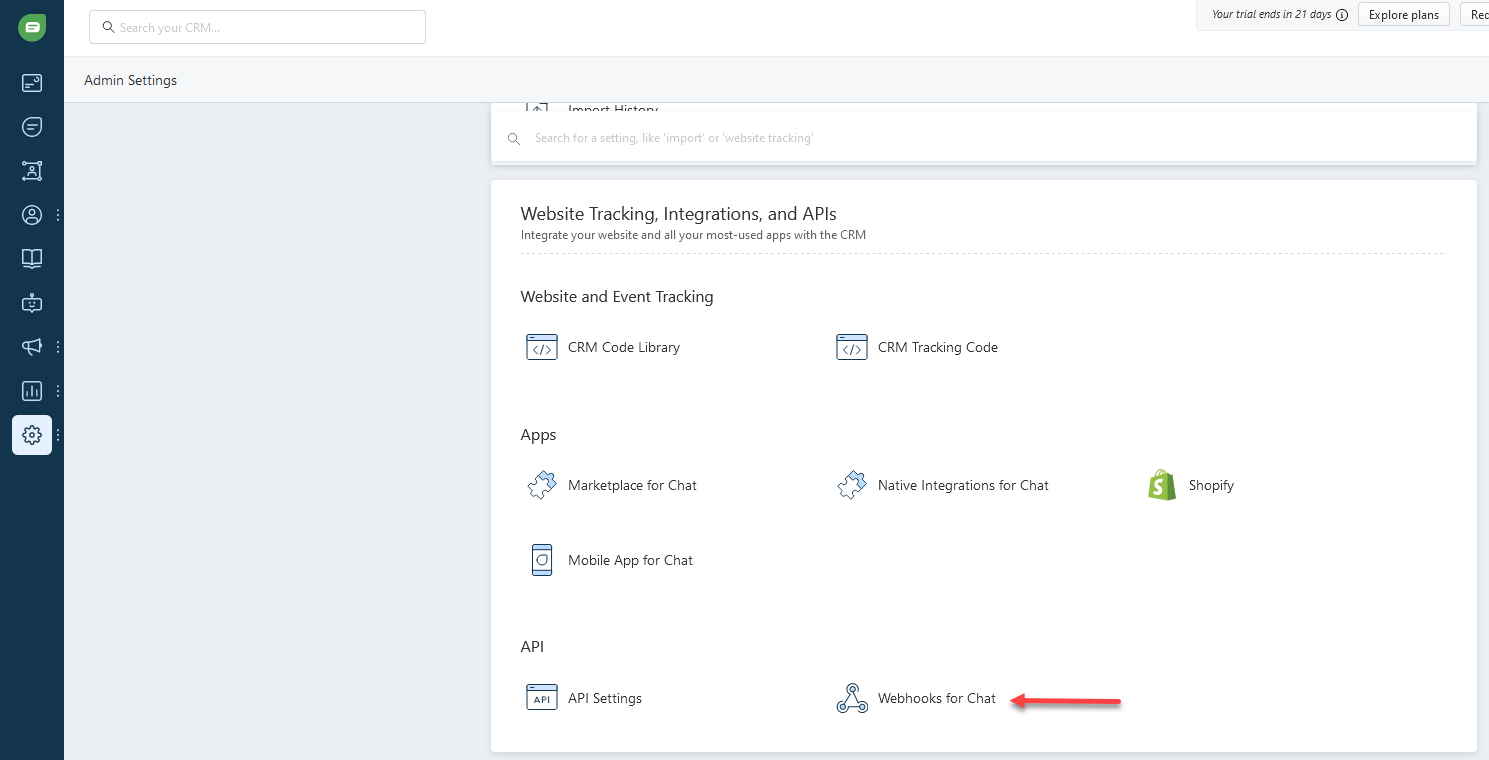
- In the Admin Settings page, scroll down to section Website Tracking, Integrations, and APIs and click on Webhook for Chat.
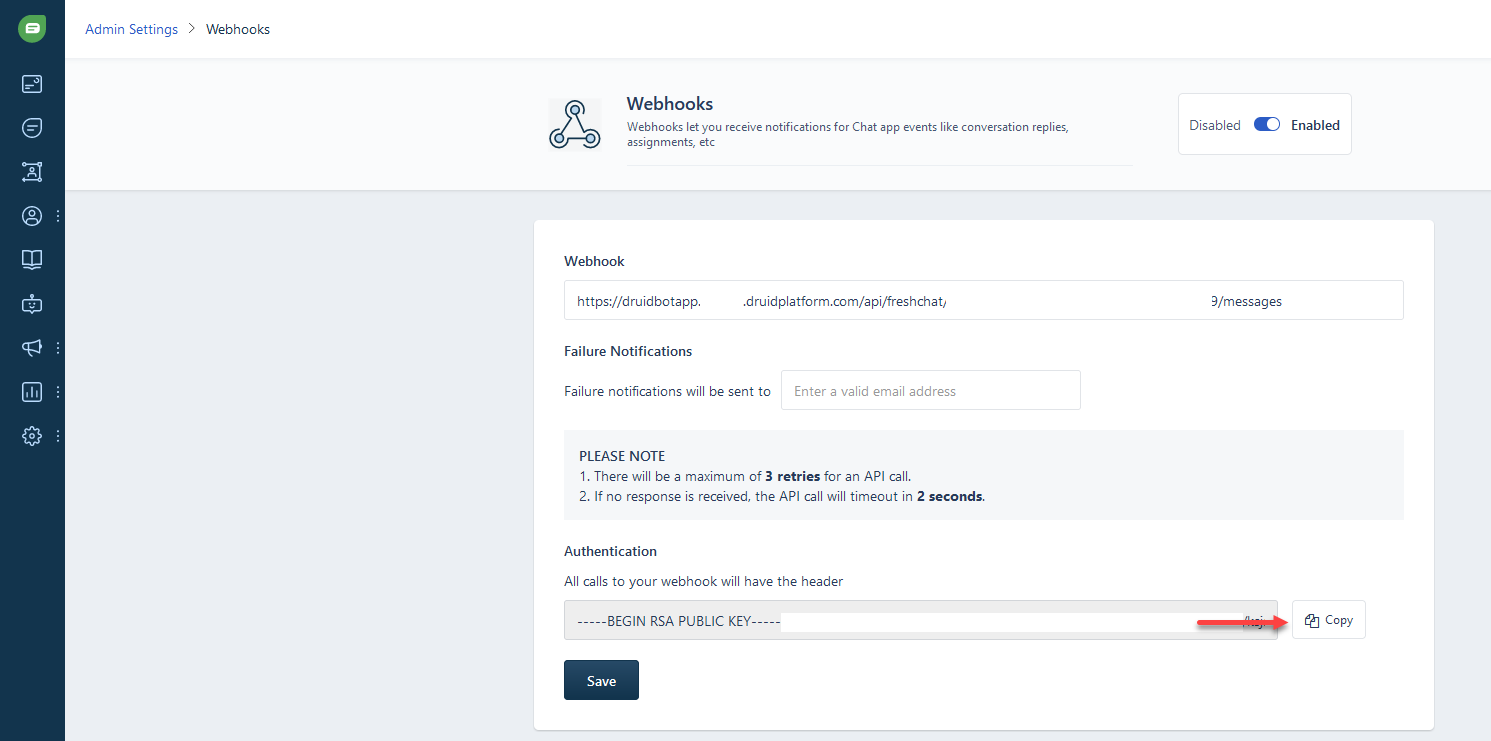
- The Webhooks are disabled by default. Tap on to enable them.
- In the Webhook field, enter the value of the Druid url (webhook) you copied from the Druid Portal.
- Click the Save button. The authentication key that will be included in the header of all calls to your webhook is automatically generated.
- Copy the authentication key as you will need it to configure your AI Agent.
You can now configure your DRUID AI Agent.
Step 3. Configure the DRUID AI Agent
In the Druid Portal, go to the AI Agent settings, click the LiveChat section header and follow the instructions provided in subsequent section.
3.1. Configure the connection strings
In the Webhook key field, enter the authentication key you copied from Freshchat, Webhooks section.
In the API Key field, enter the Account API key you copied from Freshchat, API Settings section.
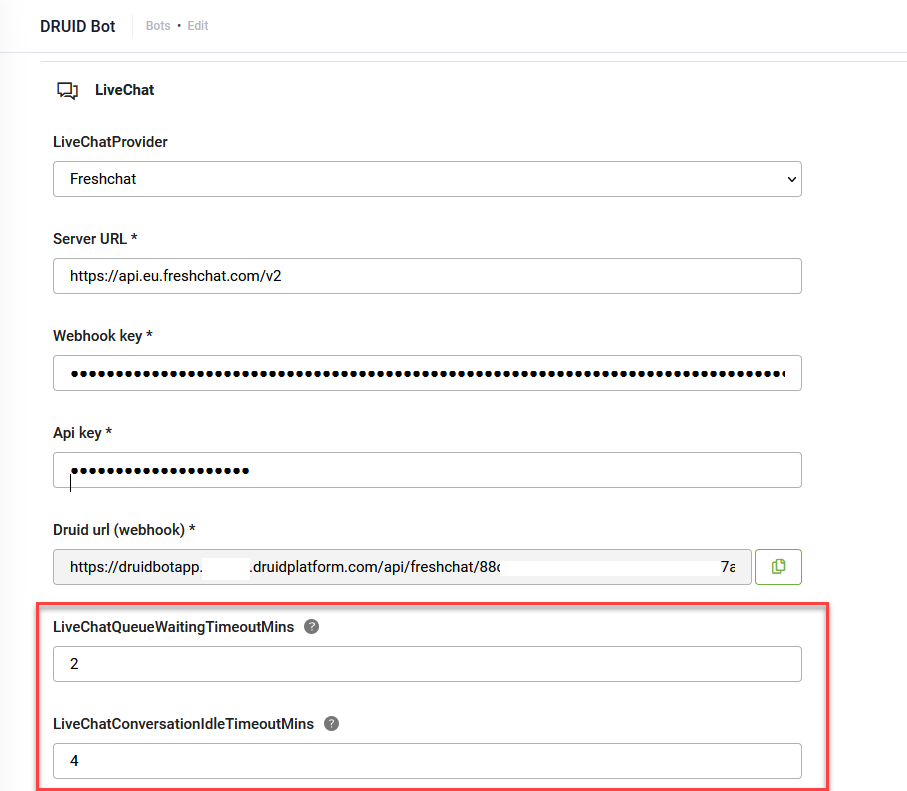
3.2. Set Timeouts
If similar configurations in Freshchat application are intended to be used, then set the DRUID Live Chat timeouts to values higher than those in Freshchat.
Make sure that the two timeout
| Field | Description |
|---|---|
| Live Chat Queue Waiting Timeout Mins | The amount of time in minutes that a client could wait until an agent accepts the incoming live chat request. When the timeout is reached, the client goes back in the AI Agent-client conversation. |
| Live Chat Conversation Idle Timeout Mins | The amount of time in minutes after which an engaged live chat conversation is automatically closed due to chat idleness (if both agent and client don’t send any message in their live chat session). |
3.3. Set Special Flows
| Special Flow | Description |
|---|---|
| LiveChatClientDisconnectedFlowId | DRUID triggers this flow in the client’s conversation, after a live chat conversation ends. You can use it to capture client’s feedback about the live chat experience. This special flow is optional. |
| LiveChatAgentDisconnectedFlowId | DRUID triggers this flow in the client’s conversation when t he live chat session is ended by the agent (the agent disconnects). You can use it to capture the agent’s closing resolution. |
| LiveChatClientWaitingInQueueFlowId |
DRUID triggers this flow in the client’s conversation every minute while the client is in the waiting queue. Use it to show the client’s position in the queue and estimated waiting time. As long as the client responds to any questions prompted from this flow, the client remains in the waiting queue (and the waiting queue timeout will be overridden), unless the flow configuration will take the client off the waiting queue, using the TakeClientOffTheQueue internal action |
| LiveChatClientConnectedFlowId | DRUID triggers this flow when an agent connects with the client. |
3.4. Set Special Messages
You can set up specific responses triggered by special Live Chat special flows and events in which a AI Agent might reach out. You can either set the list of responses via the AI Agent Designer or set the flows to provide customized responses via the Flow Designer.
The table below provides you with the list of Live Chat messages you can customize for Freshchat integration:
| Special Message | Description |
|---|---|
| ConnectedToHelpdeskAgent | The default message sent to the client when an agent picks up the live conversation with the client. Use placeholder {0} to show the name of the agent, as send by the Freshchat platform. |
| ConversationIdleWarningMessage | The default message sent to the client when the live chat conversation becomes idle. The time when this special message is triggered is half of the time set in LiveChatConversationIdleTimeoutMins. |
| LiveChatAgentDisconnectedFromPool | The default message sent to the agent after signing out Live Chat (who is being taken out from the available agents’ queue). |
| LiveChatAgentDisconnectedSelfConfirmation | The default message sent to the client when either the client or the agent disconnects from live chat. |
| LiveChatAgentError | The default message sent to the client when an error occurs that does not end the live chat. Use the {0} placeholder to show the error message sent by Freshchat platform. |
| LiveChatAgentLeft | The default message sent to the client when one of the agents engaged in the live session leaves the conversation (when multiple agents are present in on live chat engagement). |
| LiveChatAgentLeftInformation | The default message sent to the client when the (last remaining) agent disconnects from live chat. |
| LiveChatClientDisconnectedSelfConfirmation | The default message sent to the client when either the client or the agent disconnects from live chat; if not likewise set on the special flow LiveChatClientDisconnectedFlowId. |
| LiveChatExpectedWaitTimeInQueue | The default message sent to the client whenever in the waiting queue (on the Freshchat platform side). You can change the message to best suite your AI Agent profile. Use the placeholders {0} and {1} to display the position in queue, respectively the waiting time. |
| LiveChatNewLeadAgent | The default message sent to the client whenever a new agent becomes lead agent. Use placeholder {0} to show the name of the agent, as send by the Freshchat platform. |
| LiveChatQueueWaitingTimeout | The default message sent to clients when the LiveChatQueueWaitingTimeoutMins is reached, if not likewise set on the live-chat-waiting-message-in-the-queue flow. |
| LiveChatWaitForAvailableAgent | The default message sent to clients when in the waiting queue, if not likewise set on the flow. |
Save the AI Agent.
Step 4. Configure the Freshchat Integration solution
The Freshchat Integration solution template provides you with a flow that gets the channels (topics) from Freshchat and provides the user with the possibility to choose a preferred channel, than the AI Agent will try placing the call under the selected channel (topic). If you want the AI Agent to route the call to a specific chat group or agent, you can adjust the flow and use the integrations already defined in the solution template to get the list of groups assigned to a topic or the list of agents within a chat group.
To authenticate the requests DRUID sends to Freshchat to get the channels, chat groups and agents, you need to configure your authentication details.
- In Freshchat, on the menu, click Admin Settings.
- In the Admin Settings page, scroll down to section Website Tracking, Integrations, and APIs and click on API Settings. You will be prompted to confirm that you are not a bot.
- Confirm that you are not a bot to view your Chat - API authentication details by checking the check box and passing the verification.
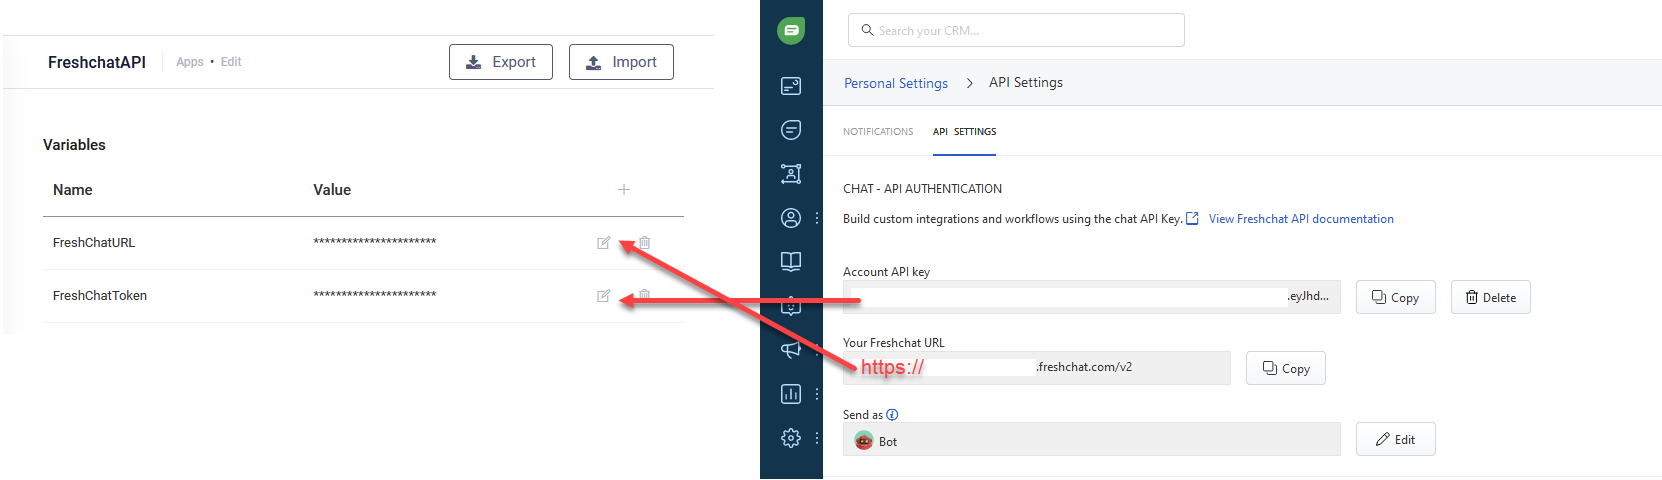
- Copy the Account API key and Your Freshchat URL and save the values as you will need them in DRUID.
- In the Druid Portal, select the Freshchat Integration solution.
- On the main menu, click Apps, then click on FreshchatAPI. In the FreshchatAPI app configuration page, scroll-down to the Variables table.
- Edit the values of the two variables as follows:
- FreshChatURL - Enter the Freshchat URL you copied from Freshchat adding "https://": https://<Your Freschat URL>.
- FreshChatToken - The Account API key you copied from Freshchat environment.
Send the conversation transcript to Freshchat Agents
Most contact centers want their helpdesk agents to get the transcript of the conversation the client had with the AI Agent prior to being engaged in a live chat session.
In order to save the conversation transcript and make it available for Freshchat agents, on the flow that connects the client with the agent, make the following settings:
- On the step where you call the internal action ConnectToHelpdeskAgent(Post Actions section), in the Pre Actions section, call the internal action GetConversationTranscript.
- On the ConnectToHelpdeskAgent internal action add the following:
- Save the step.
{
  "SendConversationTranscript": true
}![]()
Send Contact Center Parameters
The table below lists the Contact Center Parameters authors can send to Freshchat.
| Parameter | Data Type | Description |
|---|---|---|
| channelId | String |
The channelId of the topic under which the call will be placed. The call will be automatically assigned to the group associated with that topic. NOTE: This parameter is mandatory.
|
| groupId | GUID | The ID of the of the group, auto-generated when a group is configured in the Freshchat system. |
| agentId | String | The ID of the Freshchat agent to be assigned the call. |
| freshchatUserId | String | The Freshchat ID of the client. |
| lastName | String |
The last name of the client. NOTE: This parameter is mandatory.
|
| firstName | String |
The first name of the client. NOTE: This parameter is mandatory.
|
| userPhone | String |
The phone number of the client. |
| emailAddress | String |
The email address of the client. NOTE: This parameter is mandatory.
|
How to send Freshchat parameters
On the ConnectToHelpdeskAgent internal action, provide the desired parameters inside the ContactCenterParameters object in JSON format.
{
    "SendConversationTranscript": true,
    "ContactCenterParameters": {
        "channelId": "[[FreshChatChannel]].Id",
        "groupId": null,
        "agentId": null,
        "freshchatUserId": null,
        "lastName": "[[ChatUser]].LastName",
        "firstName": "[[ChatUser]].FirstName",
        "userPhone": null,
        "userEmail": "[[ChatUser]].Email"
    }
}
Freshchat Troubleshooting
DRUID Freshchat integration enables AI Agents to place clients in the Freshchat waiting queue. As there might be situations when DRUID fails placing the client in an Freshchat waiting queue or an error occurs during an ongoing conversation, you might want to show friendly messages to the user and easily troubleshoot and handle such cases.
This section provides information on how to handle DRUID and Freshchat errors.
Friendly handling errors when connecting clients to Freshchat waiting queues
When issues occur while placing a client in the Freshchat queue, DRUID offers you a mechanism to handle errors directly in the connect client to helpdesk agent flow, either by displaying a friendly error message or by trying to reconnect.
On your flow that places clients in the Freshchat waiting queue, you can add two child steps to the step that calls the internal action ConnectToHelpdeskAgent, as follows:
- A step for cases when the client is successfully placed in the Freshchat waiting queue. Show a message to inform the clients that they've been successfully placed in the waiting queue.
- To avoid interrupting the flow in case connection errors occur between DRUID and Freshchat , add a step with the following condition:
@InternalActionResult==false.toString(). This internal action verifies if the client was successfully placed in the Freshchat waiting queue.
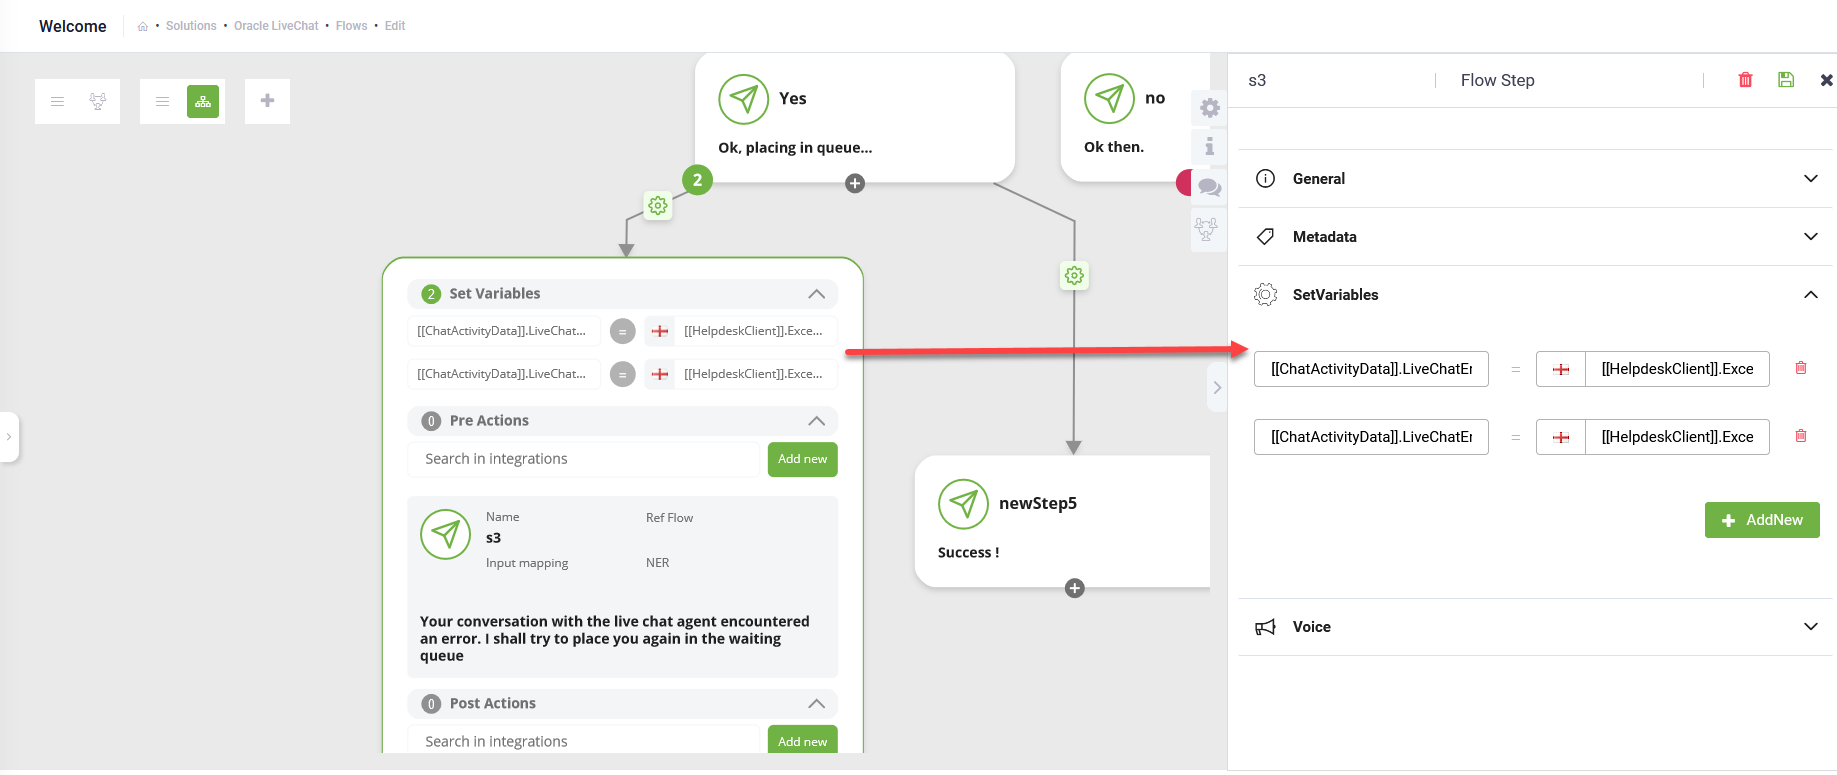
For troubleshooting purposes, you might want to register the error details provided by Freshchat when placing the client in the Freshchat waiting queue fails. As the error message and the error code exist in the conversation context, you can save [[HelpdeskClient]].ExceptionMessage and [[HelpdeskClient]].ExceptionCode in the ChatActivityData entity. To do so, in the SetVariables section, add the following two variables:
- [[ChatActivityData]].LiveChatErrorMessage -> [[HelpdeskClient]].ExceptionMessage
- [[ChatActivityData]].LiveChatErrorCode -> [[HelpdeskClient]].ExceptionCode
You can see these errors in ChatActivity History.