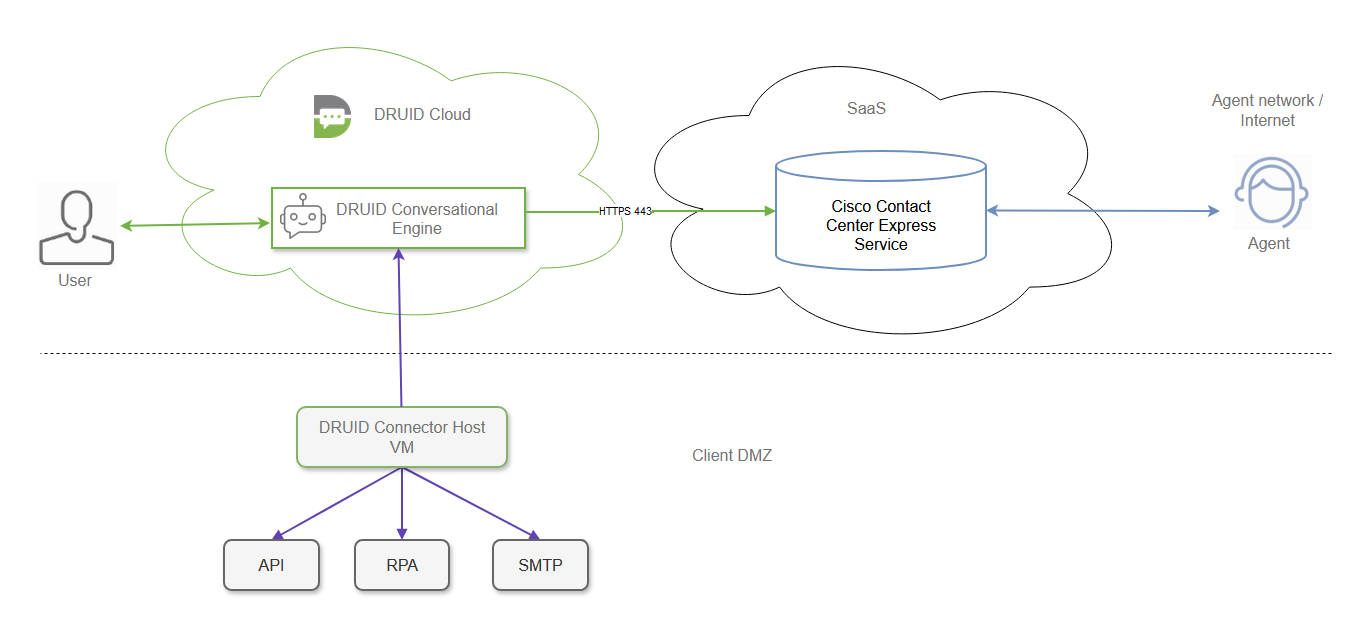
Cisco Contact Center Express Live Chat Integration
You can integrate AI Agents with Cisco Contact Center Express functionality, for cases when chat clients need to be transferred to helpdesk agents who use the Cisco Contact Center Express instead of the DRUID built-in live agent.
This section provides information on how to integrate AI Agents with Cisco Contact Center Express. It does not cover Live Chat specific configuration within the conversational flow design.
If you’re using DRUID on premise deployment, the Cisco Contact Center Express integration is scalable for high loads.
For technical details about the integration solution between DRUID and Cisco Contact Center Express, see the specific Cisco documentation.
How the integration works
- The users chat with the AI Agent.
- If the AI Agent determines that the user wants to talk to a human, it transfers the chat session to Cisco CCX.
- The Cisco Customer Collaboration Platform (CCP) routes the user request to the correct queue based on chat rules.
- An Unified CCX agent who is monitoring the queue accepts the live chat request and provides support to the user. The agents are not using DRUID native live agent.
- When the live chat session ends, the chat session returns to the AI Agent.
Prerequisites
- You should have installed and set up Cisco Unified Contact Center Express.
- You should enable a digital channel for DRUID in your contact center solution following the flow described in Cisco documentation.
-
Cisco Customer Collaboration Platform (CCP) which is previously known as SocialMiner, acts as Chat Proxy responsible for routing chat requests from DRUID to the Unified CCX. To configure your AI Agent you need to know the IP of the server where the CCP was installed.
-
White list the IP of the DRUID.CCI component that is responsible for DRUID Contact Center integrations. To get the IP of this component, which is unique per DRUID environment, get in touch with DRUID Support.
Configuring the AI Agent
In the Druid Portal, go to the AI Agent settings and click the Live Chat section header. The section expands. From the Live Chat Provider field, select Cisco, then configure the AI Agent for Cisco CCX integration, following the steps:
Step 1. Configure the Connection strings to your Cisco CCX digital channel
To configure the connection strings to your Cisco CCX digital channel, select fill in the fields provided in the table below:
| Field | Description |
|---|---|
| Server URL |
The URL of the Cisco Chat REST API. https://<Server IP>:<Port>/ccp/rest/chat The ServerIP is the IP of the server where the CCP was installed and the port it uses for bidirectional traffic. You might want to check Cisco documentation to learn about the SocialMiner port utilization. |
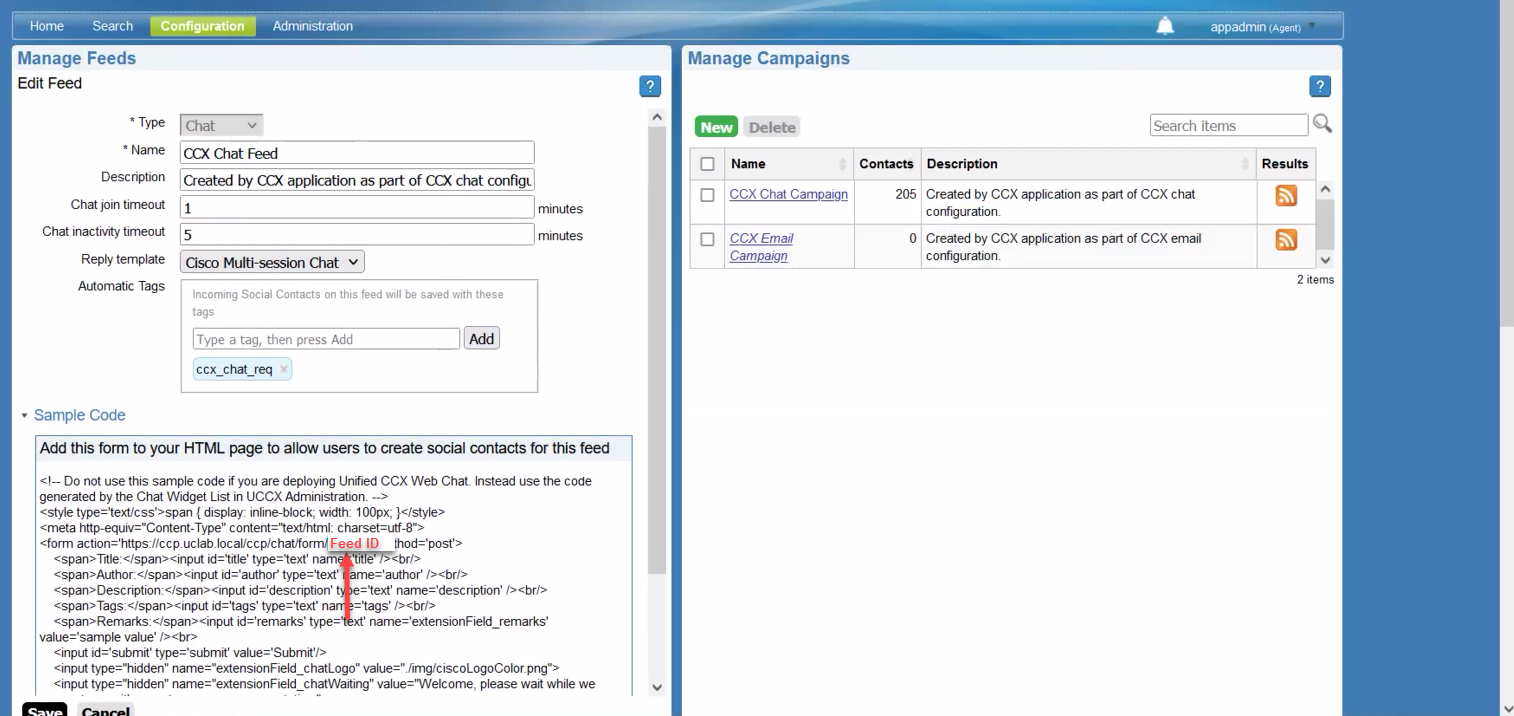
| Initialization URL |
The reference URL of the chat feed configured to process chat requests. https://<Server IP>:<Port>/ccp/rest/chat/<feedid>. The ServerIP is the IP of the server where the CCP was installed and the port it uses for bidirectional traffic. You might want to check Cisco documentation to learn about the SocialMiner port utilization. The feed ID is automatically generated when you install CCP. To get the feed ID, log into the Cisco Customer Collaboration Platform and on the menu click Configuration. From the Sample Code field, copy the ID as shown in the figure below.
|
| Disable SSL certificate validation | By default, DRUID tries to validate the SSL certificate installed on the Cisco Chat Proxy. If the SSL certificate was not issued by a recognized Certificate Authority, select to Disable SSL certificate validation; otherwise, the certificate validation will fail. |
| Pooling interval in milliseconds |
The amount of time in seconds DRUID waits between attempts to read agent's messages from Cisco CCX. To streamline the chat user experience, enter a value between 1000 ms and 5000 seconds. |
Step 2. Set Timeouts
If similar configurations in Cisco CCX are intended to be used, then set the DRUID Live Chat timeouts to values higher than those in Cisco CCX.
| Field | Description |
|---|---|
| Live chat queue waiting timeout mins | The amount of time in minutes that a client could wait until an agent accepts the incoming live chat request. When the timeout is reached, the client goes back in the AI Agent-client conversation. |
| Live chat conversation idle timeout mins | The amount of time in minutes after which an engaged live chat conversation is automatically closed due to chat idleness (if both agent and client don’t send any message in their live chat session). |
Step 3. Set Special Flows
| Special Flow | Description |
|---|---|
| Live chat client disconnected flow | DRUID triggers this flow in the client’s conversation, after a live chat conversation ends. You can use it to capture client’s feedback about the live chat experience. This special flow is optional. |
| Live chat agent disconnected flow | DRUID triggers this flow in the agent’s conversation, after a live chat conversation ends. You can use it to capture the agent’s closing resolution. This special flow is optional. |
| Live chat client waiting in queue flow |
DRUID triggers this flow in the client’s conversation every minute while the client is in the waiting queue. Use it to show the client’s position in the queue and estimated waiting time. As long as the client responds to any questions prompted from this flow, the client remains in the waiting queue (and the waiting queue timeout will be overridden), unless the flow configuration will take the client off the waiting queue, using the TakeClientOffTheQueue internal action IMPORTANT! The Cisco CCX sends periodic waiting queue status information towards the client; therefore, we recommend you not to set up this special flow, as the client will receive messages from both platforms, Cisco CCX and DRUID.
|
| Live chat client connected flow | DRUID triggers this flow when an agent connects with the client. |
Step 4. Set Special Messages
You can set up specific responses triggered by special Live Chat special flows and events in which a AI Agent might reach out. You can either set the list of responses via the AI Agent Designer or set the flows to provide customized responses via the Flow Designer.
The table below provides you with the list of Live Chat messages you can customize for Cisco CCX integration:
| Special Message | Description |
|---|---|
| ConnectedToHelpdeskAgent | The default message sent to the client when an agent picks up the live conversation with the client. Use placeholder {0} to show the name of the agent, as send by the Cisco CCX. |
| ConversationIdleWarningMessage | The default message sent to the client when the live chat conversation becomes idle. The time when this special message is triggered is half of the time set in LiveChatConversationIdleTimeoutMins. |
| LiveChatAgentDisconnectedFromPool | The default message sent to the agent after signing out Live Chat (who is being taken out from the available agents’ queue). |
| LiveChatAgentDisconnectedSelfConfirmation | The default message sent to the client when either the client or the agent disconnects from live chat. |
| LiveChatAgentError | The default message sent to the client when an error occurs that does not end the live chat. Use the {0} placeholder to show the error message sent by the Cisco CCX. |
| LiveChatAgentLeft | The default message sent to the client when one of the agents engaged in the live session leaves the conversation (when multiple agents are present in on live chat engagement). |
| LiveChatAgentLeftInformation | The default message sent to the client when the (last remaining) agent disconnects from live chat. |
| LiveChatClientDisconnectedSelfConfirmation | The default message sent to the client when either the client or the agent disconnects from live chat; if not likewise set on the special flow LiveChatClientDisconnectedFlowId. |
| LiveChatExpectedWaitTimeInQueue | The default message sent to the client whenever in the waiting queue (on the Cisco CCX side). You can change the message to best suite your AI Agent profile. Use the placeholders {0} and {1} to display the position in queue, respectively the waiting time. |
| LiveChatNewLeadAgent | The default message sent to the client whenever a new agent becomes lead agent. Use placeholder {0} to show the name of the agent, as send by the Cisco CCX. |
| LiveChatQueueWaitingTimeout | The default message sent to clients when the LiveChatQueueWaitingTimeoutMins is reached, if not likewise set on the live-chat-waiting-message-in-the-queue flow. |
| LiveChatWaitForAvailableAgent | The default message sent to clients when in the waiting queue, if not likewise set on the flow. |
Step 5. Save the AI Agent
Sending the conversation transcript to Cisco Live Chat Agents
To ensure agents receive the conversation transcript from the AI Agent before engaging in live chat, follow these steps:
- On the step where you call the ConnectToHelpdeskAgent internal action, in the Pre Actions section, call the GetConversationTranscript internal action.
- On the ConnectToHelpdeskAgent internal action, add the following:
- Save the step.
{
  "SendConversationTranscript": true
}Sending Contact Center Parameters
You can send the following Contact Center parameters to Cisco Live Chat:
|
Parameter |
Data Type |
Description |
Required/Optional |
|---|---|---|---|
| Title | string | The name of the contact. |
Required |
| Author | string | The author of the contact. |
Required |
| ExtensionFields | array | An array of CCX custom fields. They should match the they match the names in Cisco CCX. |
Optional |
| FeedRefUrl | string |
Create a feed to be stored in the database. Enter the feed URL adding at the end the feed ID: https://<Customer Collaboration Platform_Hostname_or_Ip>/ccp-webapp/ccp/feed/<feed id> For more information on how to get the feed ID, see Cisco CCX documentation, section Use the Sample Code to Create a Customer Callback Request. |
Optional |
How to send Contact Center parameters
On the ConnectToHelpdeskAgent internal action, provide the desired parameters inside the ContactCenterParameters object in JSON format.
Example - Send Contact Center parameters
{
    "SendConversationTranscript": true,
    "ContactCenterParameters": {
        "ExtensionFields": [
            {
                "Name": "Name",
                "Value": "John"
            },
            {
                "Name": "CNP",
                "Value": "1234567891234"
            }
        ],
        "Author": "John",
        "Title": "Update account details",
        "FeedRefUrl": ""
    }
}