Website Data Sources
Website data sources, classified as unstructured data sources, are a type of data collection mechanism within DRUID that specifically target information extracted from websites. They capture unorganized or semi-structured data from web pages, providing a means to integrate online content into the Knowledge Base.
By default, the extractor excludes content from a standard set of HTML elements (such as headers or footers) to ensure data quality. You can customize this behavior and manage how web content is processed by navigating to Knowledge Base Settings > Advanced > HTML Settings. For more information, see HTML Settings.
Adding website data sources
To add a website data source, follow these steps:
Step 1: Create the data source
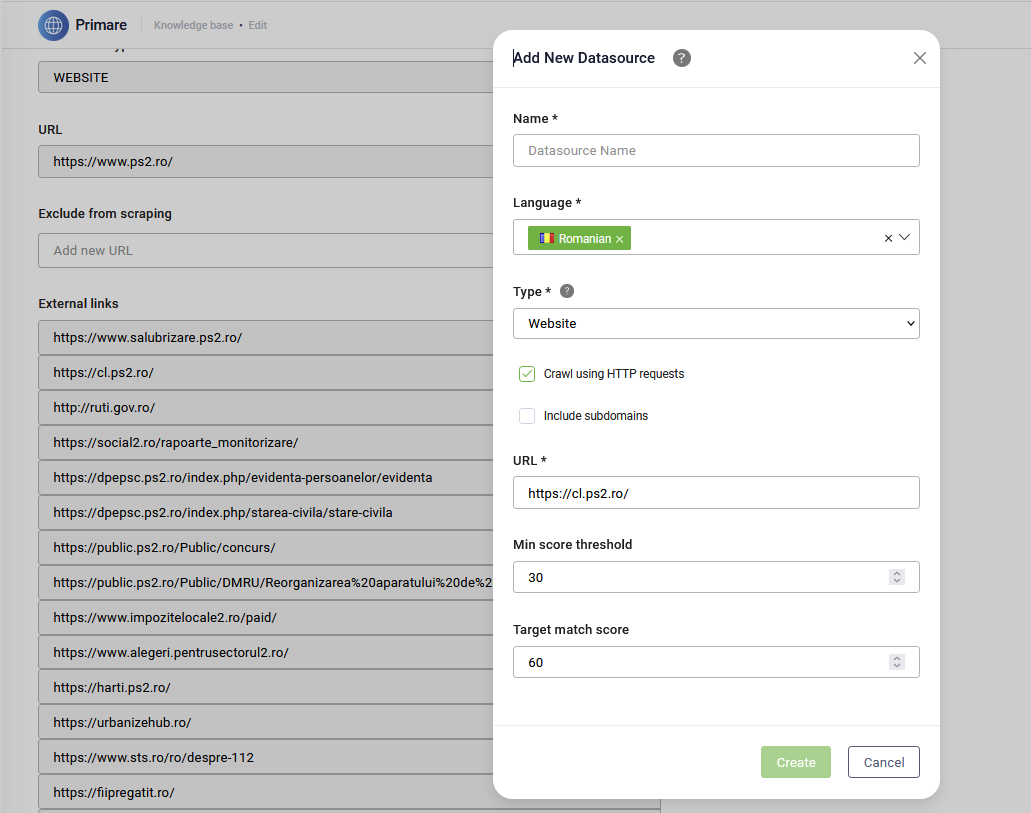
- In the top right corner of the page, click Add new. The Add New Datasource modal opens.
- In the Name field, enter a clear, descriptive name for the data source so you can easily identify it later.
- From the Language dropdown, select the language of the data you’re uploading. The language must match one of the AI Agent languages.
- From the Type dropdown, select Website.
- Leave the Crawl using HTTP requests option selected if you want DRUID to retrieve data directly from your servers using HTTP requests. This method works best for websites that don’t rely on JavaScript to display content.
-
To crawl a password-protected website, disable the Crawl using HTTP requests option, then provide your credentials and authentication page URL (Login url) in the designated fields. Alternatively, you can enter this information later in the data source Details tab.
- Select Include subdomains if you want the Knowledge Base Engine to also retrieve data from subdomains of the provided URL.
- In the URL field, enter the website URL starting with https://. E.g. https://druidai.com.
- Optionally, set the Min score threshold and the Target match score for the data source. If you don’t specify these values, the thresholds defined at the Knowledge Base level apply.
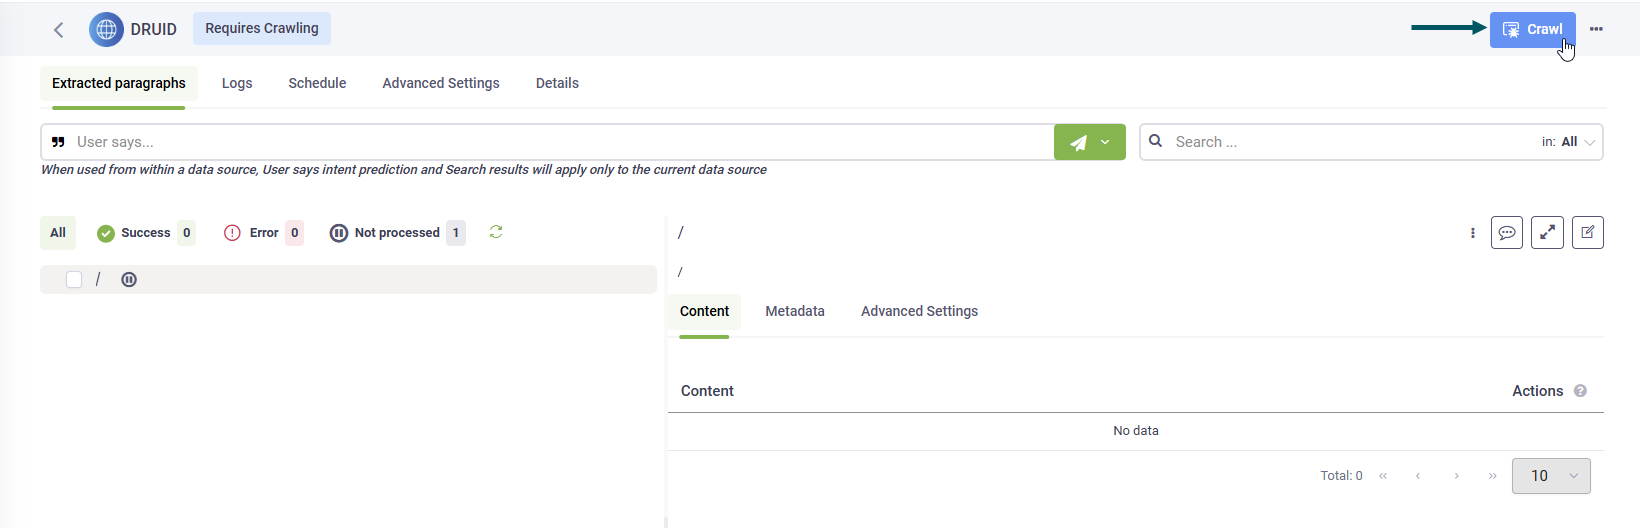
- Click Create to save the data source. The website data is added to the Knowledge Base and the data source page displays by default on the Extracted paragraphs tab. There are no text articles yet because the data source requires crawling.
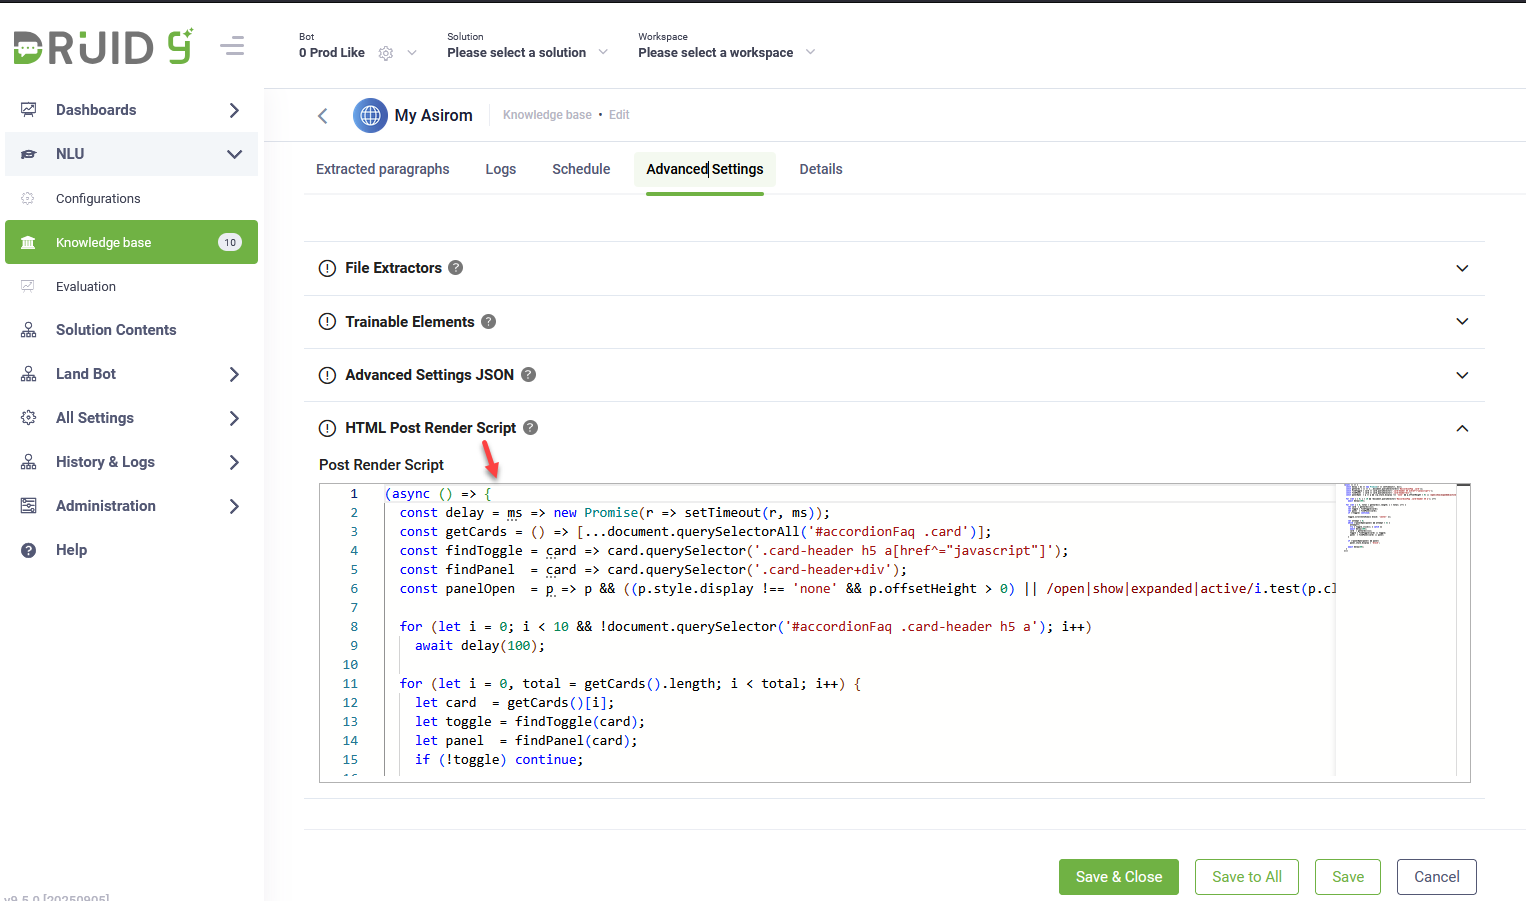
Step 2. Provide content rendering script (only for websites with dynamically rendered content)
If your website data source contains content that is rendered dynamically (for example, content displayed only after JavaScript execution such as drop-downs, tabs, or accordions), you can use a Playwright script to ensure all content is available for scraping.
To configure this:
- Go to the website data source.
- Click the Advanced Settings tab.
- In the HTML Post Render Script field, enter Playwright-compatible JavaScript to manipulate the DOM and fully render dynamically loaded content. This can include expanding collapsible elements, loading content via API calls, or simulating user interactions. The script runs after the page loads, ensuring all content is visible before DRUID scrapes the page.
- Save the data source settings.
Step 3. Crawl the website data source
User-agent: Elastic-Crawler
Allow:
Sitemap: <your website or web page goes here - e.g., https://www.druidai.com>

User-agent: druidai-kb
Allow:
Sitemap: <your website or web page goes here>
To crawl the data source:
- In the top right corner of the page, click Crawl.
- In the Start Crawling Parameters modal, define the crawling parameters described in the table below.
- 0 – Only the content of the current URL is crawled.
- 1 – Includes content from links found on the current page.
- 2+ – Continues following links from each subsequent page, up to the specified depth.
- Click Start.
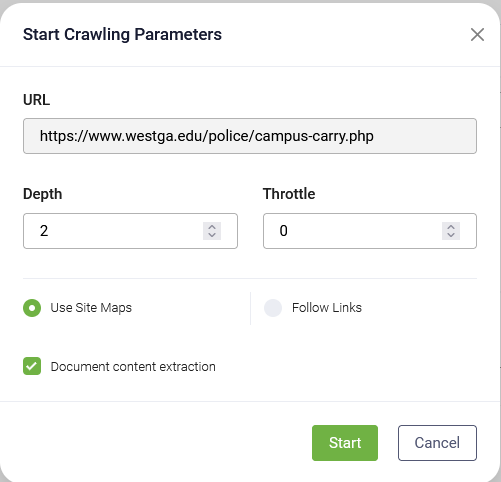
| Parameter | Description |
|---|---|
| Depth |
Controls how far the system follows links from a page: |
| Throttle | The crawling speed, that is, the minimum number of seconds to wait between 2 consecutive crawling requests. |
| Use site maps | Select if you want the crawler to use the site map. If the website you entered does not have a site map, do not select this option. |
| Follow links | Select if you want the crawler to visit all the hyperlinks in the retrieved web pages identified on the specified URL. |
| Document content extraction |
Enable this option if you want the crawler to detect non-password-protected document assets available on the website. The crawler will identify only documents that match the file types supported by the KB Engine. IMPORTANT! The crawler extracts document content from files with a maximum size of 20MB. Files exceeding this limit will not be processed. This feature is available in DRUID 8.12 and higher.
|
As the crawler visits the link provided in the URL field, it will identify all the hyperlinks in the retrieved web pages and will add them to the list of URLs to visit.
After the crawling completes, you can exclude from scrapping certain hyperlinks (sub-links) on the website that you do not want DRUID to extract information from during the extraction process.
Step 4. Exclude links from scraping
Before you start the extraction process, you can choose to exclude specific links from scraping. You can do this either:
- In bulk – by specifying multiple links at once.
- Manually – by excluding individual links one by one.
Exclude links from scraping in bulk
You can exclude multiple links from scraping in a website data source at once. This bulk exclusion option saves time by eliminating the need to remove links one by one.
To exclude links in bulk:
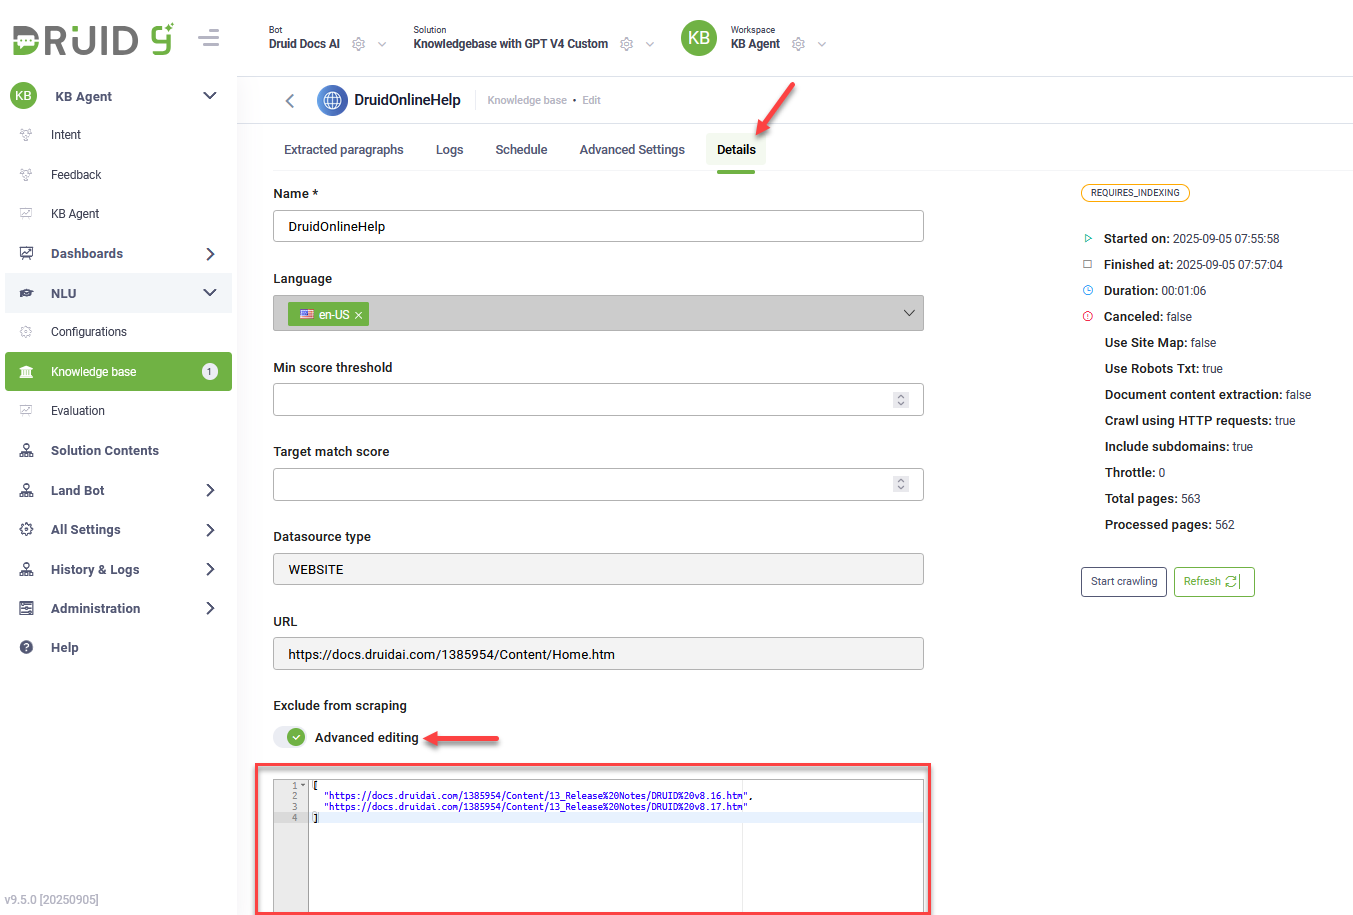
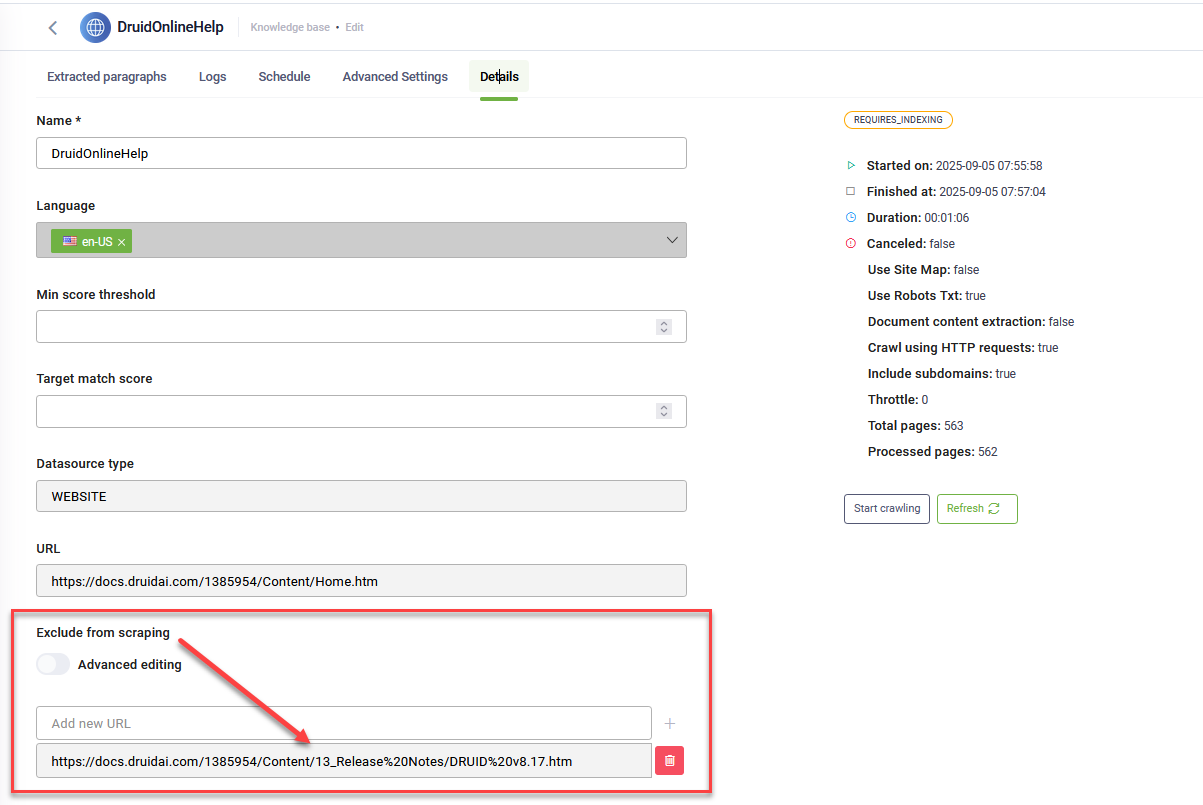
- Click the Details tab.
- In the Exclude from scraping area, turn on the Advanced editing toggle.
- Enter the links you want to exclude as a JSON array, with each link enclosed in quotation marks. Example:
["https://example.com/page1", "https://example.com/page2"] - Click Save.
Manually exclude links from scraping
To manually exclude from scraping specific hyperlinks (sub-links), in the explorer tree, click the dots next to the desired hyperlink and select Exclude. By excluding specific hyperlinks, users can ensure that only relevant content is captured and added to the Knowledge Base.
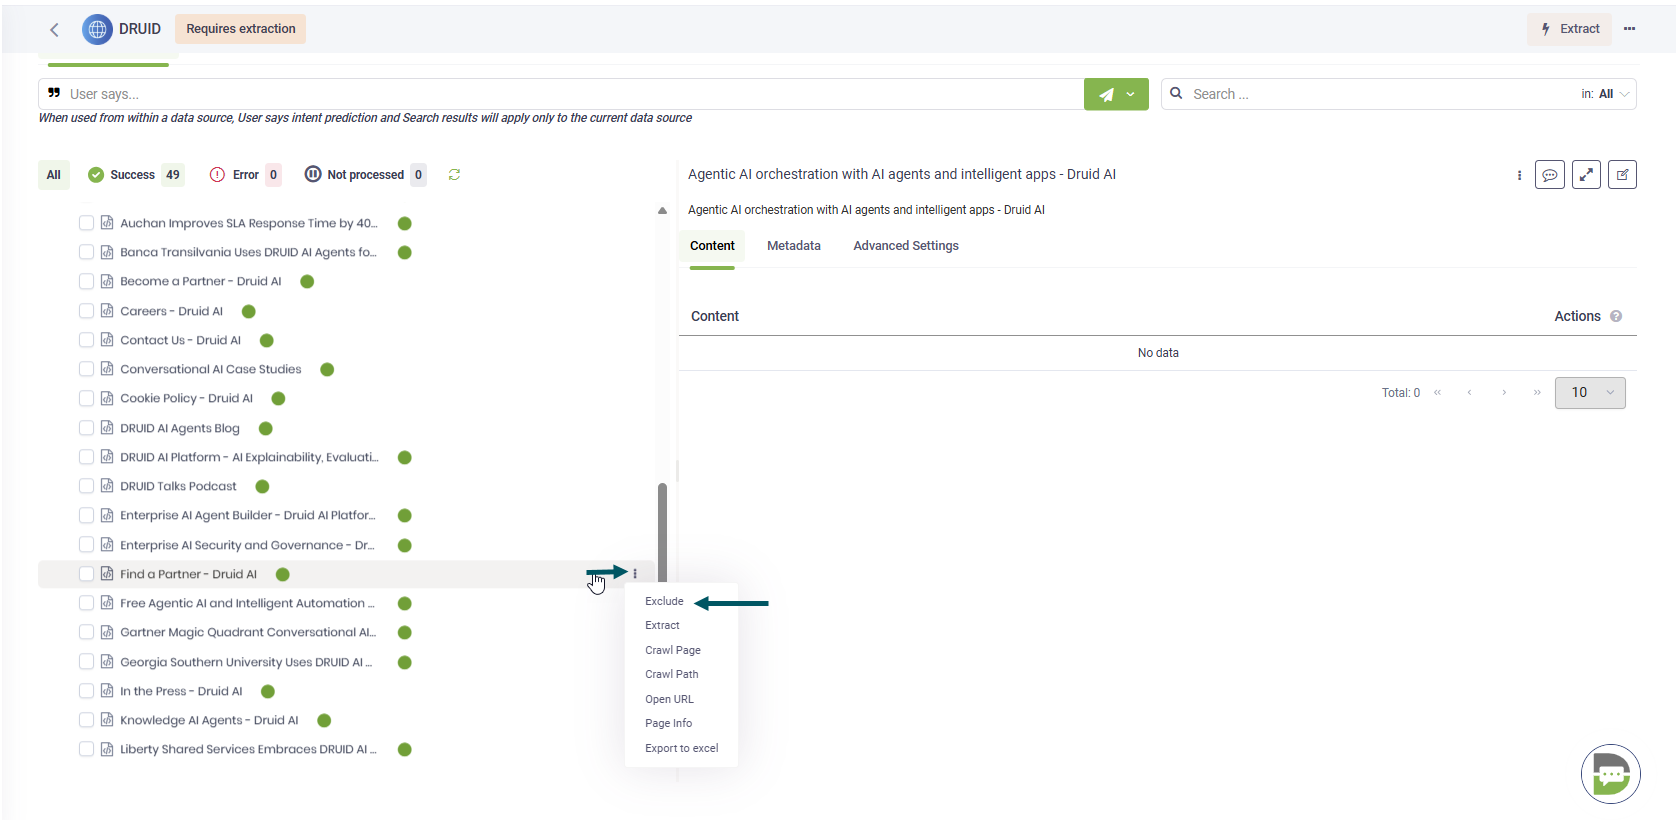
The URLs excluded from scraping appear on the Details tab, in the Exclude from scraping area.
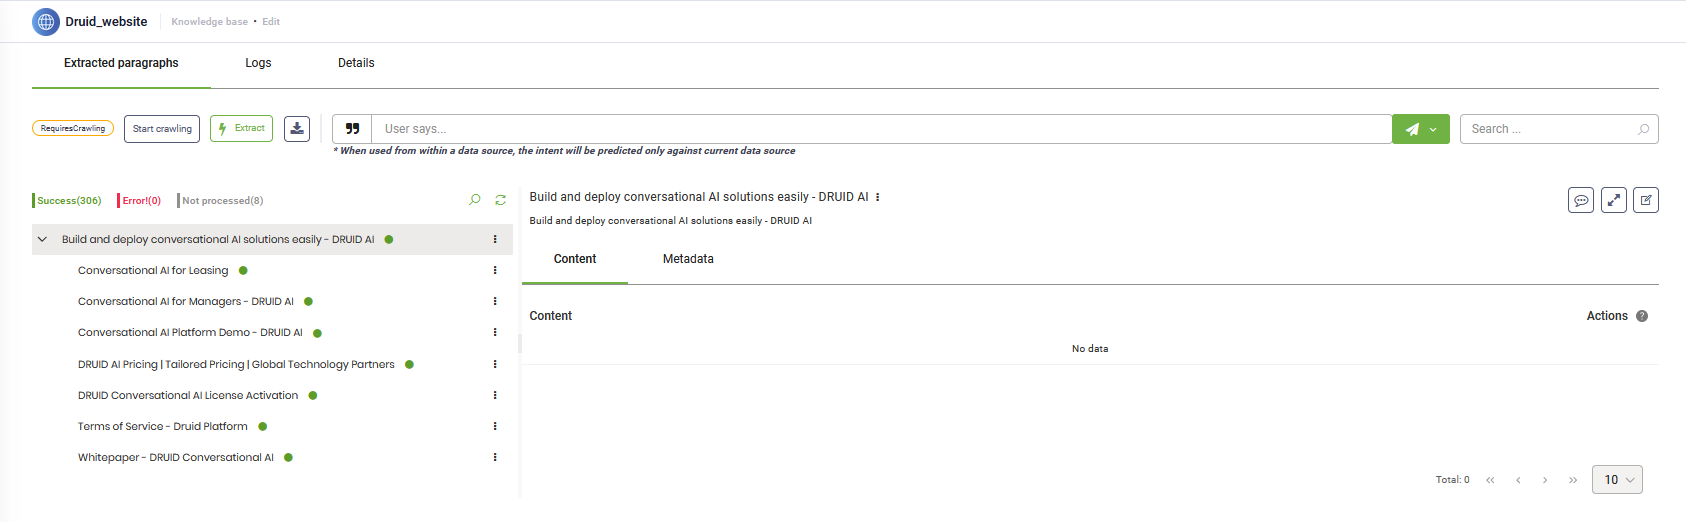
Step 5. Extract the text articles
On your website data source page, click the Extracted paragraphs tab.
In the upper-left corner of the page, click Extract.
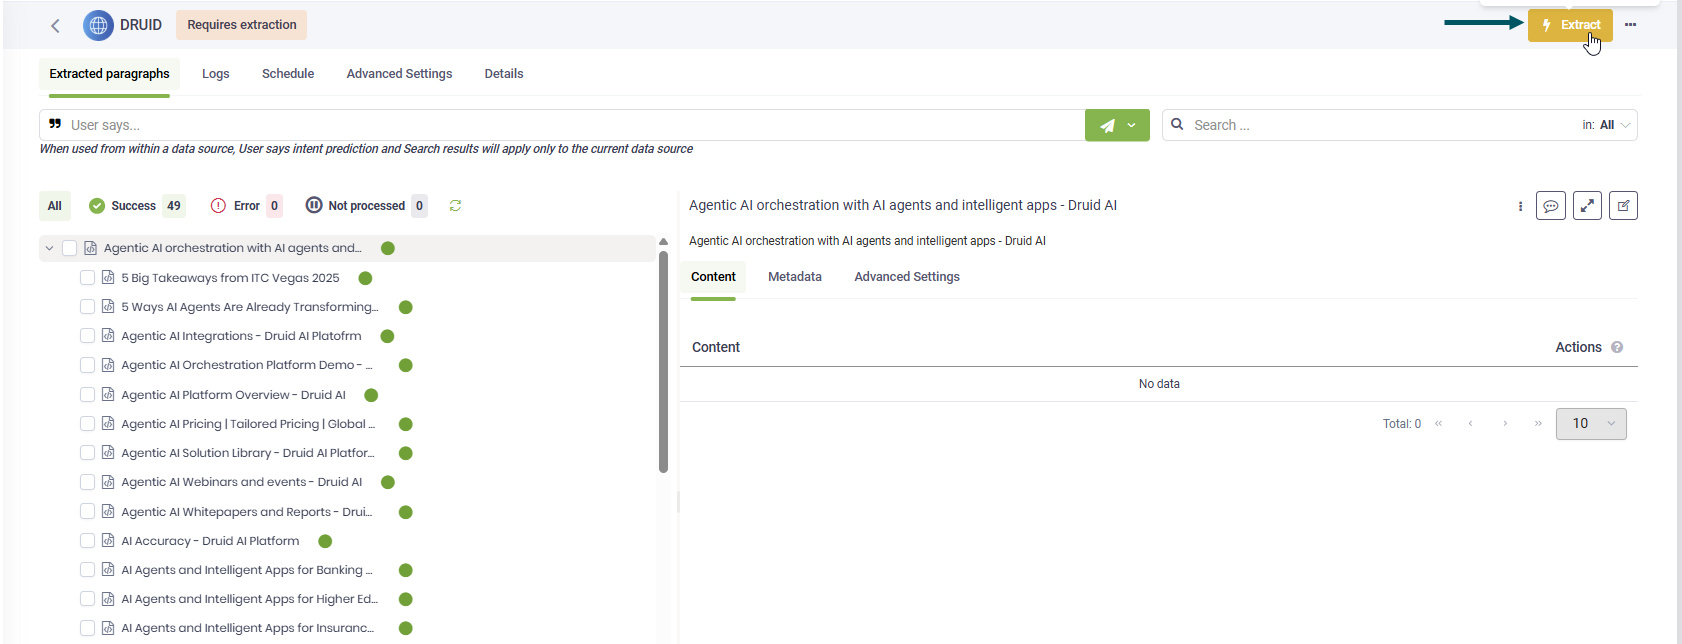
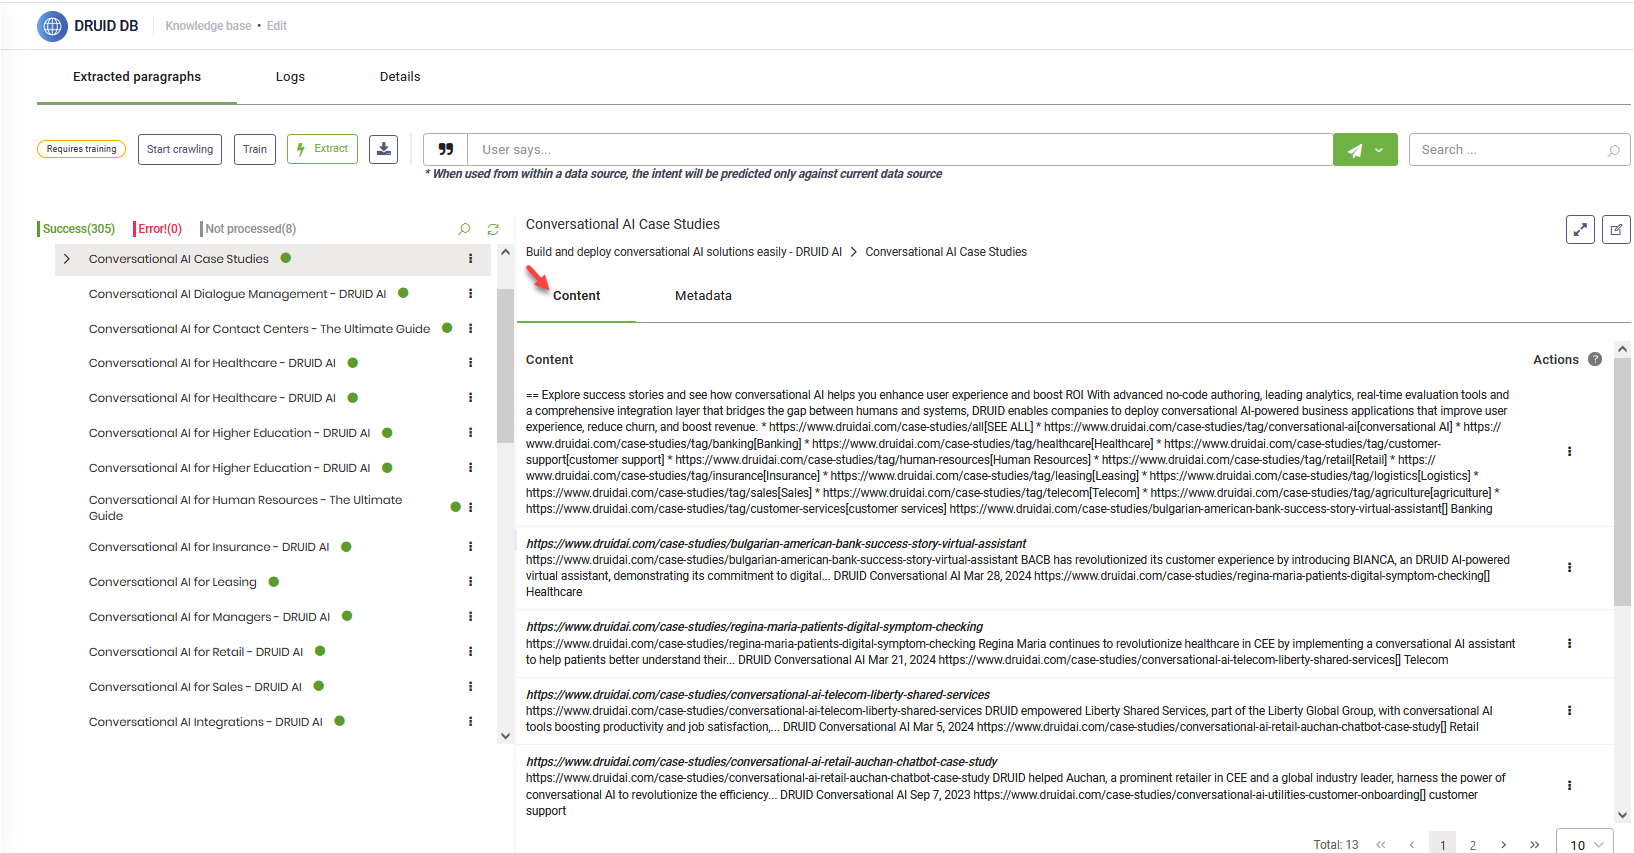
After the extraction completes, the corresponding content for each extracted paragraph is available under the Content tab.
Step 6. Train the data source
After data extraction, it's crucial to train your data source. This ensures the KB Engine provides accurate responses to user queries. In the top right corner of the page, click Train.

Crawl External Domains
By default, DRUID web crawler only crawls the domain specified in your initial website data source URL (and subdomains if selected). If your website contains links to other domains (external links), these domains will not be automatically crawled.
To include these external domains in your crawled data, you need to add them as separate website data sources.
To add a new website data source for an external domain:
- Navigate to the KB website data source you are currently working with.
- Click the Details tab.
- Scroll down to the External links section. Here you will see a list of domains linked from your primary website.
- Locate the domain for which you want to create a new data source and click the Add icon next to it.
- The Add new data source modal opens.
- Enter a descriptive Name for your new data source.
- Click Save.
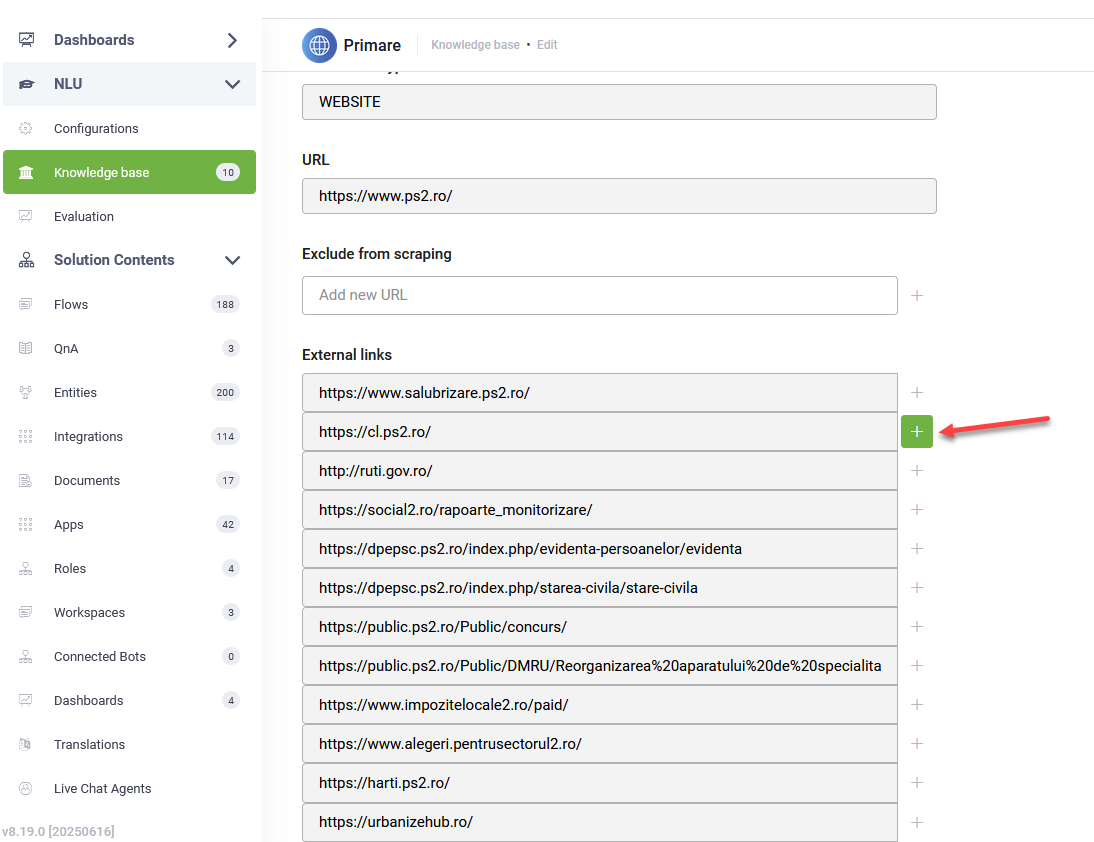
Once saved, this new data source will be created, and you can then initiate the crawling process for it independently.
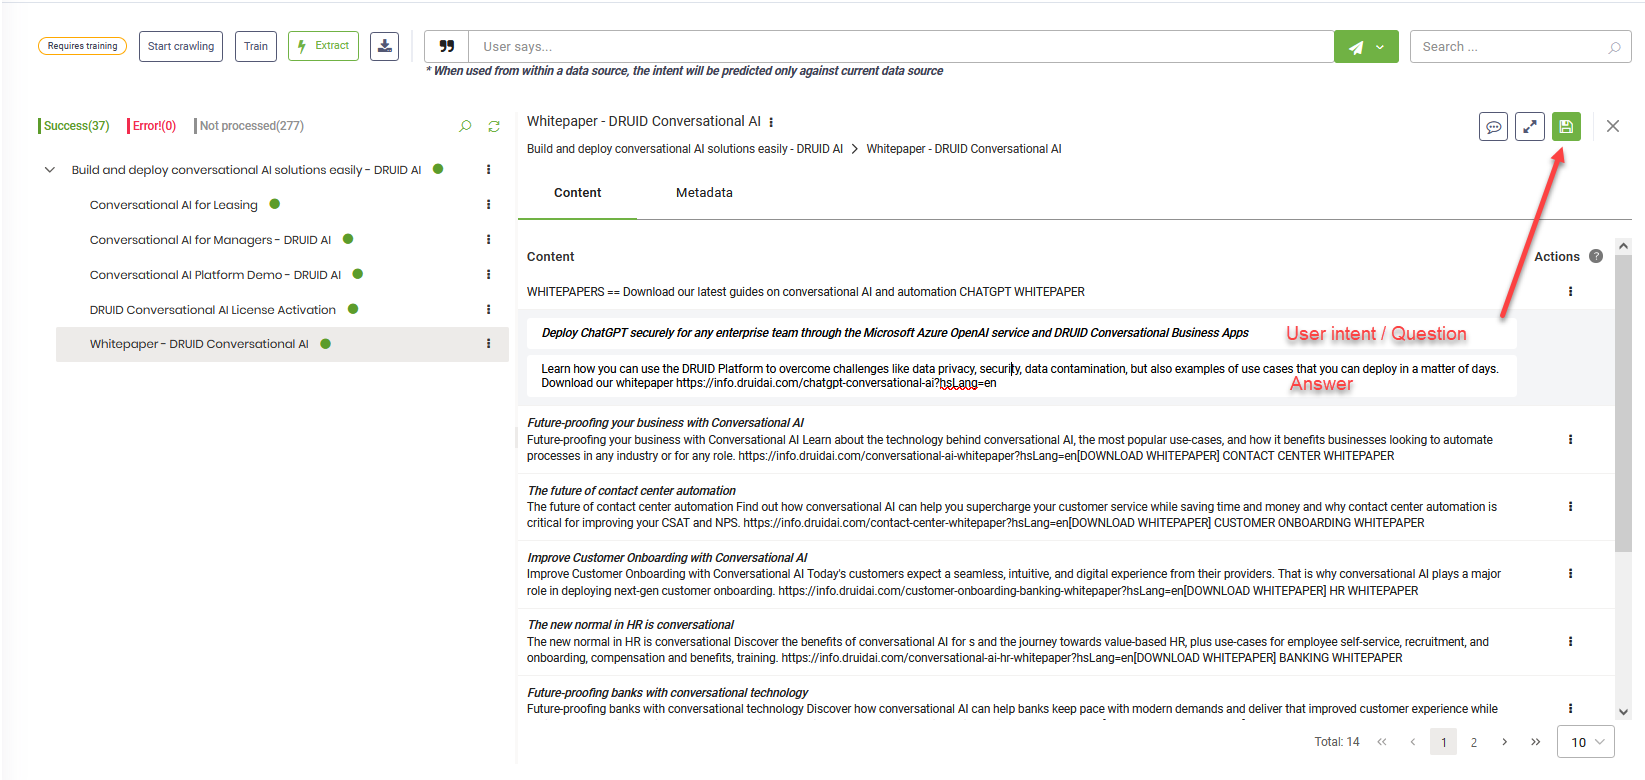
Editing articles
To ensure your Knowledge Base high quality, we recommend you to review the extracted articles and take the proper actions to improve them: open the URL from where the crawler extracted the article and compare the content, edit or delete the article.
To edit an article, click the dots (  ) next to the article and click Edit. Update the article (user intent / question / title / short description and answer) and it the top right corner of the page, click the Save icon .
Fine-tuning Predictions
You can configure Advanced Settings at both the data source and node/leaf levels to achieve more precise predictions. This approach offers granular control, allowing you to adjust the extractors and trainable elements, resulting in better accuracy and performance. Unlike KB-level settings, which apply changes broadly, this targeted method adapts configurations to the unique needs of each data source or element, streamlining your authoring process.
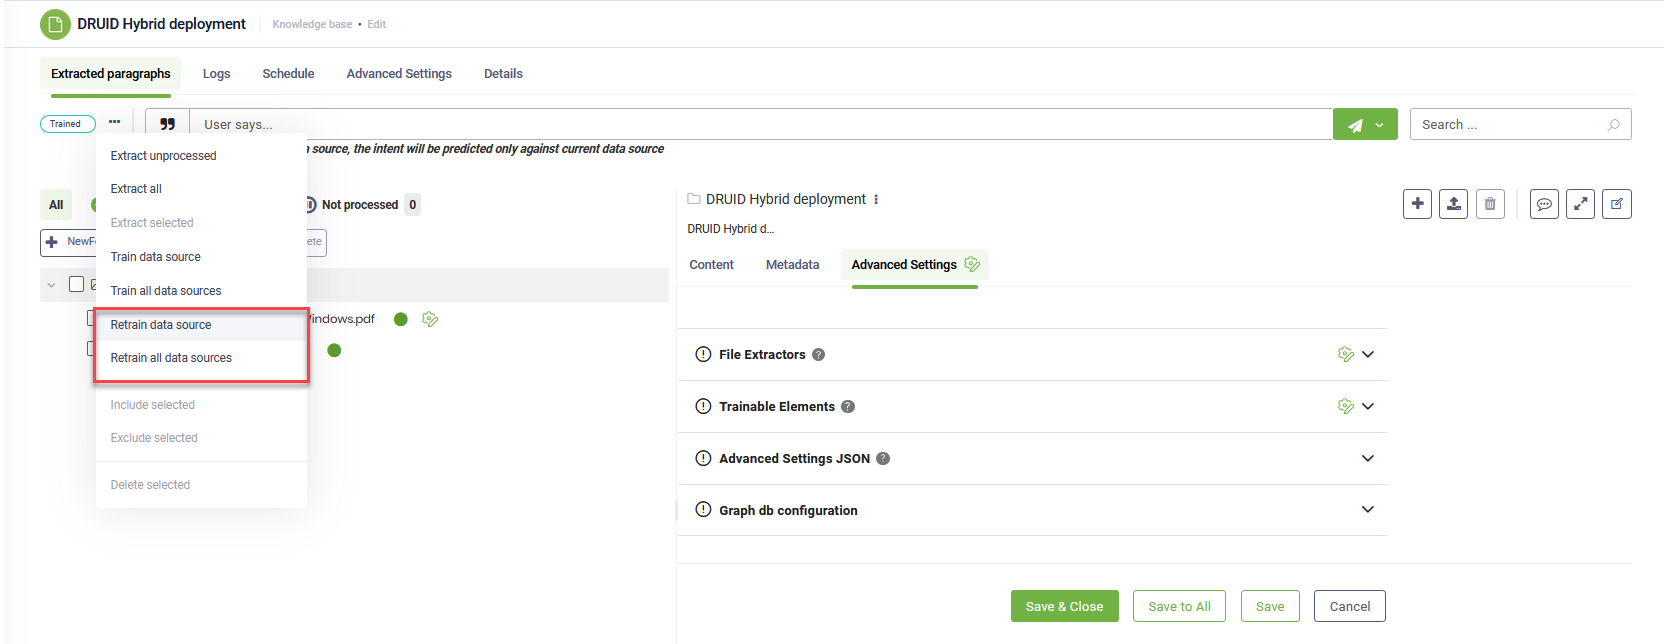
Fine-tuning at the data source level
- Navigate to the desired data source.
- Select the Advanced Settings tab.
- Modify advanced parameters as needed and save the settings.
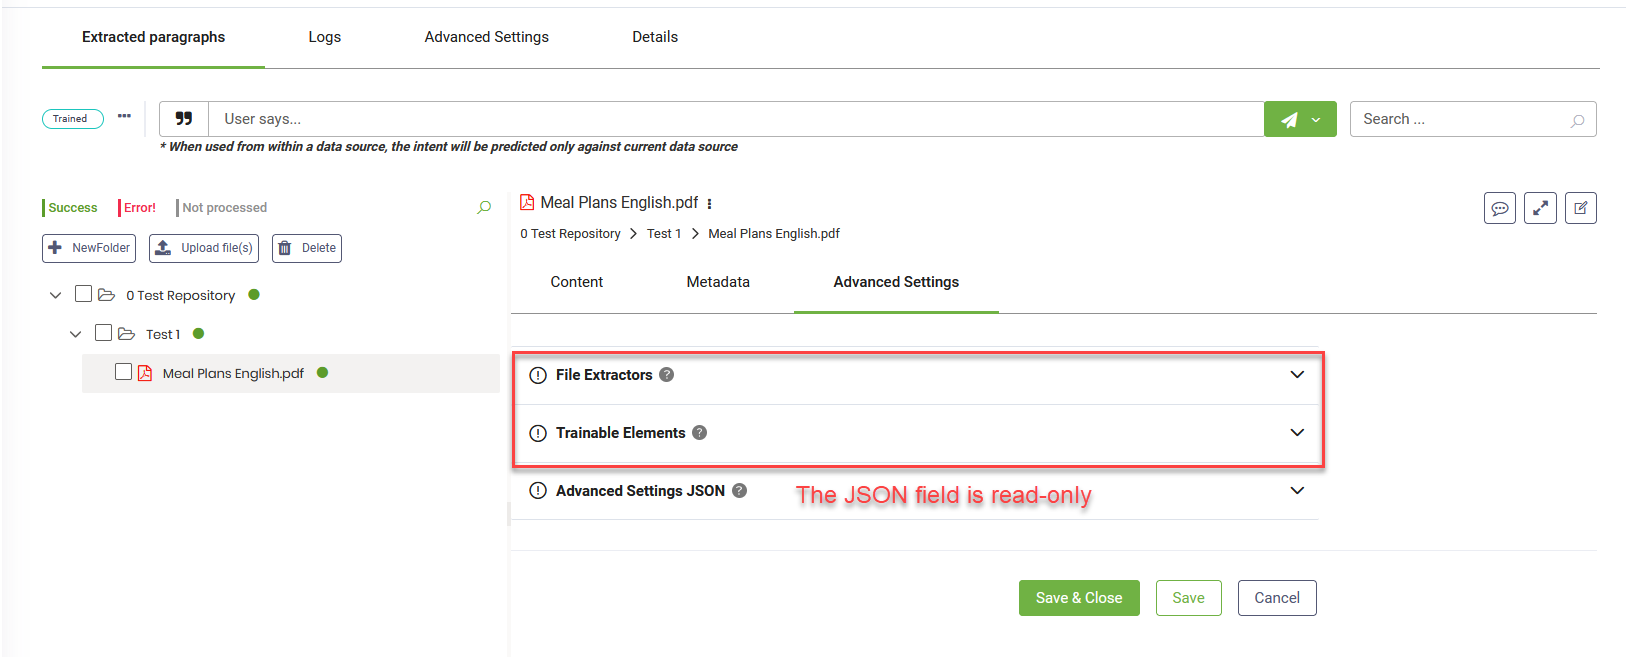
Fine-tuning at the node or leaf level
- In the tree explorer, select the desired node or leaf.
- On the right side, select the Advanced Settings tab.
- Modify advanced parameters as needed and save the settings.
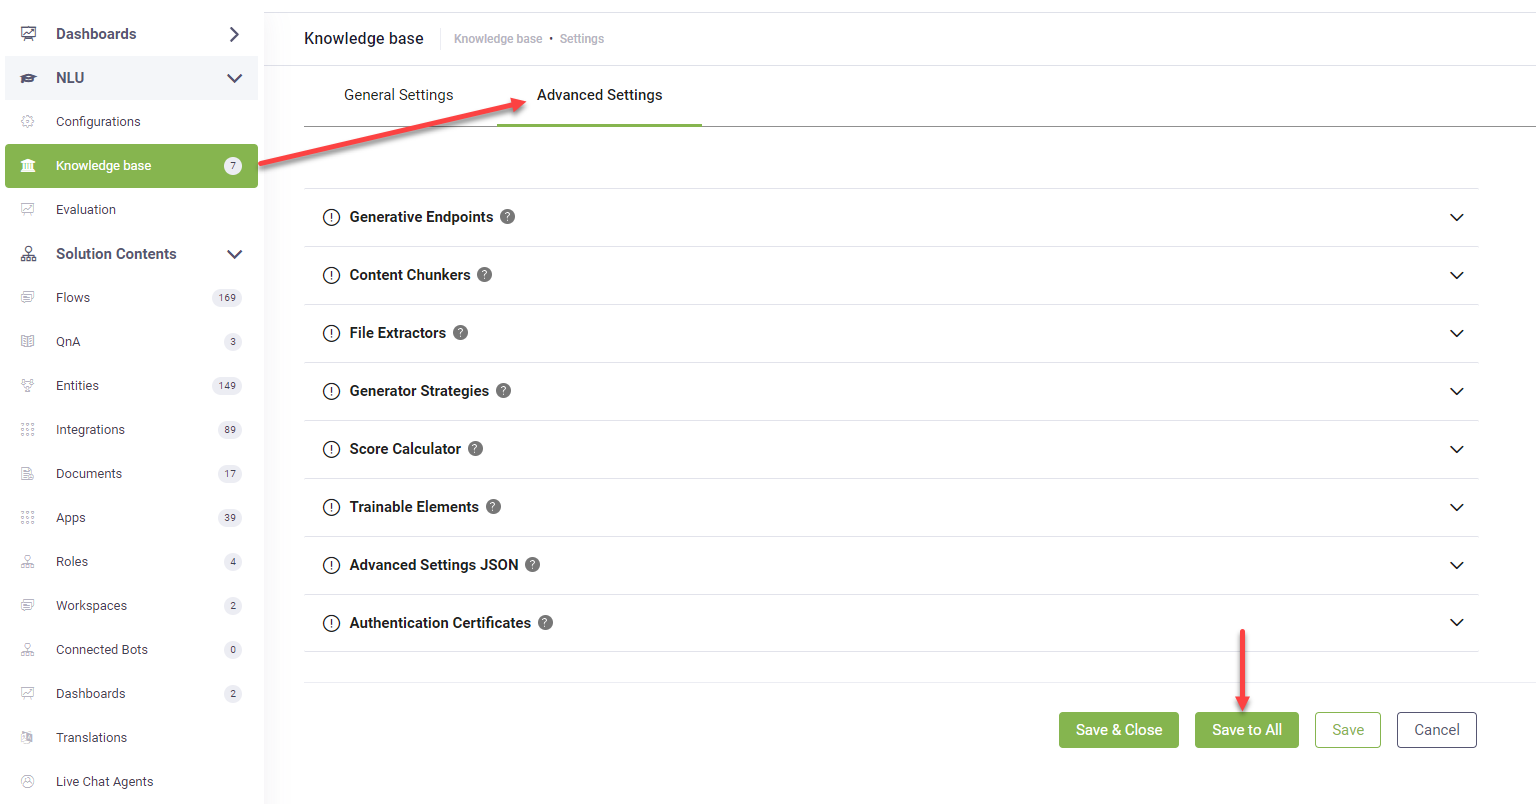
Reset advanced settings
To reset advanced configurations at the data source and node/leaf levels to match the KB Advanced settings, go to Knowledge Base > Advanced Settings and click the Save to All button. This action streamlines your settings management by applying consistent KB Advanced settings across your entire configuration with just one click.
Enhance KB prediction
Refine your articles by transforming unstructured data into a question-and-answer format. Edit articles and add question / title / short description.
Access the Knowledge Base Advanced Settings, set the "trainableColumns" parameter to "Question,Answer", then train the Knowledge Base. The KB Engine will leverage both questions and answers from unstructured data sources during the prediction process, ultimately leading to improved prediction accuracy.
Identify the reasons why specific links are missing from the data source
Website data sources provide clear error messages for links that were not successfully crawled, enabling you to swiftly pinpoint the underlying issues. This enhanced visibility helps you maintain the accuracy and completeness of your data sources.
To understand why specific links are missing from the data source:
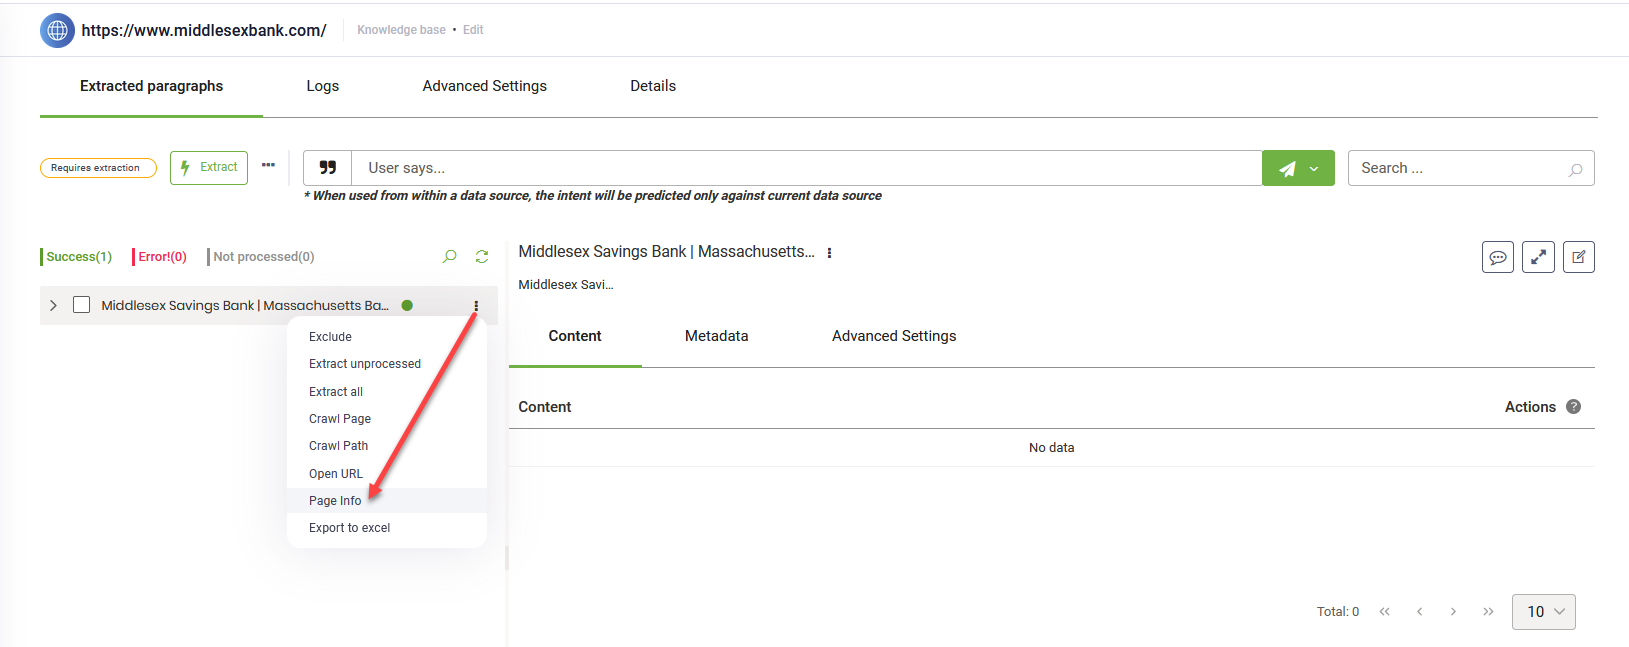
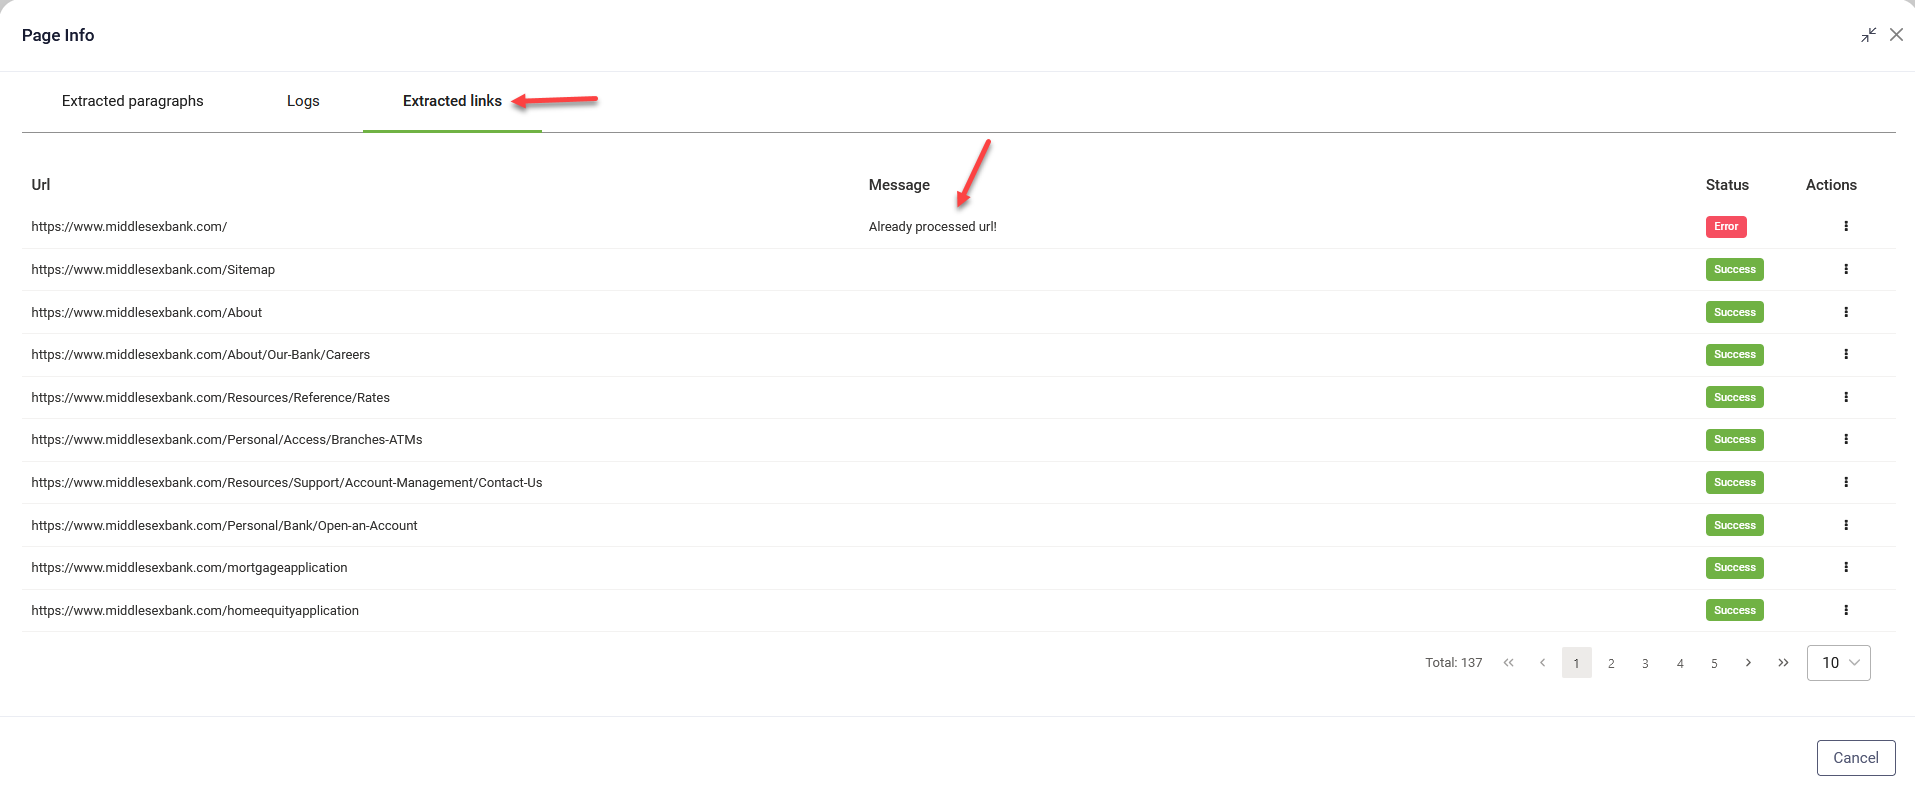
- In the tree explorer, click the Actions icon corresponding to the page you know links were not crawled and select Page Info.
- In the Page Info page, click the Extracted links tab.
- Review the information provided for each link. Error messages will highlight the specific reasons why a link was not crawled.