Knowledge Base Installation
The DRUID Knowledge Base operates as a Windows Service utilized by the DRUID conversation engine for managing and storing knowledge base data within the client's infrastructure. It serves as a robust internal DRUID tool, empowering authors and business users to curate a repository of text articles sourced exclusively from within the client's network. Furthermore, it facilitates the storage of all KB-related data within the client's infrastructure.
To facilitate data extraction from on-premises resources, such as network shared drives or SharePoint servers, we strongly recommended to install the Knowledge Base directly on your premises. This ensures that all data remains securely stored within your local network environment.
How It Works
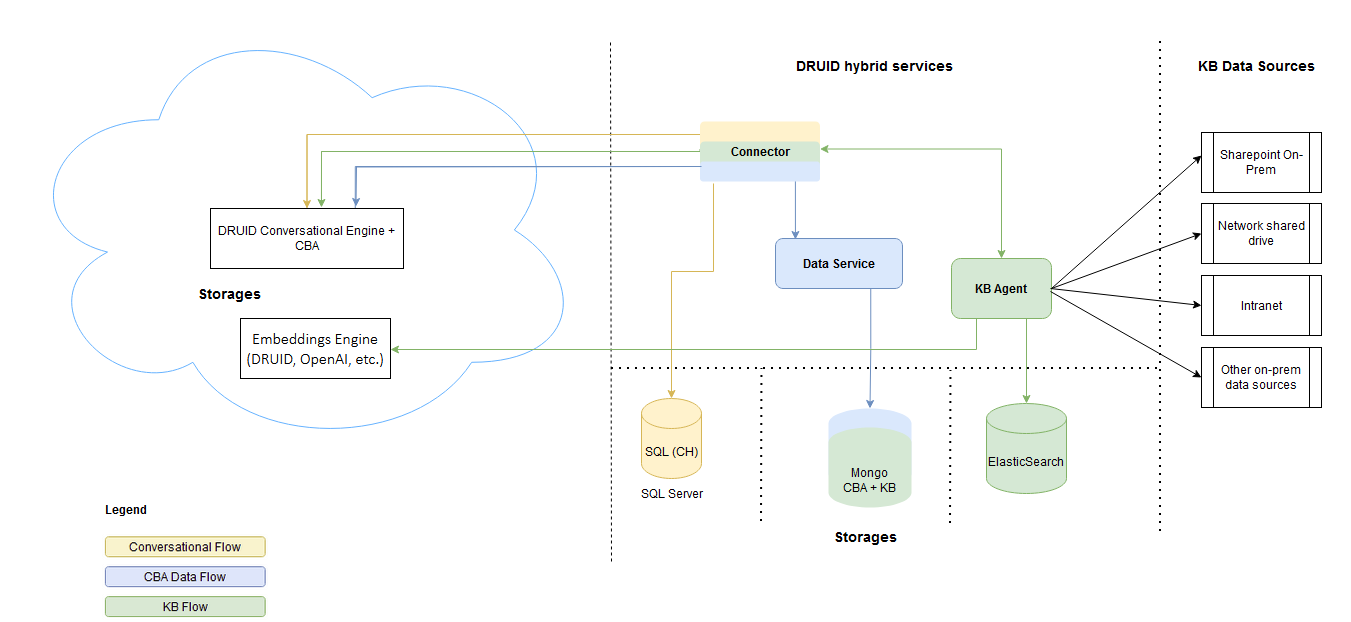
The KB Agent, a key component of the Knowledge Base, has direct access to internal data sources. It extracts relevant data and articles, saving them into MongoDB. Subsequently, the KB Agent processes this data and stores it in either Elastic Search or its built-in memory.
During KB training, articles undergo transformation and are stored in an index-based database, such as Elastic Search, which optimizes search performance. At runtime, the KB Agent communicates with the Connector Host. It also communicates with the Embedding server located in the DRUID Cloud.
Moreover, the KB Agent directly interacts with DRUID Data Services installed on your premises. This enables the utilization of conversational business applications leveraging data from MongoDB.
Prerequisites
Before proceeding with the KB Agent installation, ensure the following prerequisites are met:
- Your tenant is already configured in Hybrid mode deployment. You have the DRUID Connector Host version 7.5 or higher installed on your premises.
- DRUID Data Service version 7.5 or higher installation, if leveraging conversational business applications on MongoDB data.
- MongoDB installation. If Data Service is installed, the same MongoDB instance can be used for both DRUID Data Service and the KB Agent. By default, MongoDB is installed without any secured access, which means that the database can be viewed or modified by anyone who has network access to the machine running the MongoDB service. To set up security for your MongoDB installation, see Configure secured access to your MongoDB database
- Elasticsearch installation. To set up Elasticsearch as a service on Windows, follow the steps outlined in the official Elasticsearch documentation, section 'Install and run Elasticsearch as a service on Windows'. After installation, reset the password for the default Elasticsearch user, 'elastic,' and make sure to note it down, as you'll require it to configure the KB Agent. If you prefer, you can also create additional Elasticsearch users with elevated privileges to configure the KB agent.
- In the Druid Portal, you have a dedicated user with "Druid Backend API" permissions to authenticate connections to your tenant.
- Ensure that communication between the KB Agent and the Druid Connector Host is enabled through the gRPC protocol.
- Before installing or upgrading the KB Agent, ensure that you whitelist https://playwright.azureedge.net. If you do not, the following error message will appear during the installation or upgrade process: "Cannot install Playwright. Please try manually by checking the documentation...". Whitelisting this URL is only required during the KB Agent installation or upgrade process.
KB Agent hardware requirements
| Item | Testing environment | Production environment |
|---|---|---|
| CPU Count | 2 | 4 |
| CPU type | Proc Intel i7 gen 8 min or equivalent Xeon | |
| RAM | 4 GB | 4 GB |
| Storage type | Min 500 IOPS | |
| Storage size | 100 GB | |
| OS | Windows Server 2019 or higher with .NET 8.0 runtime | |
Elastic Search hardware requirements
| Item | Testing environment | Production environment |
|---|---|---|
| CPU Count | 2 | 8 |
| CPU type | Proc Intel i7 gen 8 min or equivalent Xeon | |
| RAM | 8 GB | 32 GB |
| Storage type | Min 500 IOPS. | |
| Storage size | Min 128 GB | |
| Elastic Search version | 8.11.x or higher | |
MongoDB hardware requirements
| Item | Testing environment | Production environment |
|---|---|---|
| CPU Count | 2 | 4 |
| CPU type | Proc Intel i7 gen 8 min or equivalent Xeon | |
| RAM | 4 GB | 16 GB |
| Storage type | Min 500 IOPS. | |
| Storage size | Min 100 GB | |
| MongoDB version | 7.0.5 or higher | |
Networking requirements
Depending on your environment, outbound calls to the following URLs must be allowed.
Production West Europe
- https://
{{TENANCY-NAME}}.druidplatform.com (Port 443) - https://druidservicegateway.eu.druidplatform.com (Port 443)
Production US
- https://
{{TENANCY-NAME}}.us.druidplatform.com (Port 443) - https://druidservicegateway.us.druidplatform.com (Port 443)
Production Australia
- https://
{{TENANCY-NAME}}.au.druidplatform.com (Port 443) - https://druidservicegateway.au.druidplatform.com (Port 443)
Community
- https://
{{TENANCY-NAME}}.community.druidplatform.com (Port 443) - https://druidservicegateway.community.druidplatform.com (Port 443)
Installation and KB data migration steps
This section describes how to install DRUID KB Agent.
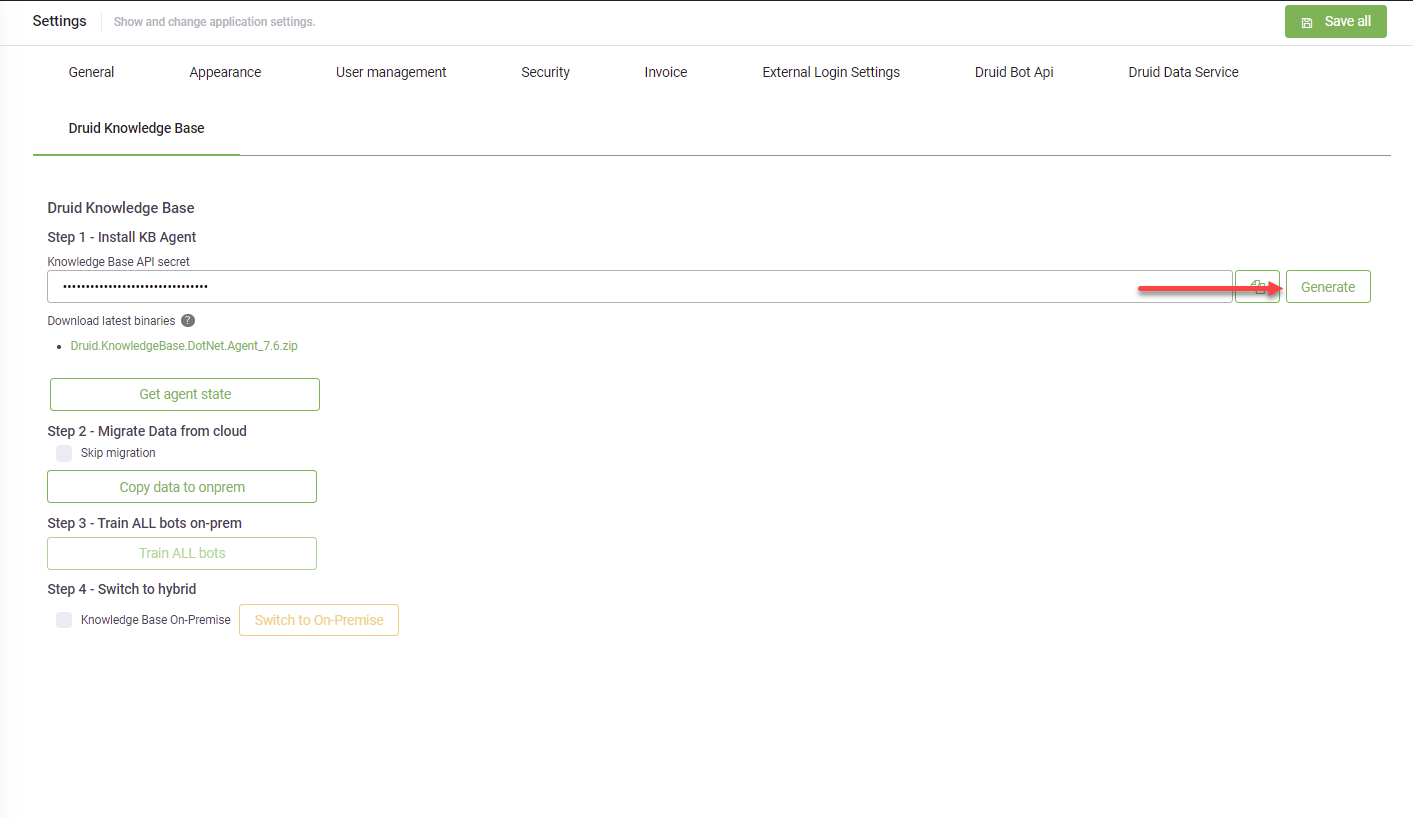
Step 1. Generate Knowledge Base API secret
In the Druid Portal, navigate to the Administration menu, then select Settings, and click the Druid Knowledge Base tab. Next, click the Generate button.
Step 2. Install KB Agent
On the desired machine, download the DRUID KB Installer:
- Access the Druid Portal using an admin account and navigate to the Administration menu, then select Settings, and click the Druid Knowledge Base tab.
- Download the latest KB Agent binaries.
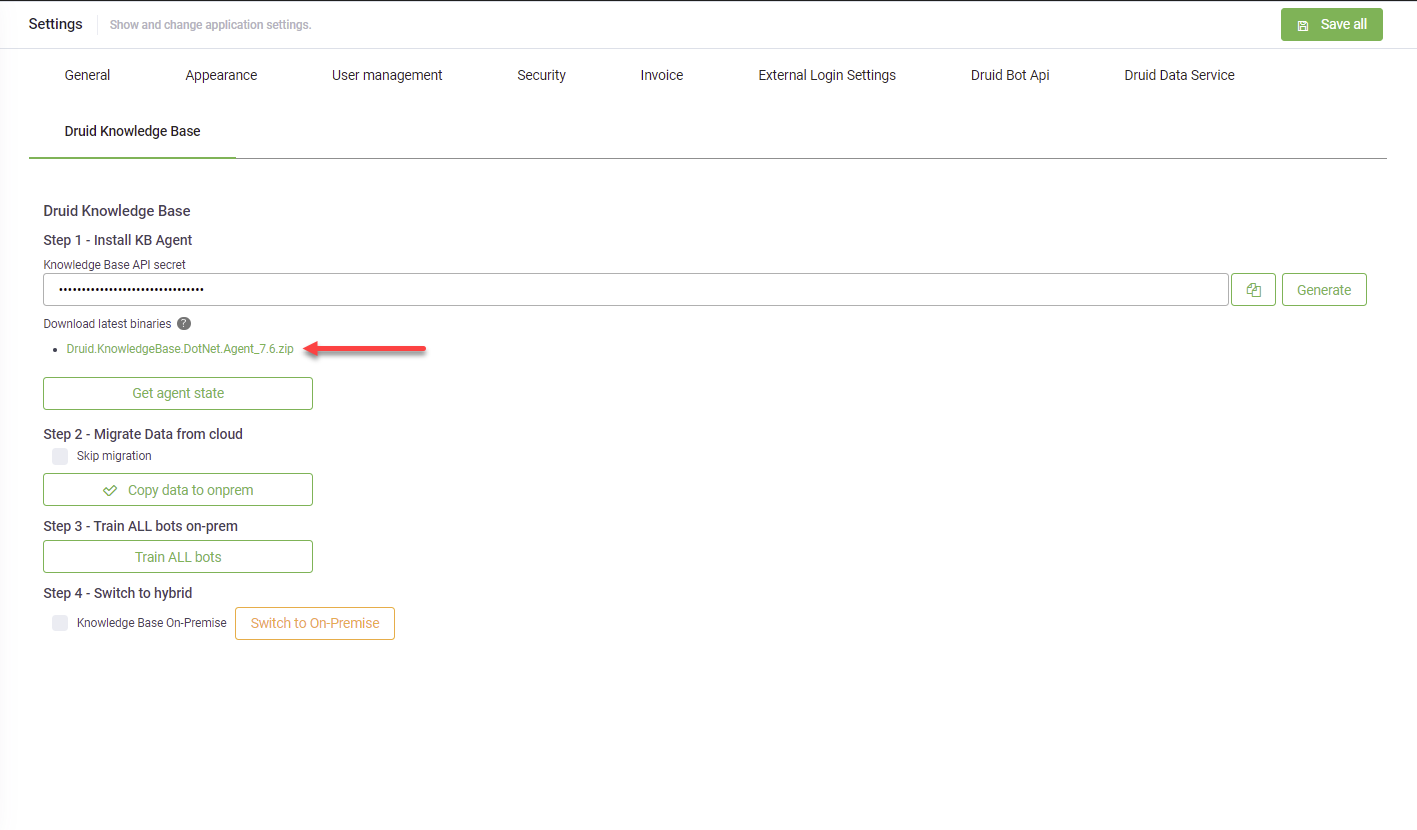
The file is downloaded as zip in your default download folder.
Step 3: Unzip the downloaded file
Usually, the URL security zone might prevent the downloaded file execution. Right-click on the file and click Properties, untick the Read-only checkbox, click Apply, confirm the changes and then click OK. Unzip the downloaded file into the installation folder, e.g. D:\Druid.
Step 4. Install the KB Agent
Go to the folder DRUID Connector installer and double-click on Druid.KnowledgeBase.DotNet.Installer.exe. The installation wizard opens.
Click Next.
Select Install a new Knowledge Base instance and click Next twice.
Click Next.
Provide DRUID Knowledge Base installation parameters or import the settings by clicking the Import settings button and uploading the appsettings.json file from an older DRUID KB installation folder.
|
Parameter |
Description |
Example |
|---|---|---|
| Installation details | ||
| Instance name | The name of the KB instance. | test-KB |
| Installation folder | The link of the folder where the KB will be installed. | E:\Druid\KnowledgeBase_test-KB |
| Local URLs |
http://+:5110;http://+:5111 The endpoint for communication between the KB Agent and the DRUID Connector Host. By default, the KB Agent communicates on ports 5110 and 5111. If your agent needs to communicate on different ports, you can replace them as needed. NOTE: Two URLs are required: the second one serves as the primary endpoint, while the first one acts as a backup.
|
http://localhost:5110;http://localhost:5111 |
| MongoDB | ||
|
Connection
|
The connection string to the MongoDB database. |
mongodb://localhost:27017/ |
| Elastic Search (Optional) | ||
| URL | The URL where the Elastic Search is exposed. http://localhost:9200 is the default address of Elasticsearch. | http://localhost:9200 |
| Username / Password | The default 'elastic' user credentials or the credentials of an Elastic search user with elevated privileges. | |
| Others | ||
| Repository storage |
The folder serving as the root of all data sources, where the KB files are stored. |
|
| Pandoc | Non-editable. It is automatically set after the KB Agent installation. | |
| Paths crawling |
Select Allow file system crawling and in the Paths field, specify the paths to the network shared drive that the KB Agent is permitted to crawl, separated by comma. Restricting the KB Agent from crawling the entire network shared drive enhances security. |
D:\KB documents, \\oana\Users\oana\OneDrive - Druid SA\DRUID\KB Docs\Manuals |
| Service gateway URL |
Provide the URL based on the DRUID Cloud you're operating in: Prod EU
Prod US
Prod AU
Community
|
|
| Service settings | ||
| Local System / User account |
The credentials of the Windows user under which the Knowledge Base will run. |
|
| Druid Portal API | ||
|
URL |
The DRUID AI platform url. |
https://{{environment}}.druidplatform.com/
|
| Tenant | The name of your DRUID AI Platform tenant assigned by the DRUID team. | documentation |
|
Username
|
A dedicated Druid Portal user ( in your tenant) with Druid Backend API permissions. We recommend you to use the same credential as the one used for DRUID Connector Host installation. |
|
|
Password
|
The password of the dedicated Druid Portal user. |
|
| Proxy settings |
By default, the proxy is disabled and you will use a direct connection to connect to DRUID. If your network setup provides access via a proxy, and the proxy connection requires authentication, you need to grant the Druid Connector Host service permission to use the proxy. For that, select Use proxy server and provide the proxy IP and credentials to connect to it. |
|
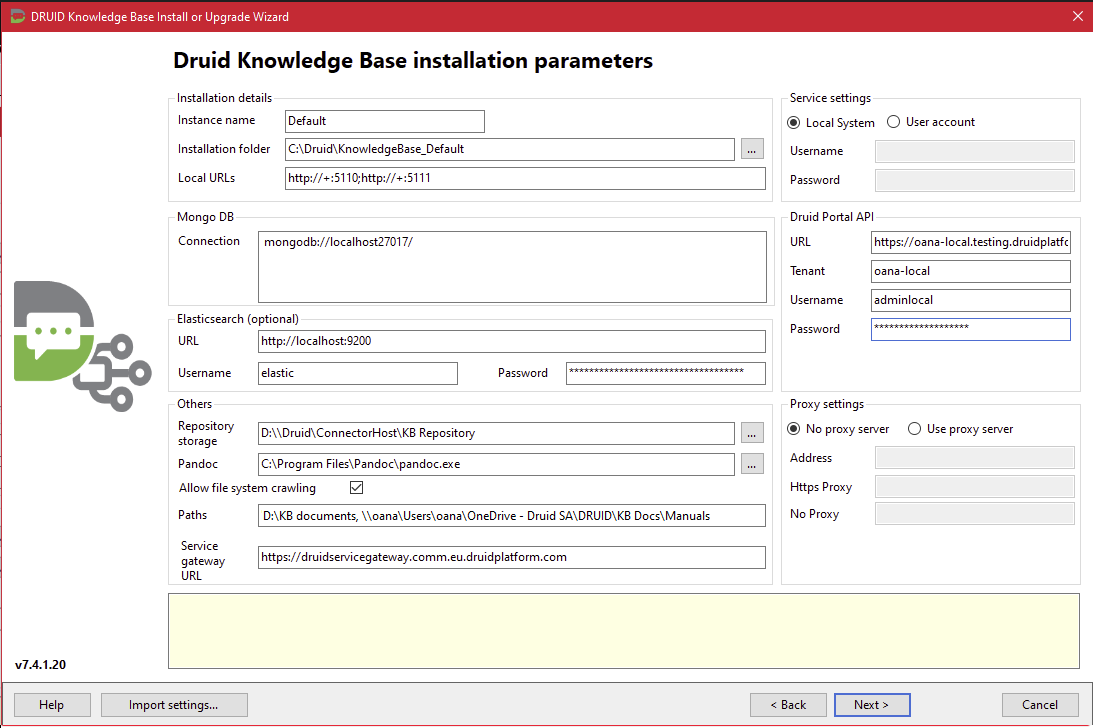
Click Next, then click Start.
After the KB installation completes, click Exit then go to the Druid Portal
Step 5. Upgrade the Connector Host to match the version of your KB Agent
To ensure seamless communication between the KB Agent and the Connector Host, upgrade the Connector Host to match the version of your KB Agent. Additionally, configure the connection to the KB Agent within the Connector Host installation parameters.
Step 6. Verify the presence of a KB Agent installed in hybrid mode
Once the KB Agent installation and the Connector Host upgrade are completed successfully, navigate to the Druid Knowledge Base tab under Administration > Settings in the Druid Portal. Then, click the Get agent state button to verify the presence of a KB Agent installed in hybrid mode.
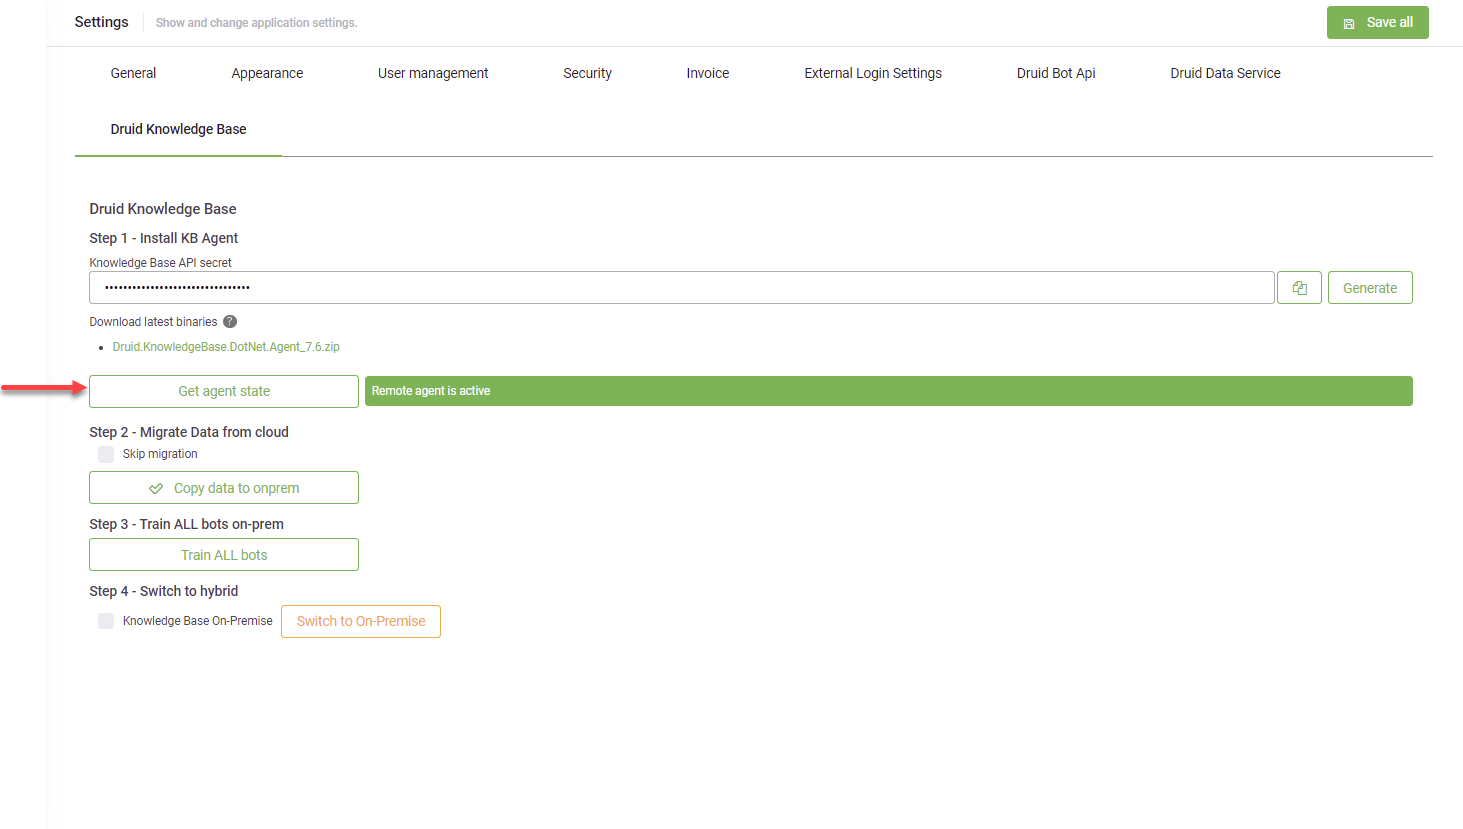
If you encounter an error message indicating that the remote agent is inactive, ensure to review the KB Agent installation parameters.
Step 7. Migrate KB data from the Cloud (optional)
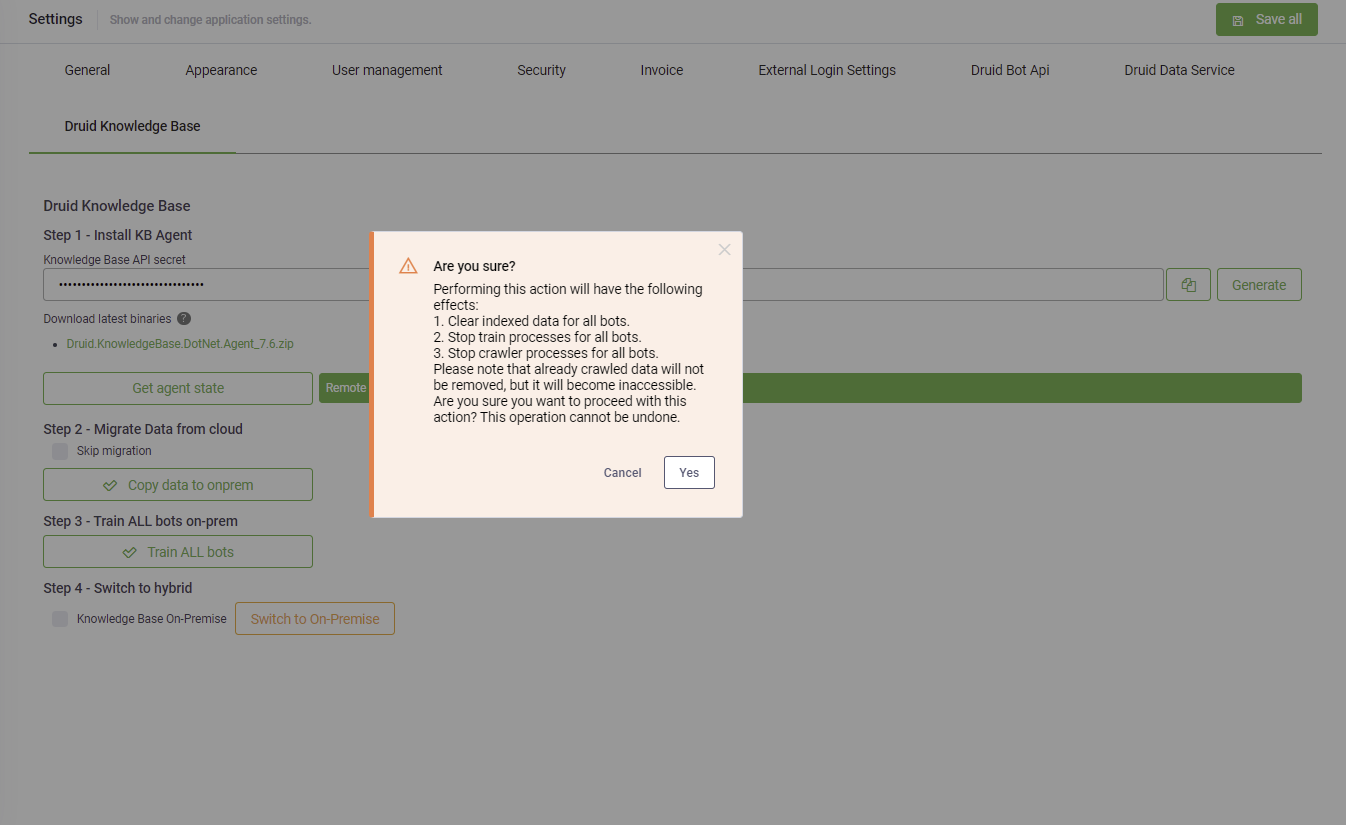
If you currently have KB data sources stored in the DRUID Cloud and wish to transfer them to your on-premises environment, simply click the Copy data to onprem button. A warning message appears.
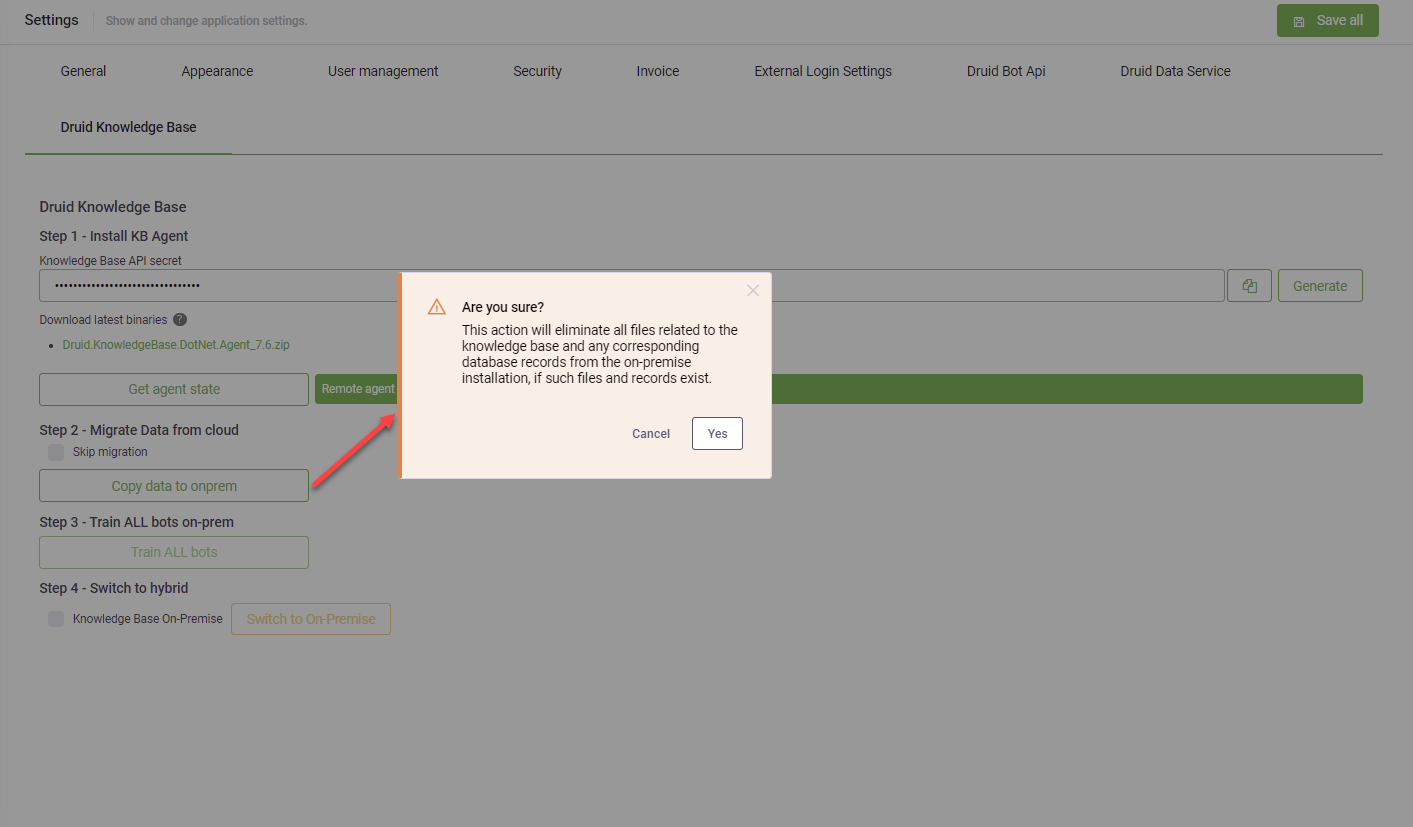
Alternatively, if you prefer to start with a fresh KB on-premises and disregard any existing KB data stored in the cloud, select Skip migration.
Step 8. Train all AI Agents
After migrating the KB data on-premise, click the Train All AI Agents button to ensure effective utilization of the KB data by your AI Agents.
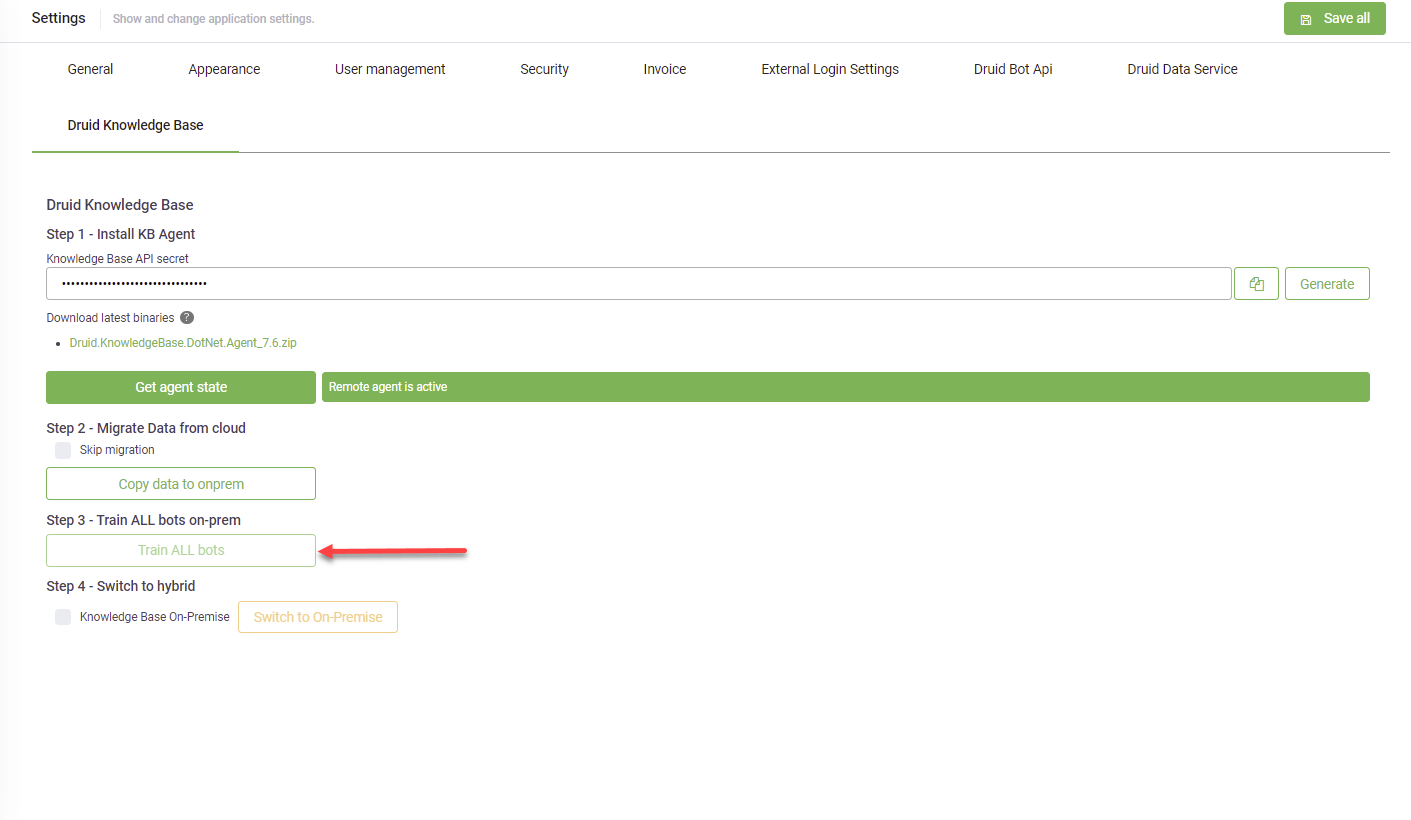
You can monitor the progress of the AI Agents' training.
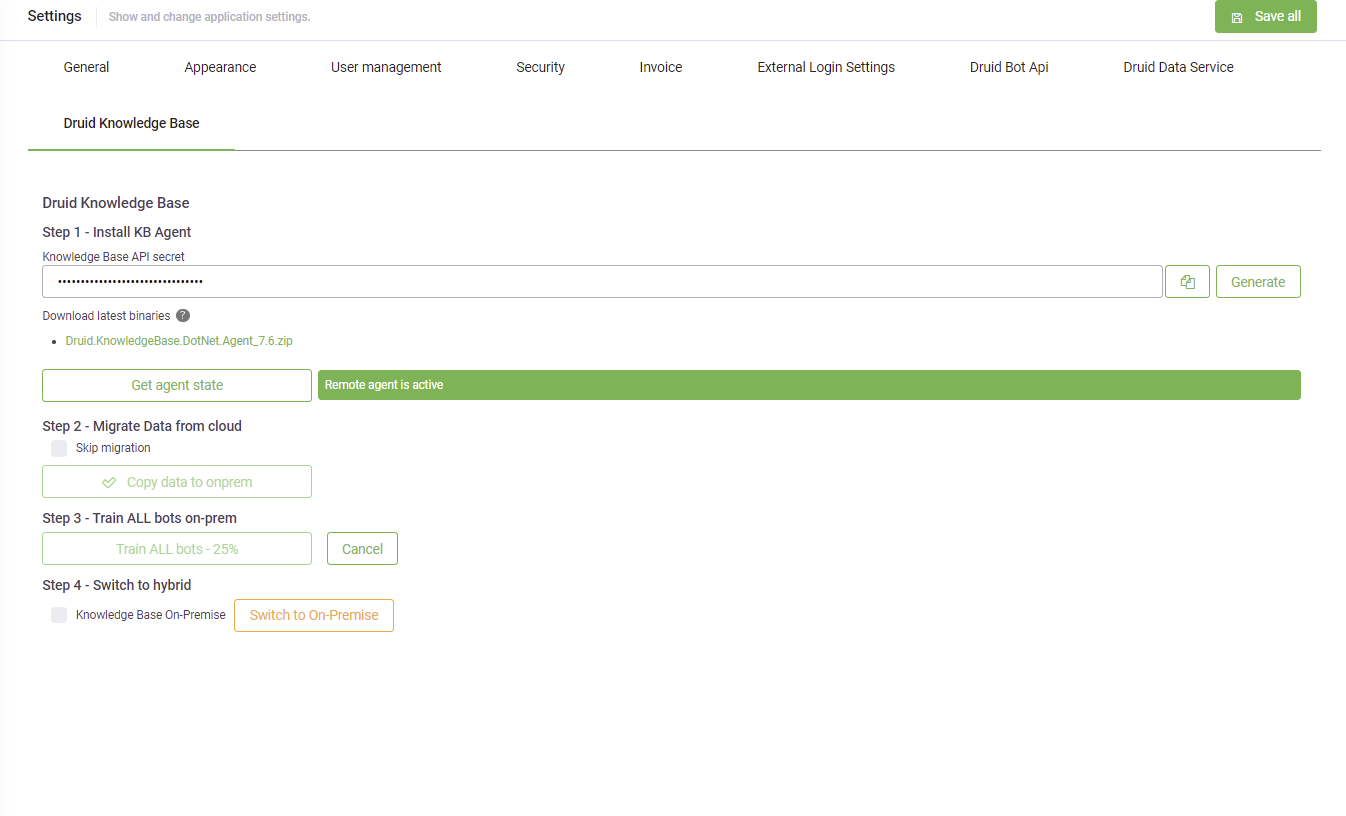
Wait until DRUID completes training all AI Agents.
Step 9. Switch the KB to hybrid mode
After completing the training of all AI Agents, click the Switch to on-premise button to transition from the KB Cloud Engine to the KB Agent installed on-premises.

A warning message appears.
Click Yes.
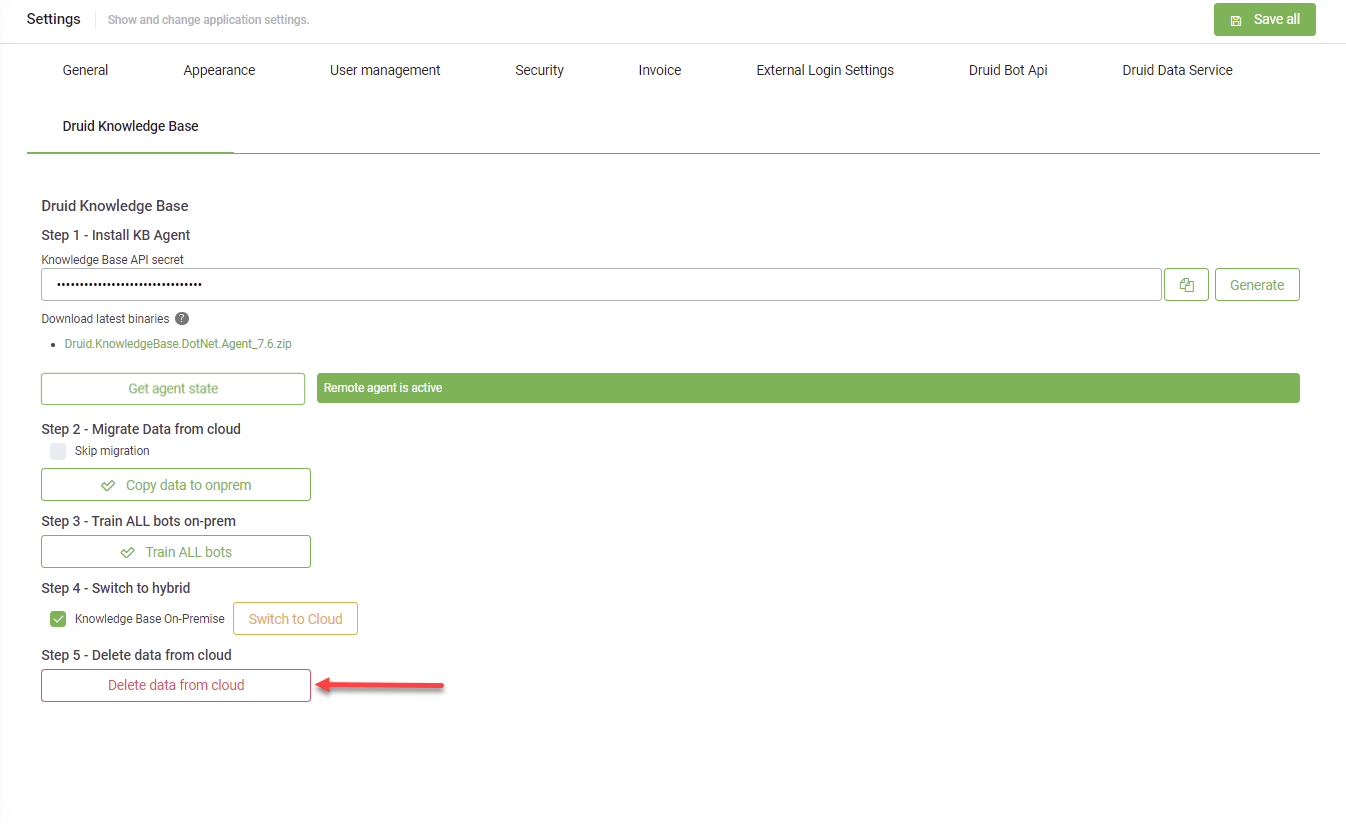
Step 10. Delete data from the Cloud
After successfully switching the KB to hybrid mode, check to confirm that all data has been successfully migrated to the on-premises environment. Then, proceed to click Delete data from the cloud as this data will no longer be necessary.
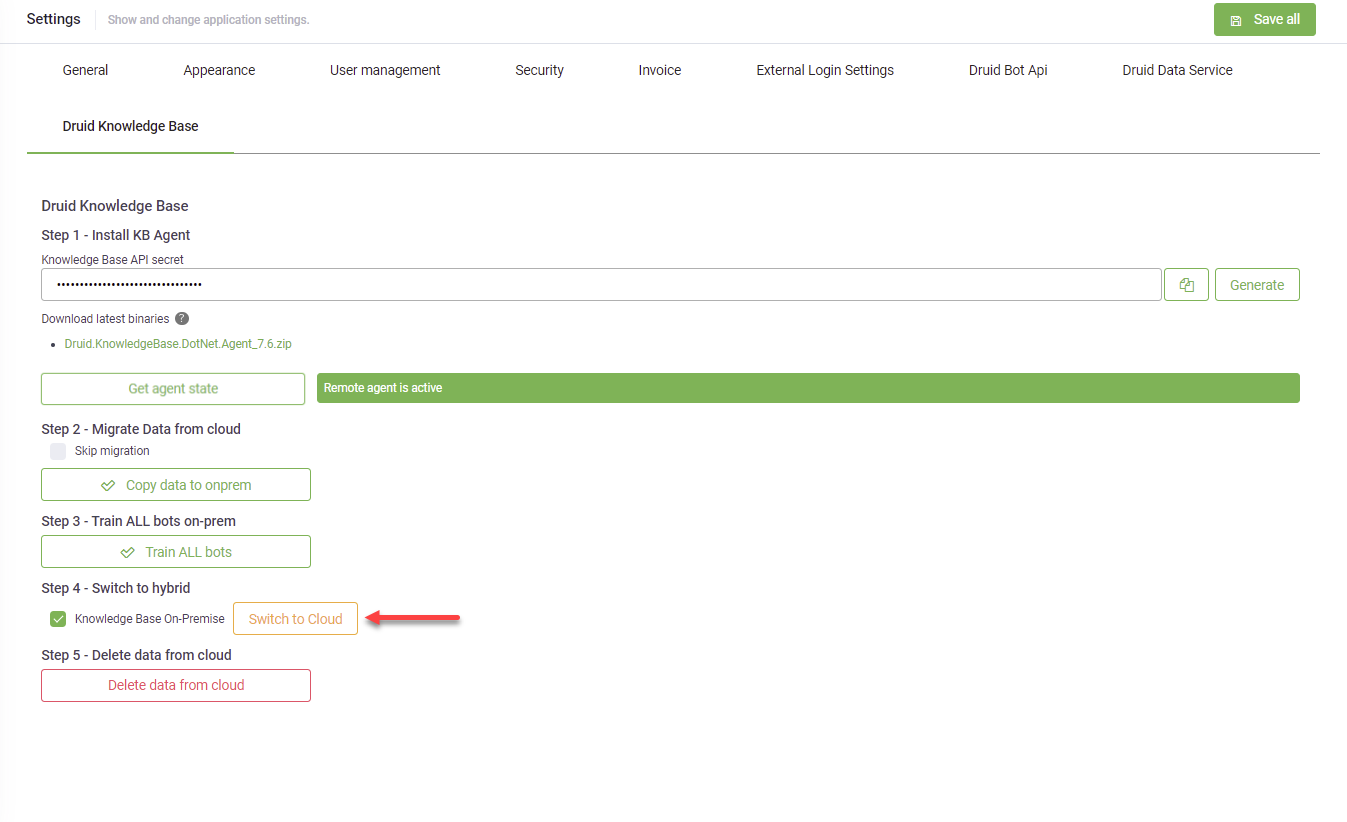
Switching to the KB Cloud Engine
You have the option to switch from KB hybrid mode to the KB Cloud Engine by clicking the Switch to cloud button at any time.
Configure secured access to your MongoDB database
If you have already installed and configured MongoDB for the DRUID Data Service, you can skip this configuration.
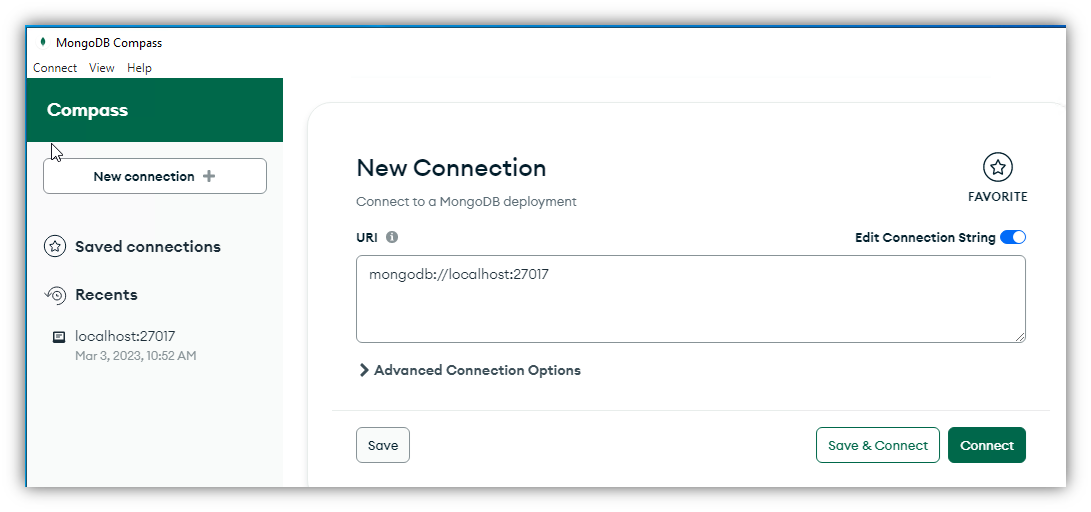
netsh advfirewall firewall add rule name="Open mongod port 27017" dir=in action=allow protocol=TCP localport=27017To configure security in MongoDB you can use mongosh or compass.
This section describes how to configure security in MongoDB using the compass tool:
- Access compass and click the Connect button
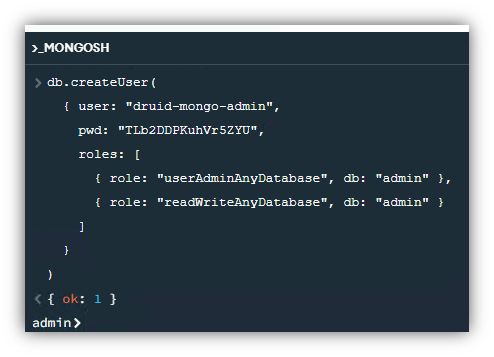
- At the left-bottom of the Compass window, click on >_MONGOSH.
- Change the database to admin by typing
use adminand pressing ENTER. - Create the user by typing the text below and replacing
{{MONGOADMIN}}and{{MONGOPASS}}with the MongoDB credentials (user and password). - Press ENTER. The response must be
{ ok: 1 }. - Edit the file C:\Program Files\MongoDB\Server\6.0\bin\mongod.cfg by setting up the following configuration.
- Restart the MongoDB service.


db.createUser(
 { user: "{{MONGOADMIN}}",
   pwd: "{{MONGOPASS}}",
   roles: [
      { role: "userAdminAnyDatabase", db: "admin" },
      { role: "readWriteAnyDatabase", db: "admin" }
   ]
 }
)
security:
  authorization: enabled

net:
  port: 27017
bindIp: 127.0.0.1, {{HOST-NAME}}{{HOST-NAME}} with the name of the Windows computer which runs the MongoDB service.To connect to MongoDB, the new connection string is:
mongodb://{{MONGOADMIN}}:{{MONGOPASS}}@localhost:27017For example, mongodb://druid-mongo-admin:TLb2DDPKuhVr5ZYU@localhost:27017.