WhatsApp Meta
To make it easy for your consumers to make purchases and get answers to questions using WhatsApp, the messaging channel they already use every day, Druid authors can integrate AI Agents with WhatsApp. This way, customers will be able to start a conversation with your AI Agent in WhatsApp.
The Druid AI Platform provides the WhatsApp channel via Meta integration (direct integration).
Prerequisites
- You built and published a DRUID AI Agent.
- You have a Meta Developer account.
- For DRUID on premise deployments, make sure that you provide access to/from the necessary messaging endpoints as follows:
| Outbound | graph.facebook.com |
| Inbound | DRUID.BotApp |
To integrate a AI Agent with WhatsApp via Meta, follow these steps:
Step 1: Create Meta developer app
- In your browser, navigate to Meta for Developers and log in.
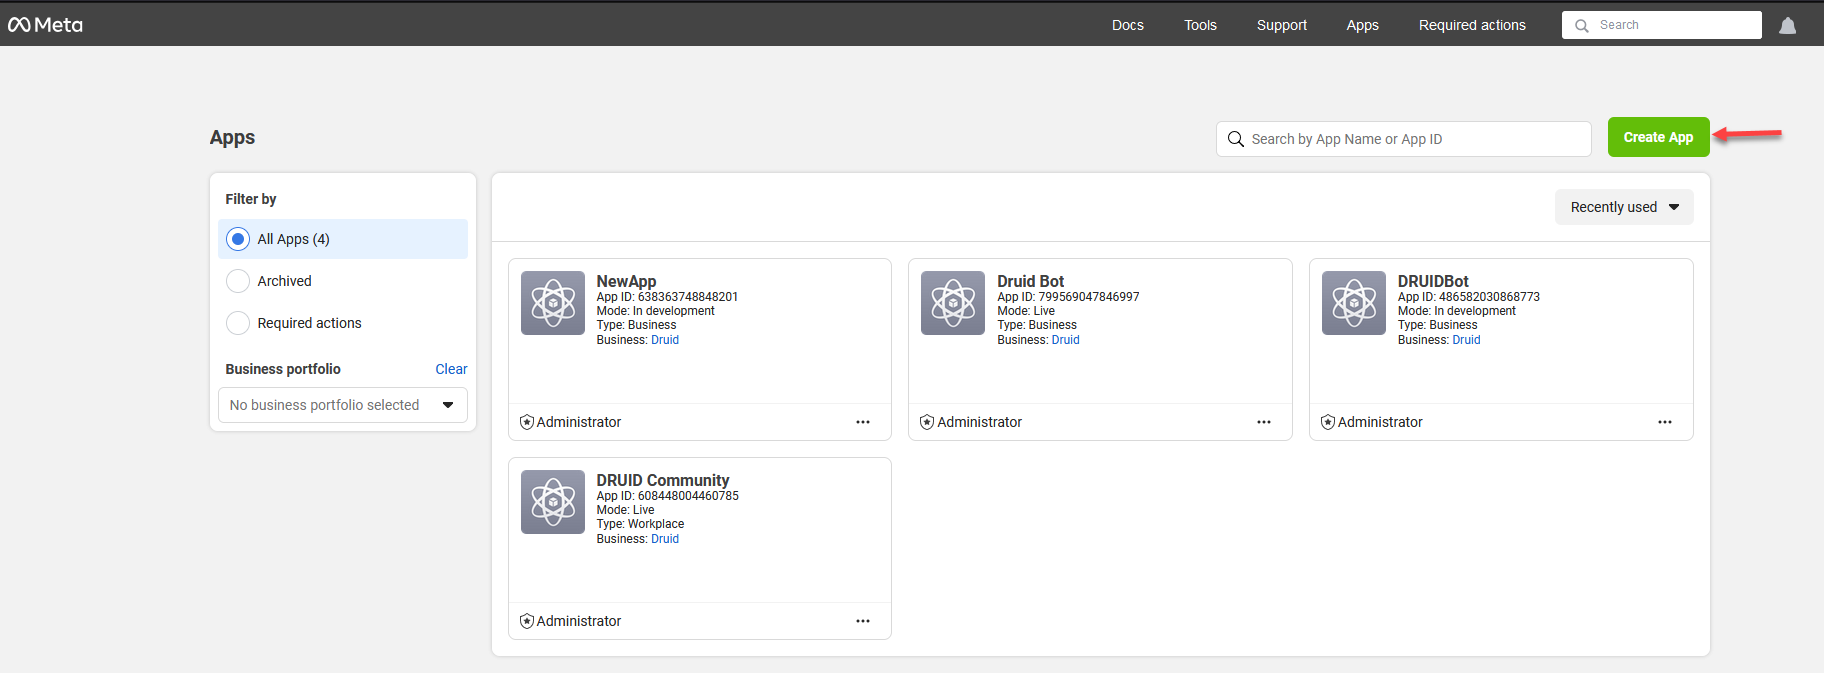
- On the toolbar, click My Apps. Your Apps page appears.
- Click the Create App button.
-
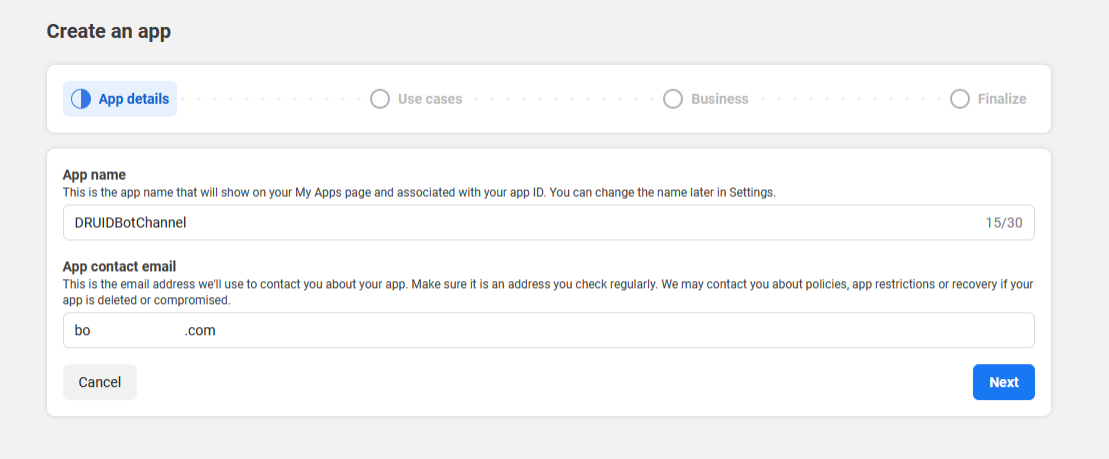
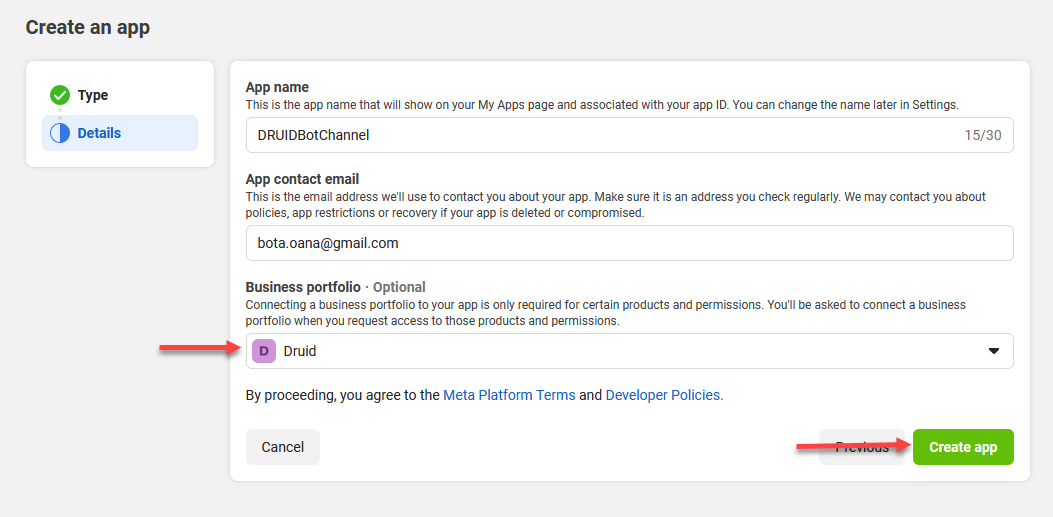
Enter App name and your email address (the email address Meta will use to contact you about your app).
- Click Next.
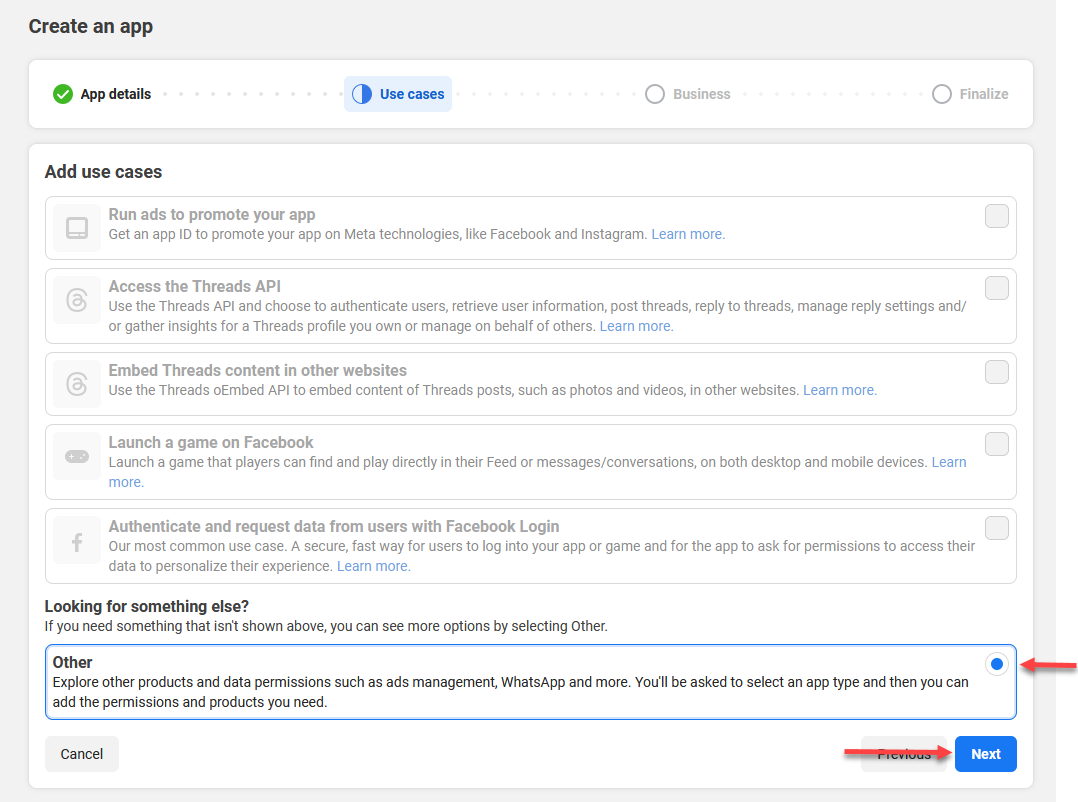
- Select Other use case and click Next.
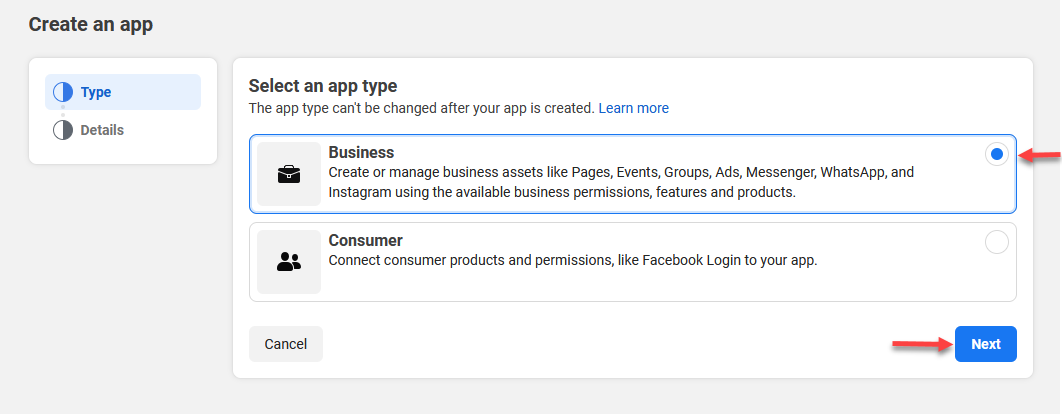
- Select Business as app type and click Next.
-
Select your Business portfolio and click Create app.
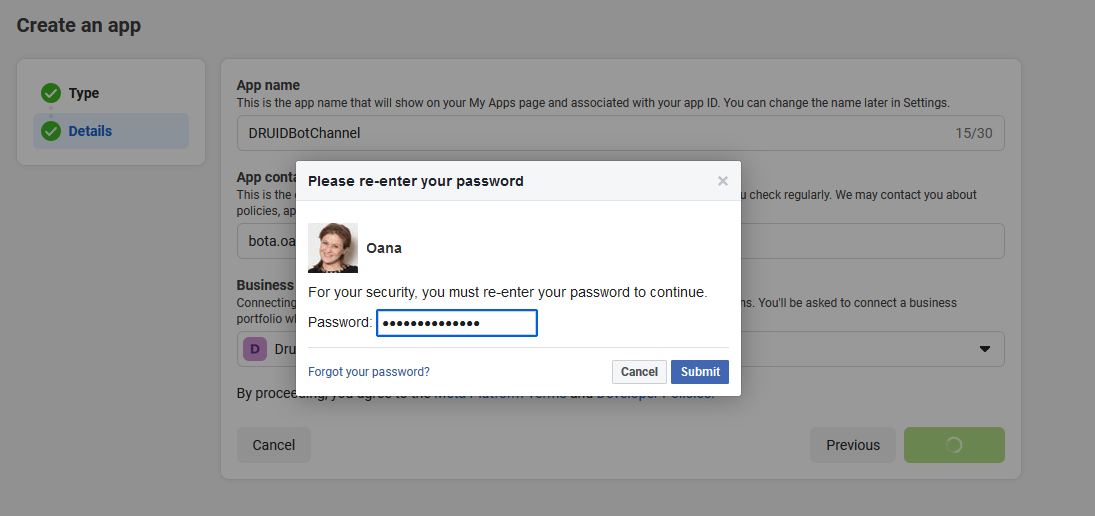
- For security reasons, re-enter your password and click Submit.
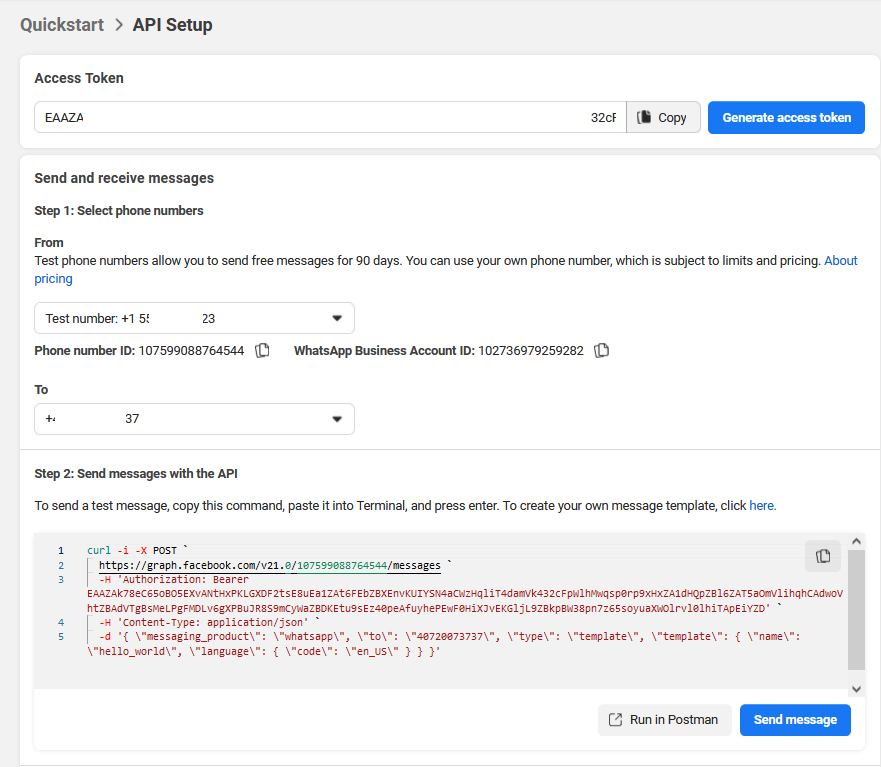
- Find the WhatsApp product and click Set up. The WhatsApp Quickstart page appears.
- Click Start using the API to test message sending in the WhatsApp channel.
- Click the Generate access token button.
- Follow the on screen instructions to grant the app access to manage your WhatsApp account and manage and access conversations in WhatsApp.
- Select your test phone number in the From field. (Unless you have registered other phone numbers, this will be the only phone number in From).
- Enter the phone number you would like to message in the To field. Ensure the number is correct, and that you want to add it to your list of 5 possible message recipients — as you add phone numbers, follow the prompts on the screen to verify you have access to them. Once this number has been added, it cannot be removed from your list.
-
Once you enter a recipient phone number, the code sample on the page will be updated to demonstrate an API call that sends a test message to that number.
- Click Send message to send the first message. Alternatively, you can copy the code sample provided and execute it in your Terminal or in Postman. You have just sent a test message!
The Create an app wizard appears.
Step 2: Generate permanent token for your app
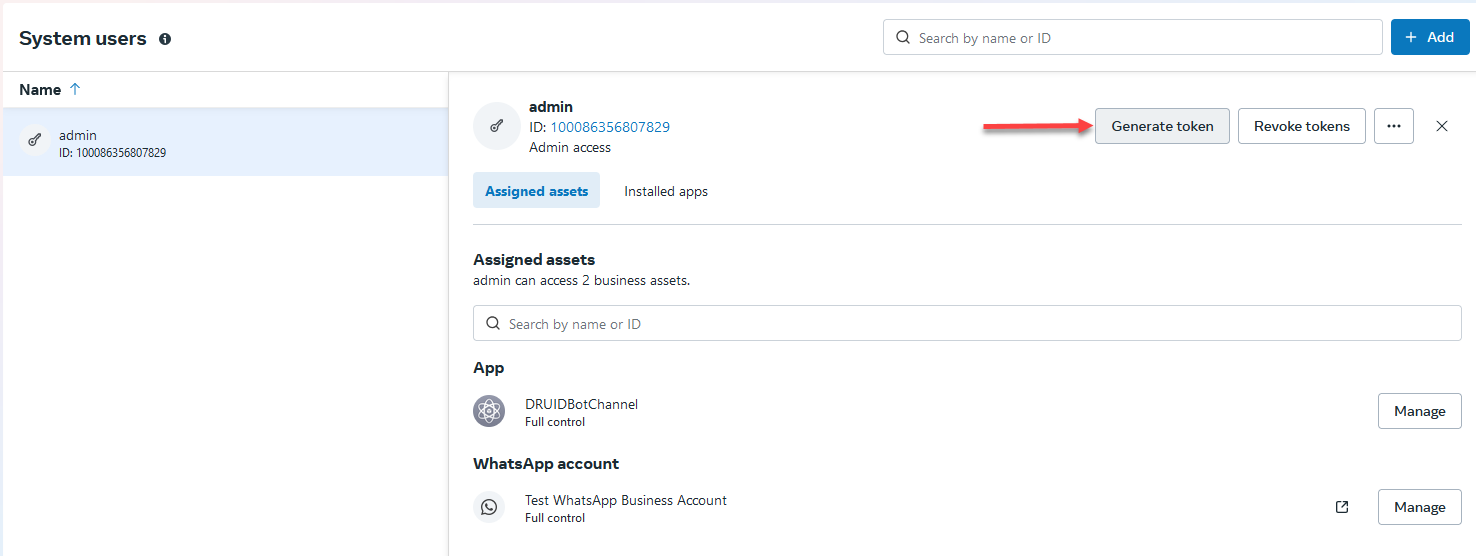
To generate a permanent token for your app in Business Manager, you must add an admin user with full control for your app (asset).
Follow these steps to generate the permanent token:
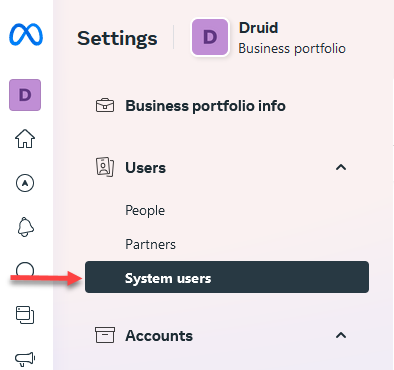
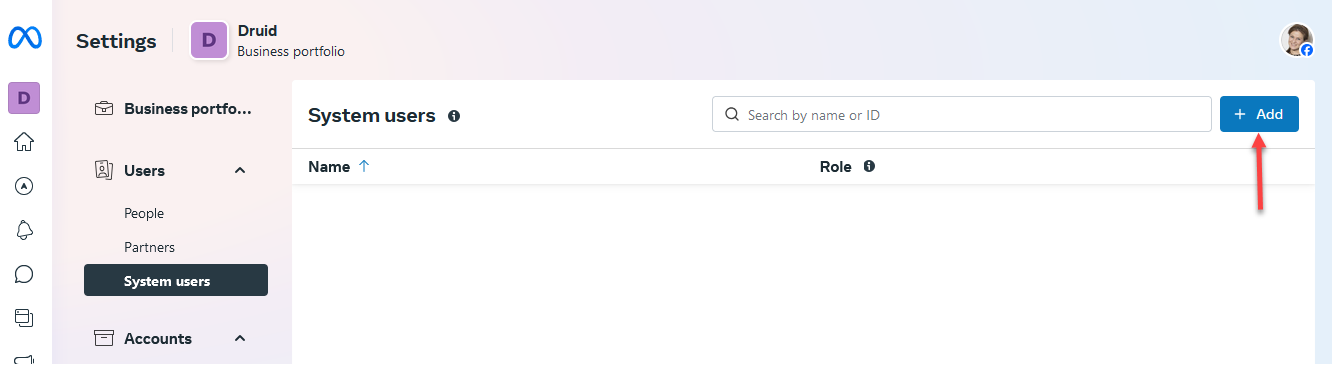
- Go to Business Settings.
- On the Users menu, click System users.
- In the System users page, click the Add button.
-
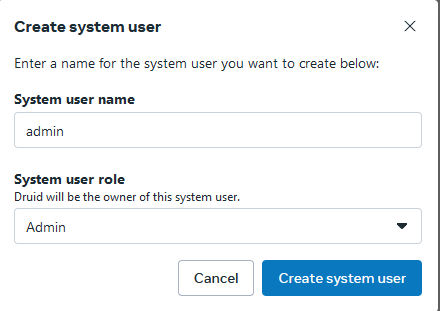
Enter a name for the system user, and from the System user role field, select Admin. Then, click Create system user.
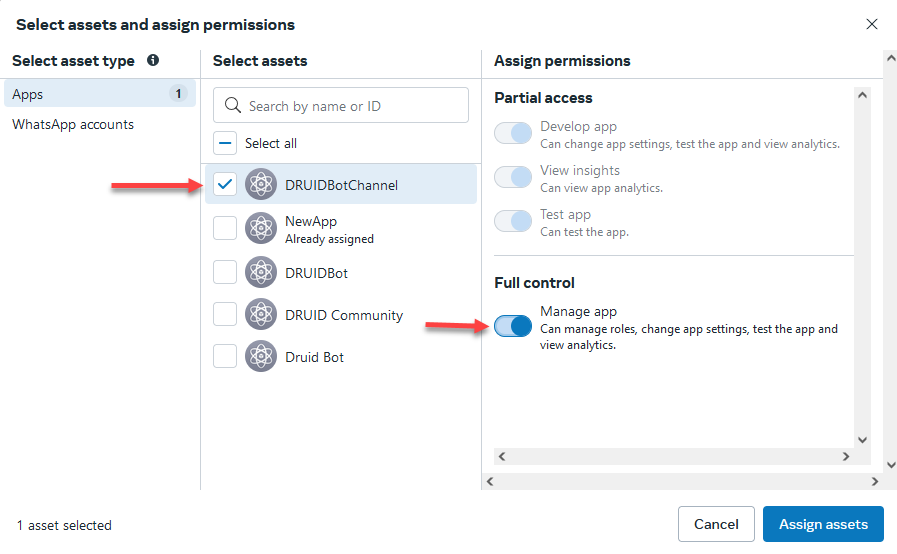
- Click on the actions icon at the top right corner of the page and select Assign assets.
- Select the app and grant the user full control to manage the app.
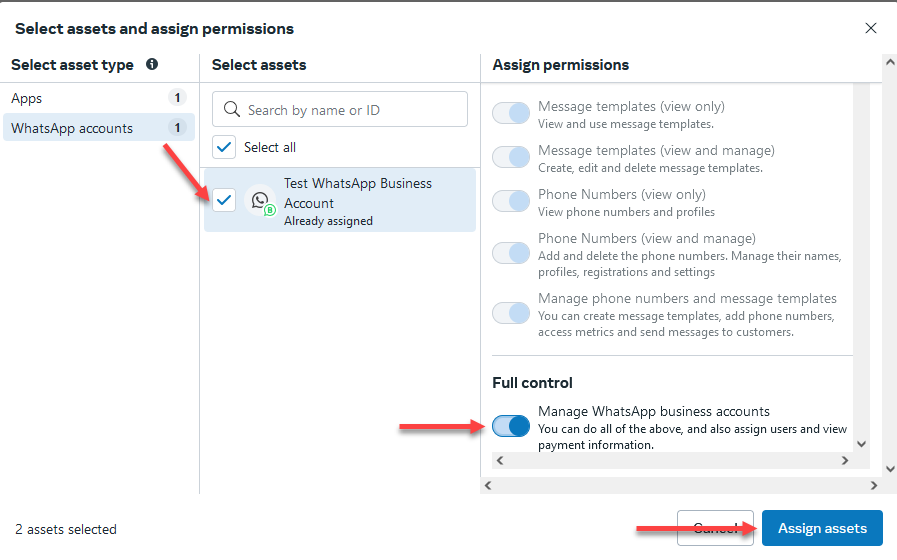
- Click on WhatsApp accounts, select the WhatsApp business account, and grant the user Full Control to manage the WhatsApp account. Then click Assign assets.
- Click Done.
- Click the Generate token button at the top-right corner of the page.
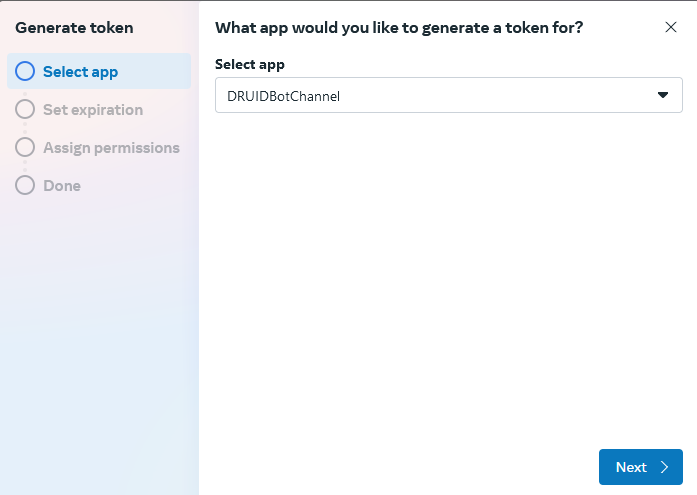
- Select your app and click Next.
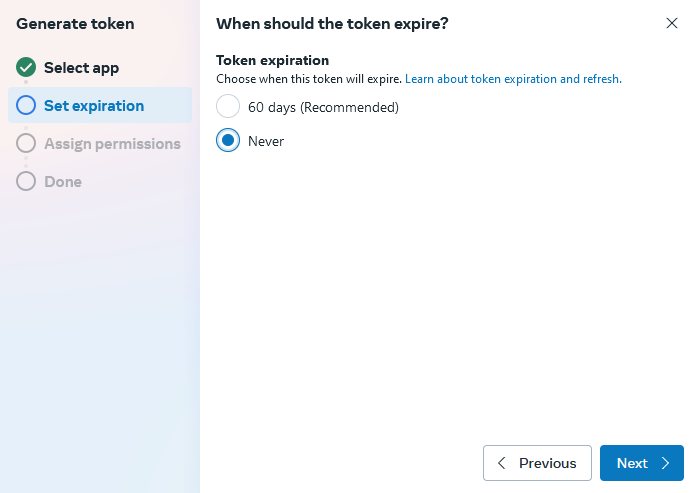
- Choose Never for the token expiration and click Next.
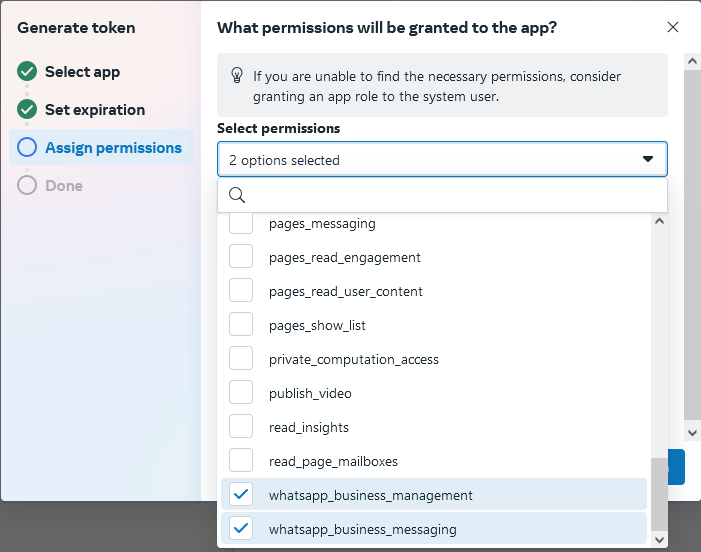
- Select the two WhatsApp permissions at the bottom of the list to assign them to the app, then click Generate Token.
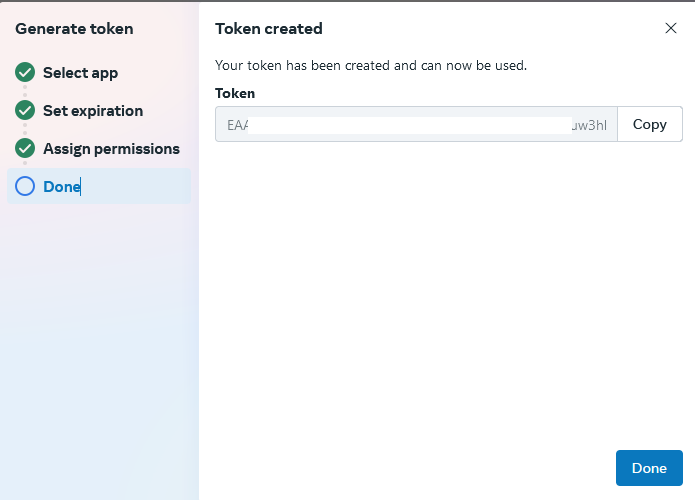
- A permanent access token has been generated.
- Copy the token and save it, as you'll need it to activate the channel in the Druid Portal. Then, click Done.
The admin user access page appears. Now you have to assign the admin user assets such as your app.
The Generate token wizard appears.
Remember, you can only share a token once. Each new system user requires a newly generated token.
Step 3: Activate the WhatsApp channel in Druid Portal
- In the Druid Portal got to your AI Agent settings. Click the Channels tab, then click WhatsApp . The WhatsApp Channel Info section expands.
- In the WhatsApp Secret field, enter the secret of you app. To get the app secret:
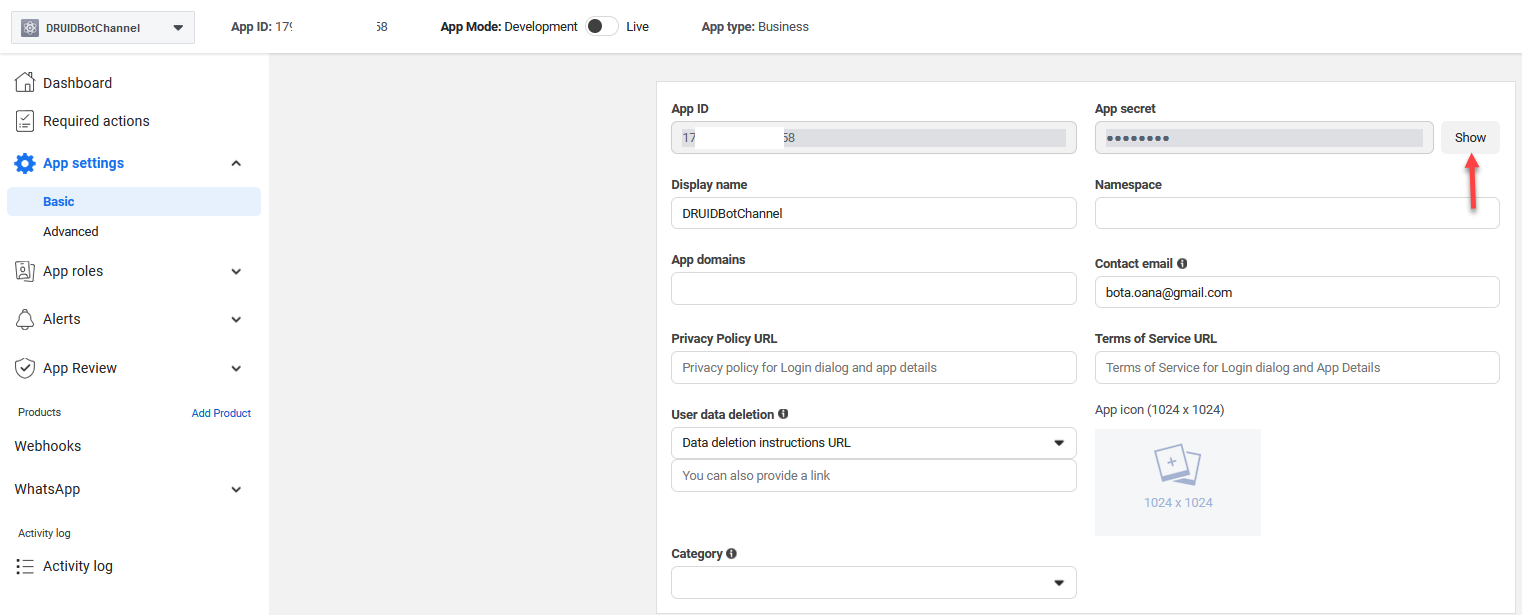
- Log in Meta for Developers, select your app and go to the app basic settings.
- Click the Show button next to the App secret.
- Enter the password associated to your Facebook account and click Submit. The App secret is showed in the field.
- Copy the App secret.
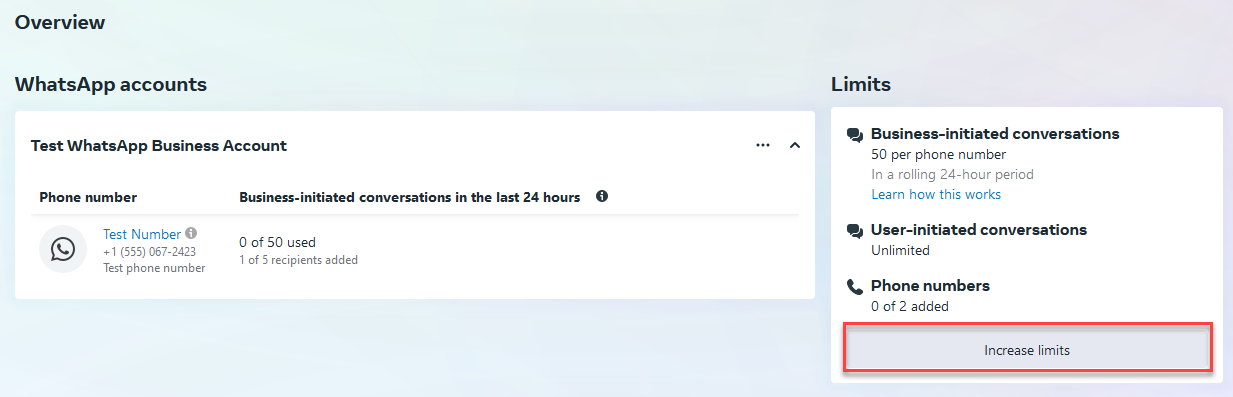
- In the WhatsApp Number field, enter the phone number associated with your WhatApp business account or increase the WhatsApp business account, without the “+”. Go to WhatsApp Manager, and increase limits for your WhatsApp account by adding new phone numbers.
- Select Phone number validation if you have a Meta account connected to multiple AI Agents to ensure the phone number uniqueness per AI Agent; otherwise, WhatsApp will send messages to all the AI Agents connected to the Meta account.
- In the WhatsApp Permanent Token field, enter the token you generated at Step 2.
- Generate the Webhook Verify Token by clicking the Generate button. This is a one-time password used to enable the webhook. Copy the token, as you'll need it to configure the WhatsApp webhook.
- In the WhatsApp API Host field, enter the following value: graph.facebook.com.
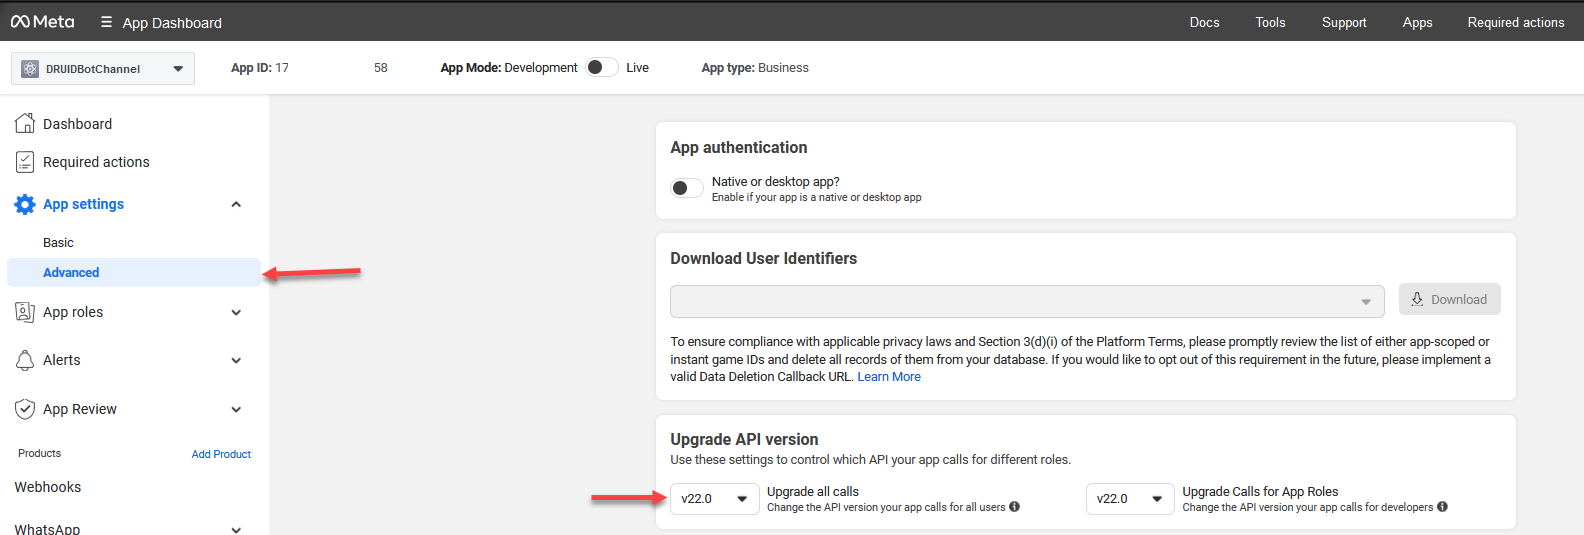
- In the WhatsApp API Version field, enter the API version your Meta app is using. Use the following format: vxx.x (e.g., v15.0).
- Copy the Druid Callback Url, you will need it to configure the WhatsApp webhook.
- Click the Publish button.
- [[ChatUser]].ChannelId = "meta-whatsapp"
- [[ChatUser]].UserId - Stores the user's phone number.
- [[ChatUser]].ChannelBotIdentifier - Stores the AI Agent number through which a user message arrived. This field is available in DRUID 8.3 and higher.
- [[HelpdeskClient]].PhoneNumber - Stores the user's phone number if the user engages with a helpdesk agent in a live chat.
- Click Save & Close to save the WhatsApp channel configuration.
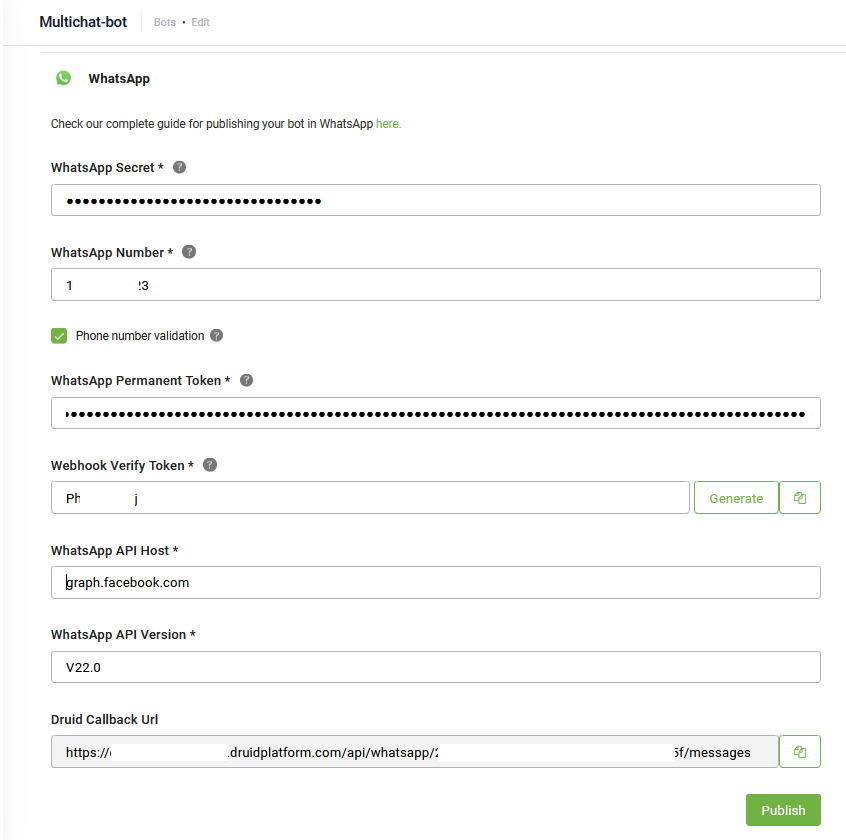
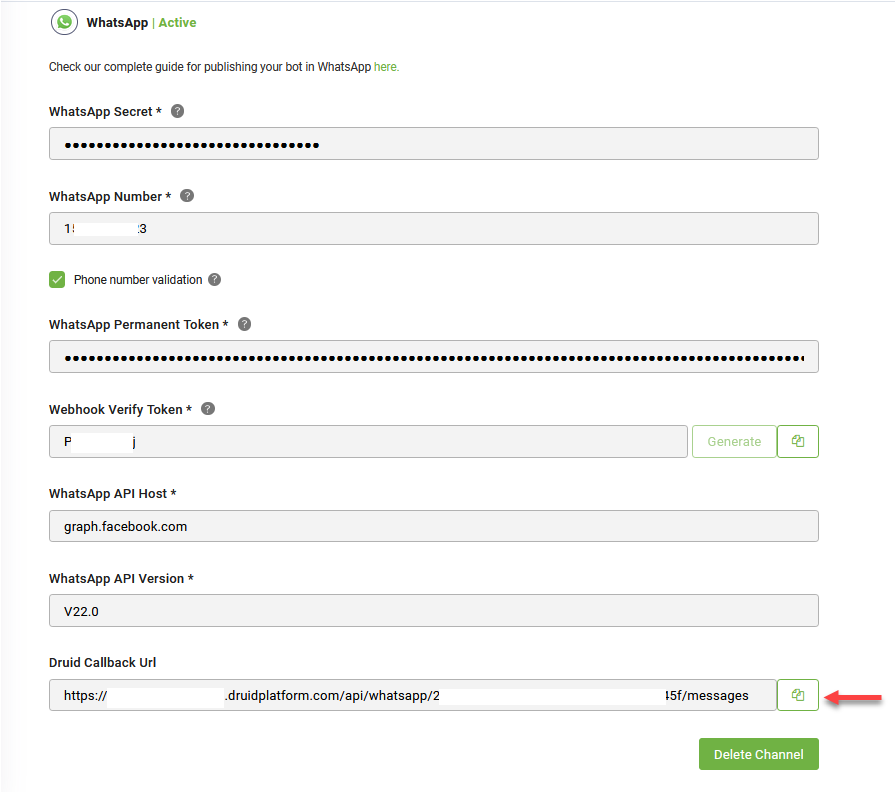
After the channel's activation, the following fields are available in DRUID:
Step 4: Enable Webhooks
In order to send messages and other events from your AI Agent to WhatsApp, you must enable webhooks integration. To do so, follow these steps:
- In Meta for Developers, go to your app dashboard and on the menu click > WhatsApp > Configuration.The Configuration page appears.
- In the Webhook section, enter the Webhook Verify Token and the Druid Callback Url you copied from DRUID, then click the Verify and save button
- Subscribe to message_template_status_update and messages
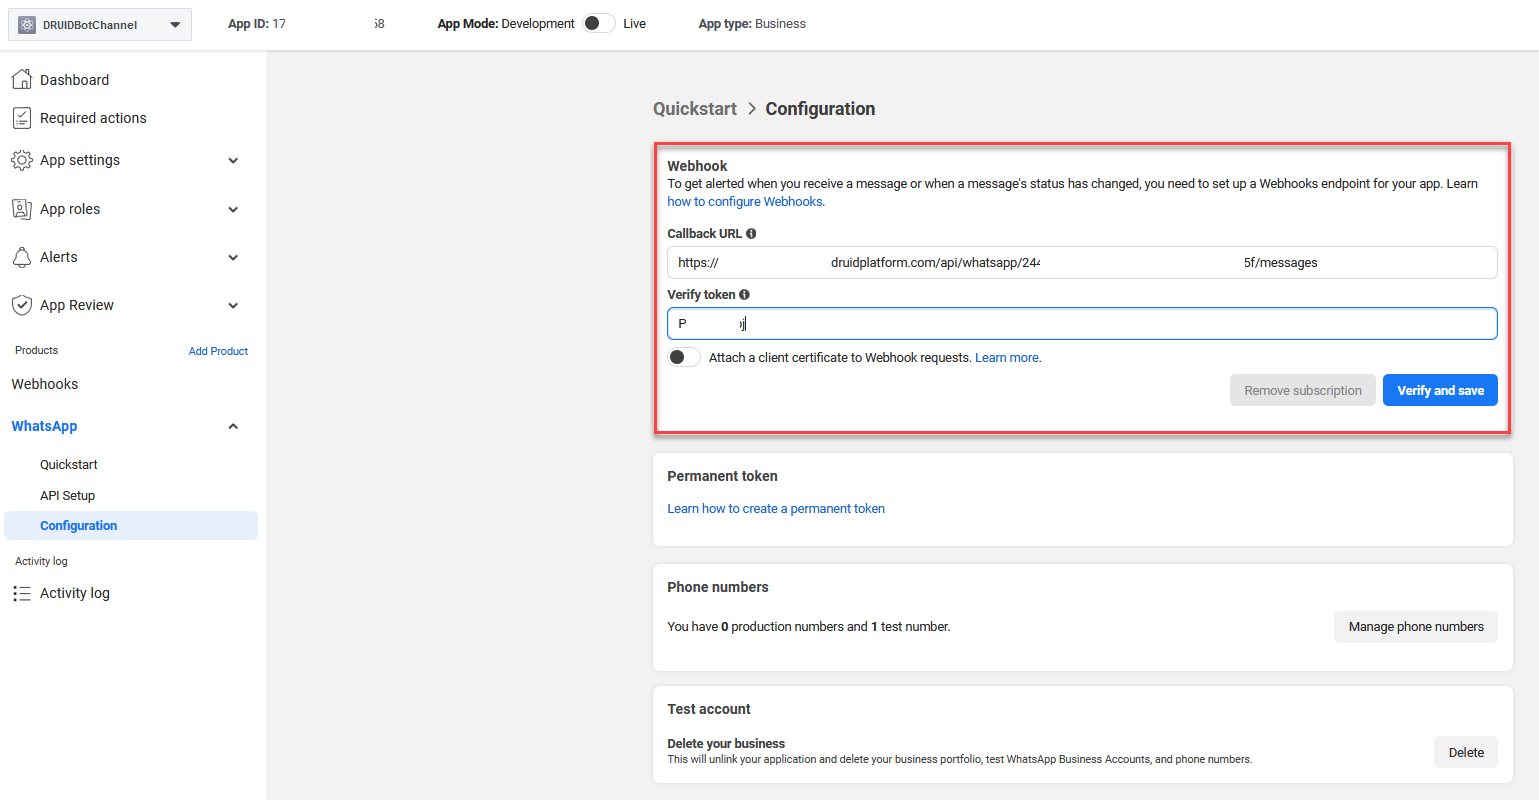
The Webhook fields appear on the page.
Once you finish the steps in the Enable webhooks section, the integration of the DRUID chat AI Agent and WhatApp via Meta is complete.
Submit the Meta app for review and after the review is successful, make the app public.
Step 5. Associate multiple phone numbers to the same AI Agent (optional)
To associate multiple WhatsApp phone numbers to the same WhatsApp Meta application, go to WhatsApp Manager, and increase limits for your WhatsApp account by adding new phone numbers.
For more information, see Phone Number Limits.
Step 6. Talk to your AI Agent
To open the AI Agent in the WhatsApp channel, in the Druid Portal, go to the AI Agent settings, click the Channels tab and click on the WhatsApp channel icon. You can start talking to the AI Agent.
Receiving and Processing Voice Messages
DRUID supports audio messages only through Microsoft Cognitive Services and ElevenLabs. For Microsoft Cognitive Services, it supports all languages available in the Azure Speech Service. For a complete list of supported languages, refer to Language and Voice Support for the Speech Service.
Here's how it works:
- Receive audio messages. When a user sends an audio message via WhatsApp, the AI Agent will:
- Process the audio recording using Azure Speech/ElevenLabs resources configured in the channel settings.
- Recognize the language for Speech-To-Text (STT) based on the user's language ([[ChatUser]].Language).
- Log in the Conversation History the user message type as 'Audio Recording'.
- Process audio. The AI Agent:
- Converts the audio message to text using Microsoft Cognitive Services/ElevenLabs.
- Uses the converted text to predict the next conversational step.
- Respond. By default, the AI Agent will respond to voice messages with text. You can choose the AI Agent to reply with voice.
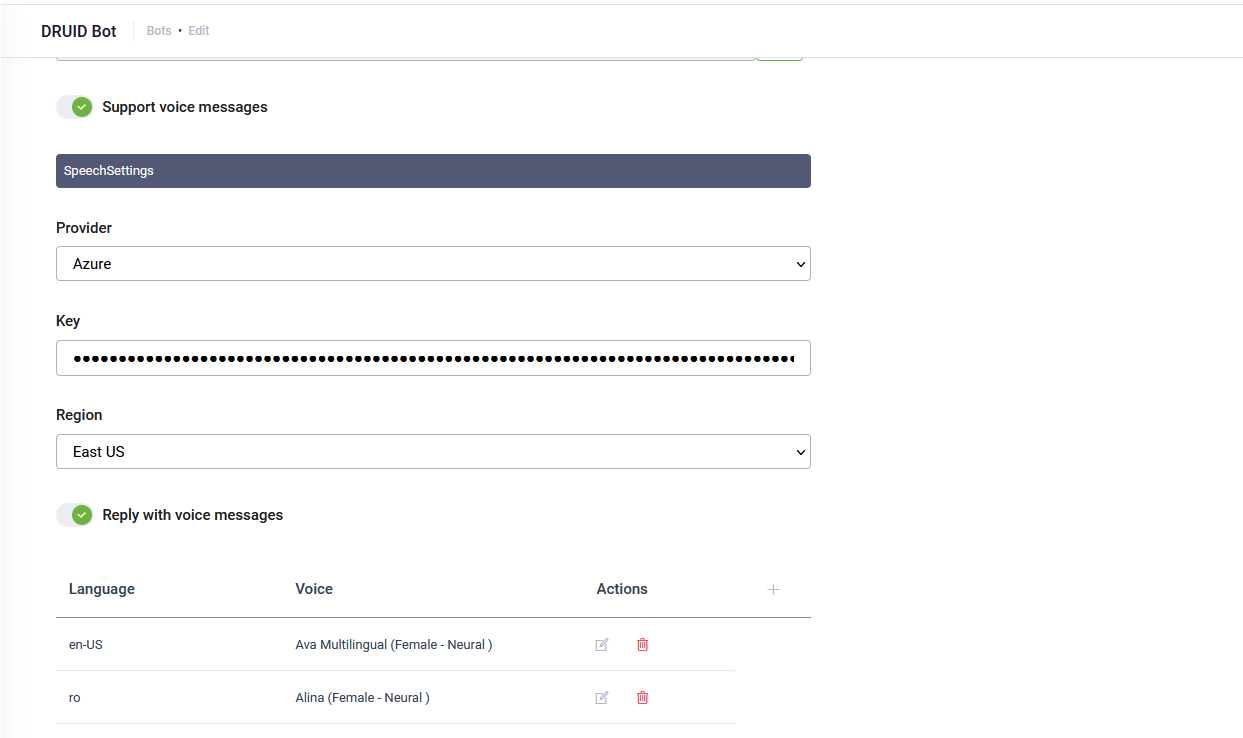
To enable voice messages support, follow these steps:
- In the channel configuration page, tap on Support voice messages.
- Select the Speech provider (either Azure or ElevenLabs), then enter the required details:
- For Azure, enter your MS Azure Speech API key and select the region.
- For ElevanLabs, enter your API key.
- By default, the AI Agent replies with text. To have the AI Agent respond with voice, toggle on Reply with voice messages.
- In the table, click the plus icon. A row is added to the table.
- From the Language drop-down, select the AI Agent language (default or additional) and from the Voice drop-down, select the human-like neural or standard voice the AI Agent will use to respond to the user.
- Click the Save icon displayed inline. You can add more languages and different voices per language as best suits your needs.
- If the channel has not been published yet, click Publish.
- Click the Save button at the bottom of the page to save the AI Agent configuration.
Enable your AI Agent to process voice messages on WhatsApp by configuring and activating the native Voice (MS Cognitive Service) channel.