Vonage Voice
Vonage Voice is a cloud-based voice communication service provided by Vonage. It enables businesses to make and receive voice calls over the internet using Voice over IP (VoIP) technology.
Integrating DRUID bots with Vonage Voice enhances customer interactions by enabling seamless voice-based conversations, automated call handling, and efficient call routing, improving support and engagement while reducing operational costs.
Prerequisites
- You built and published a DRUID bot.
- You have a Vonage account.
Integrate DRUID with Vonage Voice
To integrate DRUID with Vonage Voice, follow these:
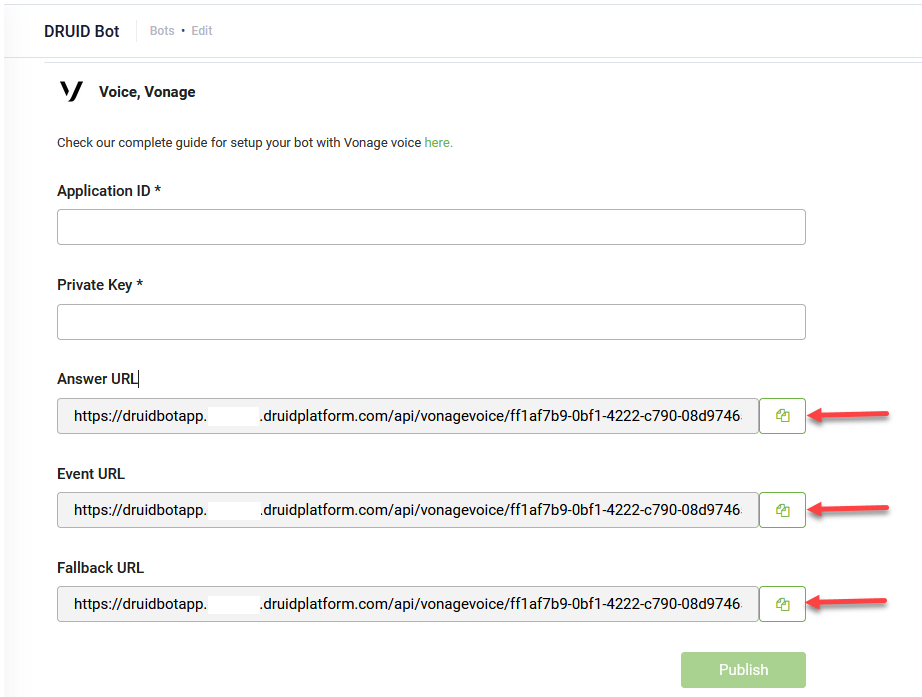
Step 1. Get the channel URLs from the DRUID Portal
Go to the bot details page and click on the Channels tab. Then, click the Vonage, Voice section header. Copy the Answer URL, Event URL and Fallback URL, as you’ll need them to configure your Vonage application.
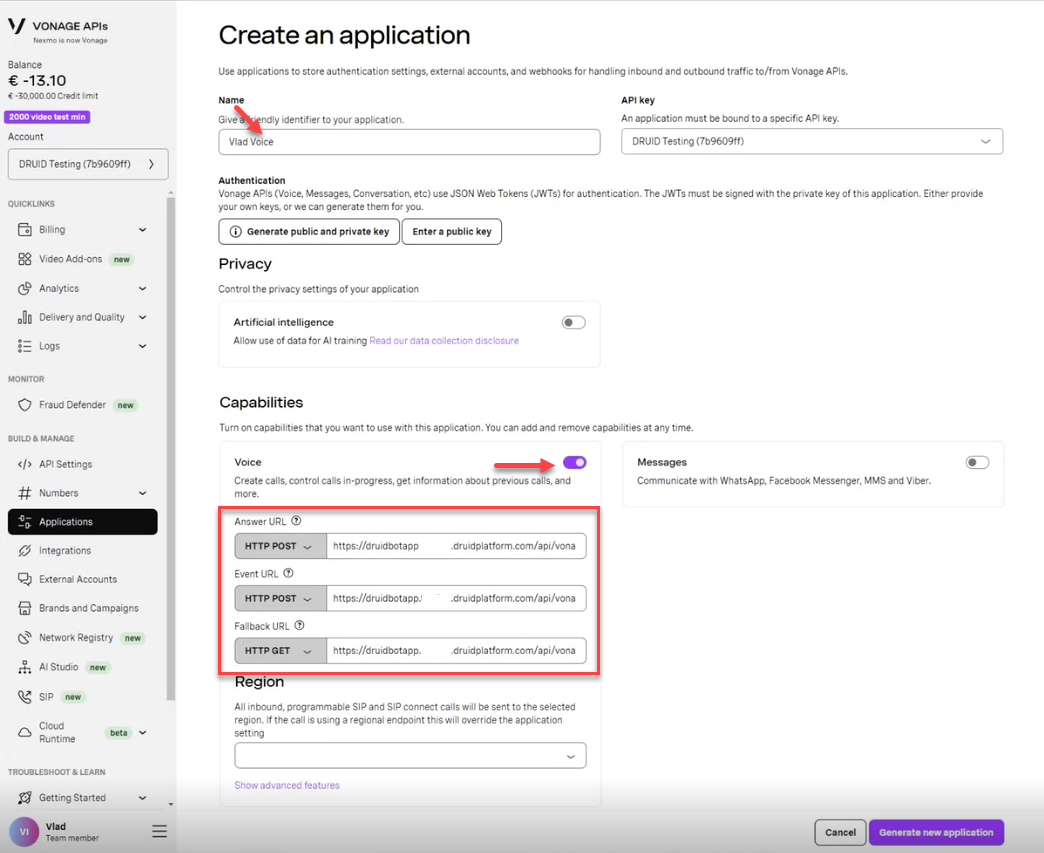
Step 2. Create and configure your Vonage application for Voice
To integrate Vonage Voice with DRUID, you need to configure a Vonage application. This involves setting up a phone number for voice, adding channel URLs from the DRUID Portal, and retrieving API private key. Follow the steps below to complete the setup:
- Log in to the Vonage Portal.
- In the BUILD & MANAGE menu, click Applications.
- In Your applications page, click the Create a new application button.
- Enter a name for your application.
- In the Capabilities section, tap on Voice.
- Enter the Answer URL, Event URL and Fallback URL you copied from the DRUID Portal.
- Click the Generate new application button to create the app.
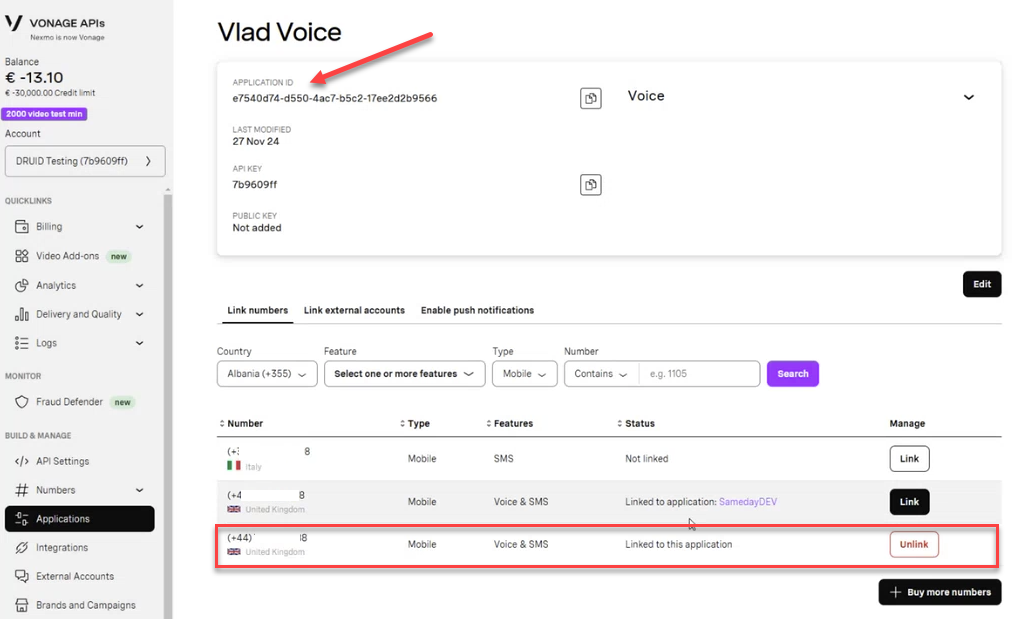
- Link the desired phone number you have for SMS & Voice. If you don't have one, buy it.
- Note down the phone number and the Application ID, as you’ll need them to configure the channel in the DRUID Portal.
- Go back to your app configuration page ( BUILD & MANAGE menu > Applications> your app).
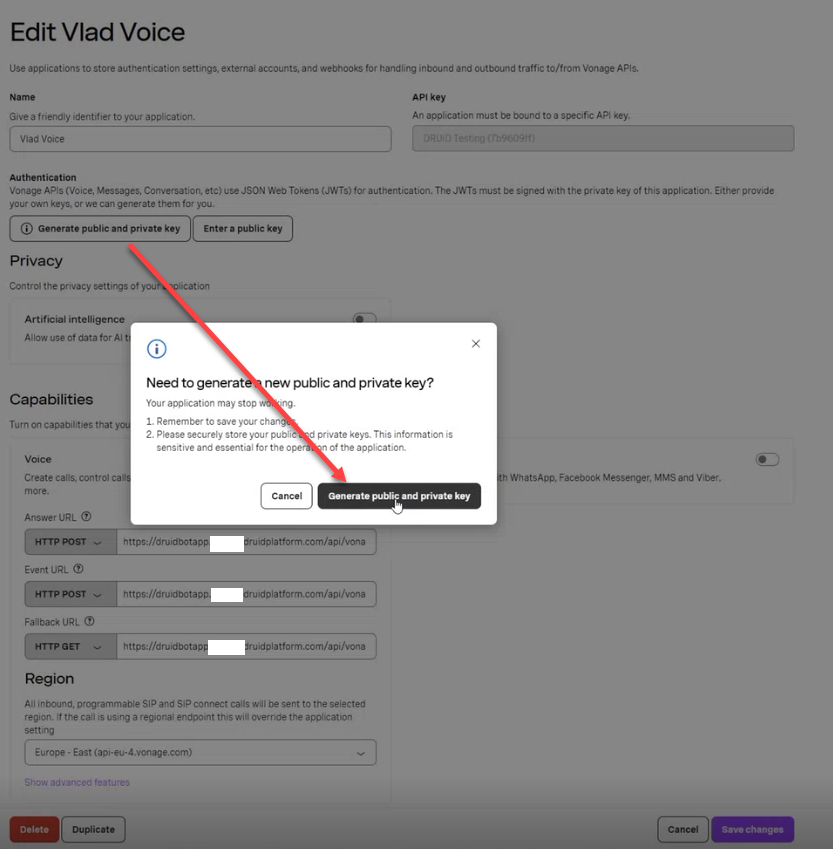
- Generate public and private key.
- The private key is downloaded on your computer.
Step 3. Activate the Vonage Voice channel in DRUID
To activate the Vonage Voice channel, follow these steps:
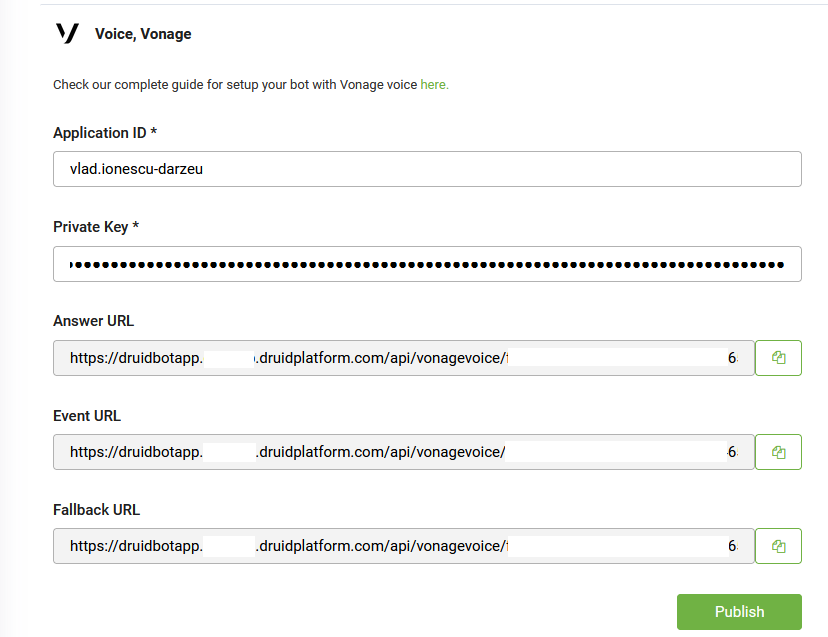
- In the DRUID Portal, navigate to the Voice, Vonage configuration section.
- Enter the Application ID you copied from Vonage and the Private Key from the file you downloaded when generating the app private key in Vonage.
- Click the Publish button to activate the channel.
After the channel’s activation, the following fields are available in DRUID:
- [[ChatUser]].ChannelId = "vonage-voice"
- [[ChatUser]].UserId - Stores the user's phone number in international format.
Transferring the call to a live agent
There are cases when the bot may be unable to fully resolve a user's request and needs to escalate the call to a human agent in a call center. This feature allows the bot to seamlessly transfer the call.
To enable your bot to escalate a call to a live agent, follow these steps:
- Add a backchannel step named transfer to the conversation flow where escalation is required.
- In the Input mapping section of the transfer backchannel flow step, you must provide an entity that stores the necessary transfer values. E.g., [[VoiceParams]].
- Ensure that the entity you provided in Input mapping contains a string field named transferTarget.
- In the SetVariables section of the transfer backchannel step, set [[entity]].transferTarget to the specific value provided by your Vonage contact center administrator.
- Save the step.
![]()
For demo purposes, you can set [[entity]].transferTarget to a phone number associated with an agent.
![]()
By default, once a transfer is initiated, the bot immediately disconnects from the call, regardless of whether the transfer to the live agent is successful.
Sending call parameters to Vonage Voice
Enhance your call interactions by sending additional data to Vonage Voice when a call is initiated. This enables greater flexibility and integration with your call workflows.
To send relevant data when a call is initiated, in the Advanced Parameters JSON field, set the desired parameters. DRUID supports sending the following call parameters:
| Parameter | Description |
|---|---|
| druidLanguage | The bot default language. |
| bargeIn | Set to true so this action is terminated when the user interacts with the application either with DTMF or ASR voice input. Use this feature to enable users to choose an option without having to listen to the whole message in your Interactive Voice Response (IVR). If you set bargeIn to true the next non-talk action in the NCCO stack must be an input action. The default value is false. |
| loop | The number of times text (the message to be synthesized in the call) is repeated before the call is closed. The default value is 1. Set to 0 to loop infinitely. |
| level | The volume level that the speech is played. This can be any value between -1 to 1. Th default value is 0. |
| language | The language (BCP-47 format) for the message you are sending. Possible values supported by Vonage Voice are listed in the Text-To-Speech guide. |
| style | The vocal style (vocal range, tessitura and timbre). The default value is 0. Possible values are listed in the Text-To-Speech guide. |
| premium | Set to true to use the premium version of the specified style if available, otherwise the standard version will be used. The default value is false. You can find more information about Premium Voices in the Text-To-Speech guide. |
| endOnSilence | Controls how long the system will wait after user stops speaking to decide the input is completed. The default value is 2 (seconds). The range of possible values is between 0.4 seconds and 10 seconds. |
| startTimeout | Controls how long the system will wait for the user to start speaking. The range of possible values is between 1 second and 60 seconds. The default value is 60. |
| maxDuration | Controls maximum speech duration (from the moment user starts speaking). The default value is 60 (seconds). The range of possible values is between 1 and 60 seconds. |
| sensitivity | Audio sensitivity used to differentiate noise from speech. An integer value where 10 represents low sensitivity and 100 maximum sensitivity. The default value is 90. |
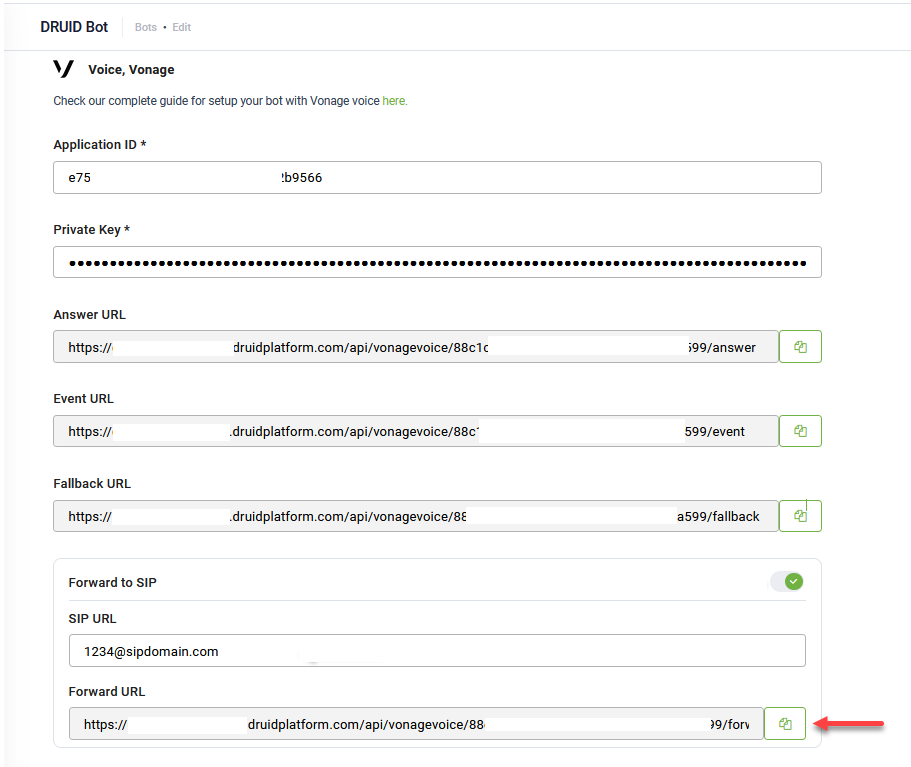
Forwarding voice calls to SIP
This section explains how to configure DRUID to forward inbound calls received on your Vonage voice-enabled virtual number directly to a SIP (Session Initiation Protocol) endpoint. This allows you to seamlessly integrate your Vonage numbers with existing SIP-compatible systems.
When a call is received on your configured Vonage virtual number, DRUID can redirect the call to any SIP-compatible system. This includes VoIP phones, Private Branch Exchanges (PBXs), or dedicated SIP servers.
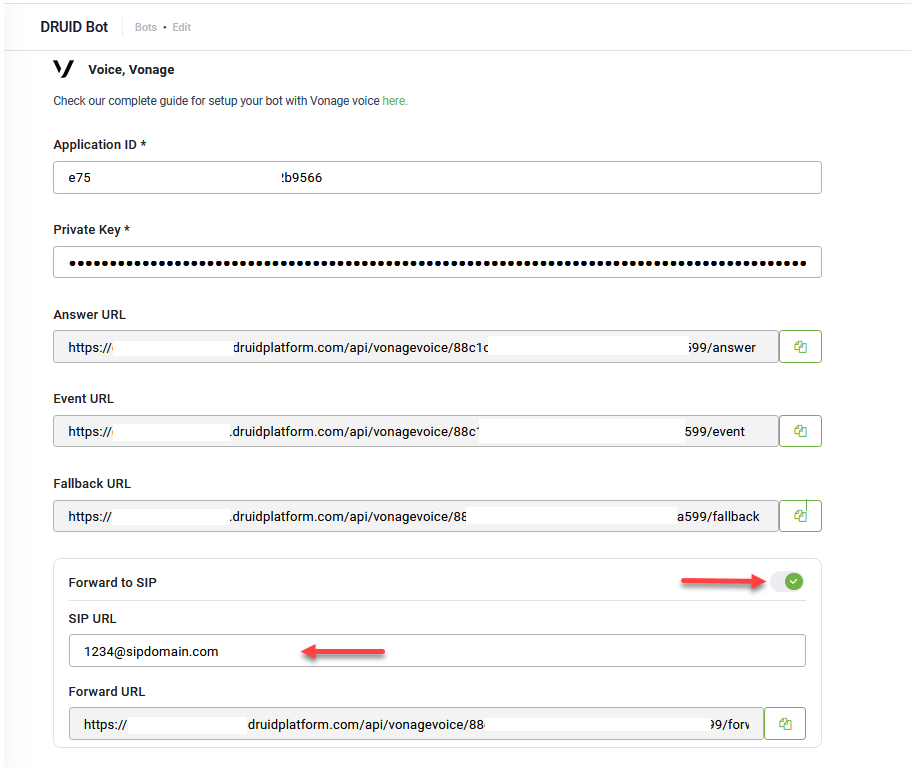
To set up call forwarding, follow these steps:
- Tap on Forward to SIP.
- In the SIP URL field, enter your SIP Uniform Resource Identifier (URI). This can be in one of two formats:
- IP Address: username@IP_ADDRESS (e.g., 123@201.354.123.456)
- Domain: username@domain.com (e.g., 1234@sipdomain.com)
- Click Save to apply your changes.