Voice AudioCodes
The Voice channel through VoiceAI Connect from AudioCodes enables you to deliver a seamless voice experience to the users talking to your DruidAI Agents.
VoiceAI Connect acts like a hub connecting different telephony systems (telephony channel, public telephony provider, contact center, enterprise communication platform, or any platform communicating via WebRTC) to the Druid bot framework and voice AI cognitive services.
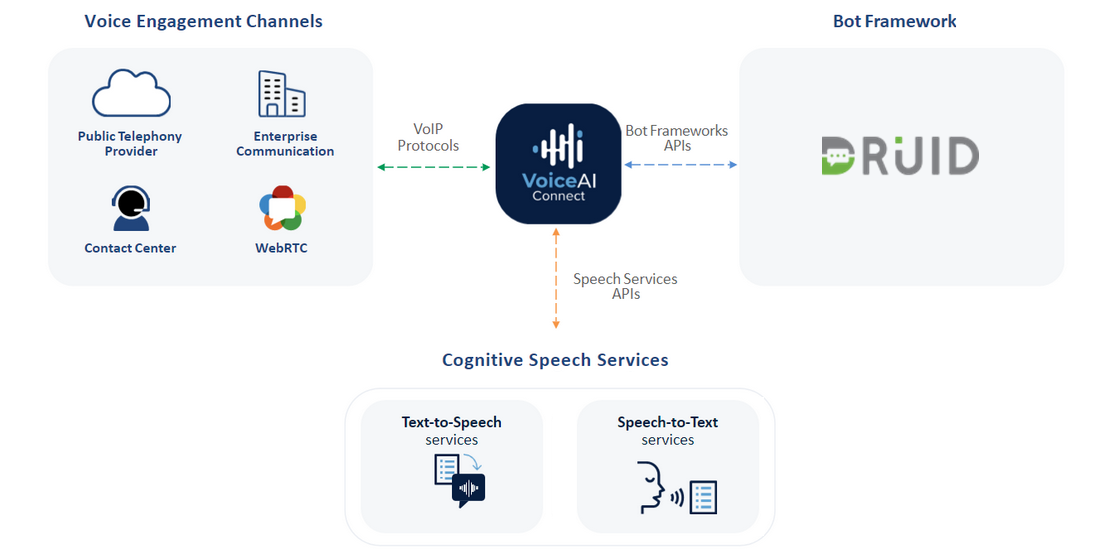
In a typical AI Agent deployment, VoiceAI Connect receives a phone call and connects it to your AI Agent.
Prerequisites
- For Druid on premise deployments, make sure that you provide inbound access from the following messaging endpoint: DRUID.BotApp.
Activate the Voice AudioCodes Channel
To activate the channel, follow these steps:
- In the Druid Portal, go to AI Agent settings, and then click the Channels tab.
- Click the AudioCodes card.
- Generate the required security token. Click the Generate button to create the security token.
- By default, the communication between DRUID and VoiceAi Connect is done via the WebSocket protocol. Clear the Use web socket checkbox only for special deployments where network restrictions may deny WebSocket communication.
- In the Reply timeout in seconds field, enter the maximum time (in seconds) the AI Agent has to respond before the call is automatically disconnected. For more information, see Handle Conversation Disconnect.
- In the Language map JSON field, provide a one-to-one mapping between the language codes used by the Speech-To-Text (STT) service provider (key on the left) and DRUID-specific language codes, that is, ISO 639-1(key on the right), providing the Text-to-speech voice DRUID will be using. For reference, consult the locales and voices supported for Text-to-speech provided by Azure Cognitive Services.
- Send the token and DRUID URL to your Druid representative and they will set up the connection between your AI Agent and VoiceAI Connect.
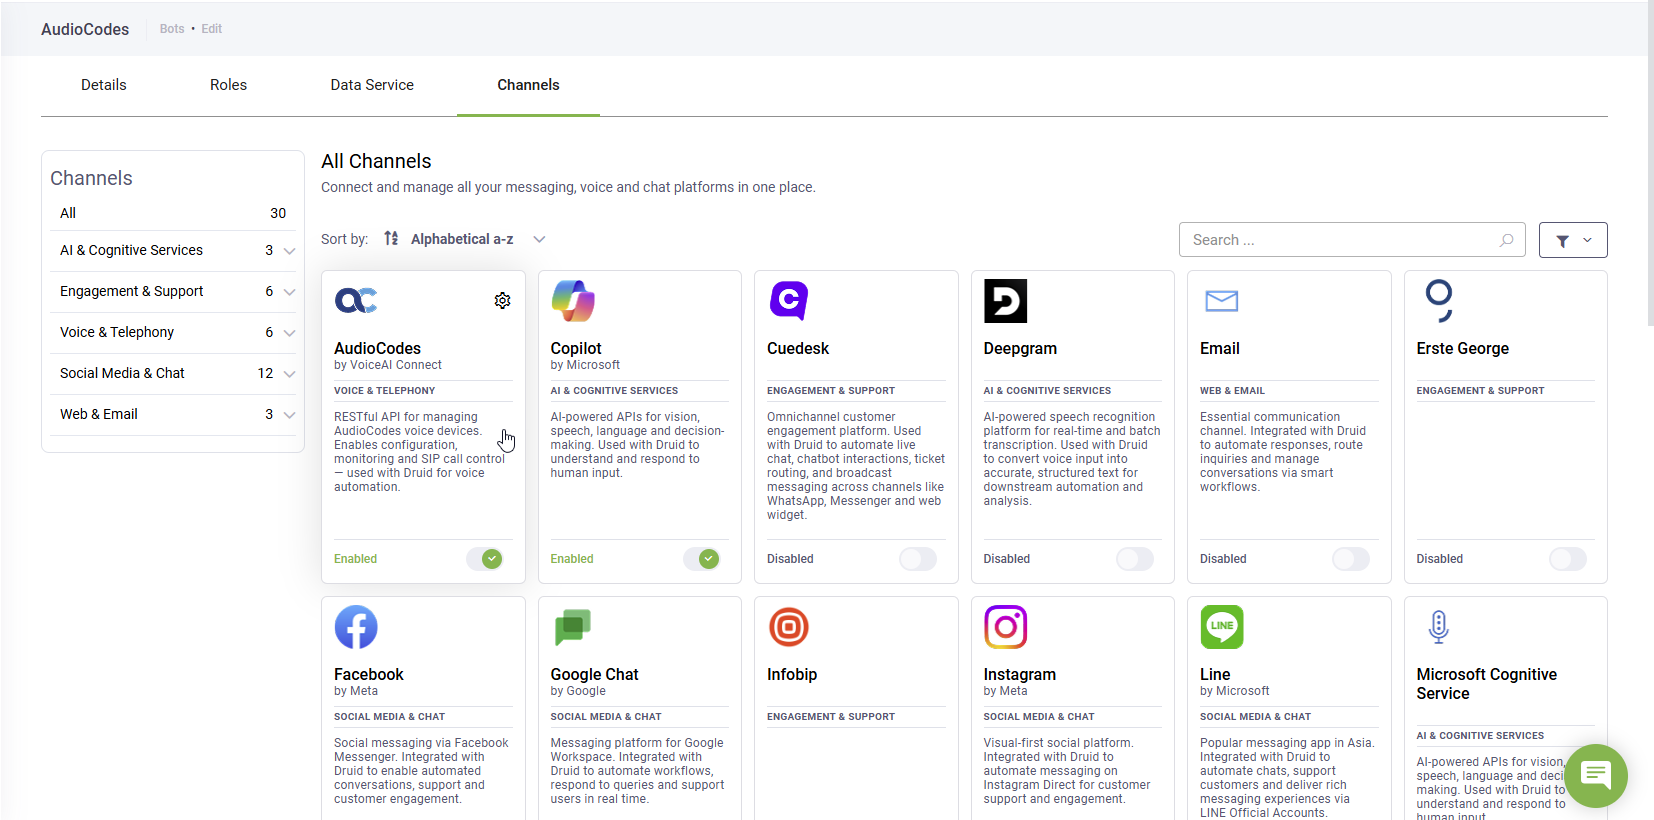
The channel configuration modal appears.

Use the following format for the language codes mapping:
"<STT Provider language code/locale>": "<DRUID-specific language code>|<Text-to-speech voice>"
For example:
{
  "ro-RO": "ro|ro-RO-AlinaNeural",
  "en-US": "en-US|en-US-AshleyNeural",
  "th-TH": "th-TH|th-TH-AcharaNeural"
}After the channel’s activation, the following fields are available in Druid:
- [[ChatUser]].ChannelId = “audiocodes”. It identifies the channel.
- [[ChatUser]].Phone – Stores the Calling Party phone number. (The initiator of the call).
- [[ChatUser]].CalleePhoneNumber – Stores the Called Party phone number. (The destination of the call).
Because the AI Agent can both receive and initiate calls, the values in thelast two fields shift depending on the direction:
Inbound Call (User calls AI Agent):
- [[ChatUser]].Phone stores the user phone number.
- [[ChatUser]].CalleePhoneNumber stores the AI Agent phone number.
Outbound Call (AI Agent calls User):
- [[ChatUser]].Phone stores the AI Agent phone number.
- [[ChatUser]].CalleePhoneNumber stores the user phone number.
Handle Conversation Disconnect
A call disconnects if the AI Agent does not respond within the Reply timeout in seconds threshold set on the channel or if the user says nothing for 120 seconds.
You can configure what happens on conversation disconnect. Go to the AI Agent details, click the Dialogue management section header and from the Voice call terminate flow field, select the flow to be triggered on disconnect. If no such flow is set, the call disconnects.
When the call disconnects, the following data is logged in the conversation context:
- [[ChatUser]].VoiceConversationTerminatedReason - The reason for which the call is disconnected. E.g., “Client Side”. The reason of the disconnect can be one of the following:
- SocketInterrupted – The connection was interrupted.
- UserBecameSilent – The user said nothing for 120 seconds.
- CallTerminatedByCaller – The user terminated the call.
- [[ChatUser]].VoiceConversationTerminatedReasonCode – The code (text) associated to the disconnect reason. E.g., “client-disconnected”.
Conversation History
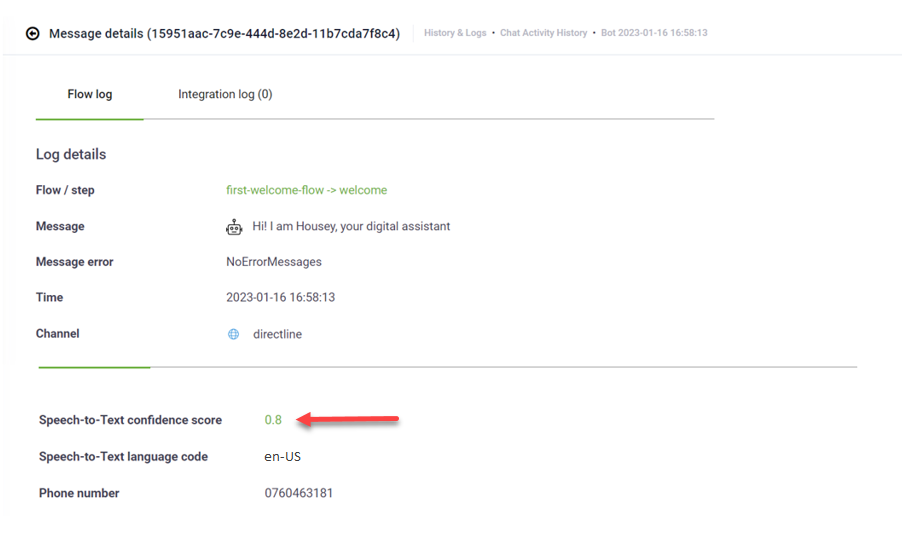
All voice conversations begin with “[Voice start event]”. This is particularly useful for debugging purposes to measure the time from the moment when the call was initiated (AI Agent picks up the call) until the AI Agent says the first message.
For this channel, Druid also logs in the Conversation History the Speech-to-Text Confidence Score, that is, the value representing the confidence level of the recognition received from the speech-to-text provider.
When the call disconnects due to an error, the disconnect reason logged in the Conversation History is “PlatformIntegrationError” (the message status is Platform Integration error).