How to Set Up the UiPath Integration
Using the Flow Designer, you can easily set up this UiPath integration by adding a flow step of type UiPath and configuring it as best suits you needs. You can either create a new flow or add a new step to an existing flow.
Step 1. Add UiPath flow step
To add a flow step that will trigger an UiPath unattended robot, you have two options:
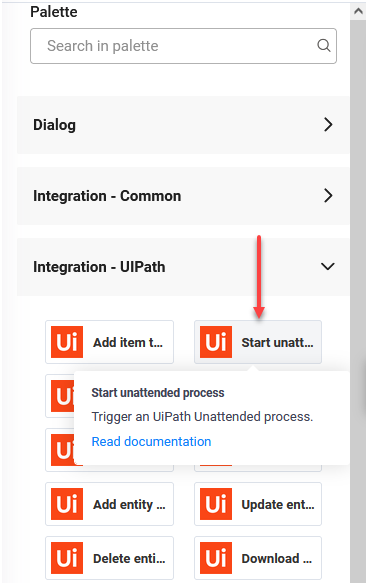
- Using the Flow Palette. From section Integration - UiPath, drag the Start unattended process integration and drop it within the flow where you want DRUID to trigger the unattended robot.
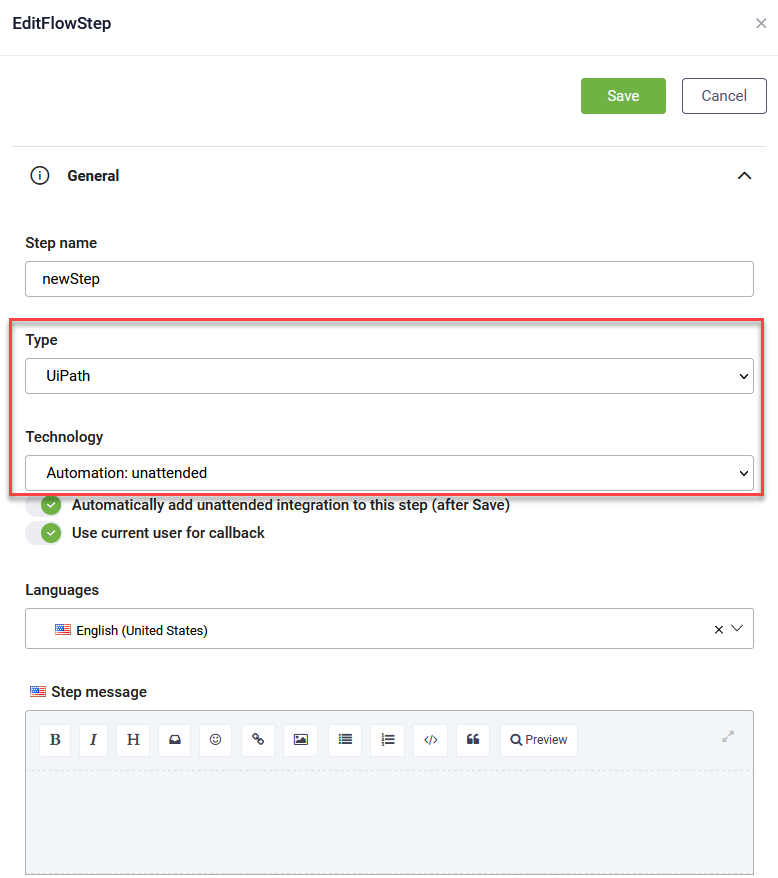
- Using the Flow Designer in list view . Add a new flow step and edit it as follows: in the General section, from the Type field, select UiPath and from the Technology field, select Automation: unattended. If you want to add a connector action and an integration task on the step after save, tap on Automatically add unattended integration to this step (after Save).
DRUID will automatically create (for this step) a connector action (named <your flow name>-<step name>) and a task (named "StartUiPathUnattendedJob"), which you can configure to accommodate your UiPath integration.
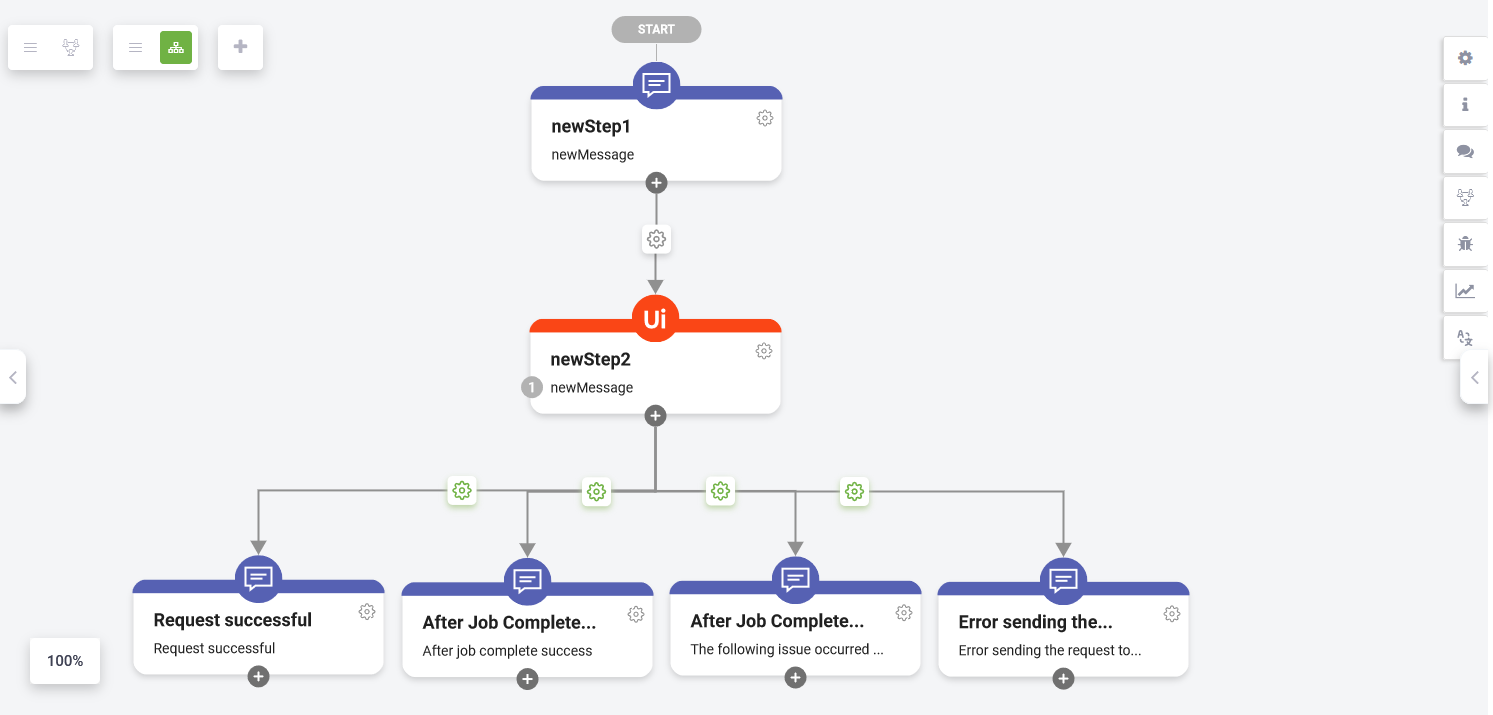
When you add a flow step of type UiPath to a flow, the flow step automatically has four child steps, providing you with all possible flow exits:
- Request successful. DRUID successfully sends the “Start a job” request to the Orchestrator.
- Error sending the request. An error occurred while DRUID tried sending the request to the Orchestrator.
- After job completes successfully. The job executed the process and completed successfully.
- After job completes with error. An error occurred during the job execution.
The conditions set on child steps are read-only making the flow configuration simple.
With this new UiPath flow step; there is no need to create a different, dedicated callback flow because the Druid AI Platform knows to resume the flow to the corresponding exit endpoint: either job completes successfully or the job completes with errors.
The events following process job completion can be designed in the same flow from where the process is initiated. After the job completes, the conversation will begin in the same flow, but not from its first step, but directly from one of the two “After job completes…” steps.
This conversation can be initiated either to the same AI Agent user which started the UiPath process (tap on the Use current user for callback option), or to a certain user, specified on the dedicated field on the UiPath step (when the option is disabled). In that field, provide the MasterId of the required user in one of the following formats:
- “<user masterId>” (directly a string)
- @<masterId> (DRUID local variable)
- [[<Entity>]].<masterId> (DRUID entity field of type string).
Step 2: Add connector action
- Click on the flow step of type UiPath. Click on the Post Actions section header. The section expands.
- Click the Add new button (
 ).
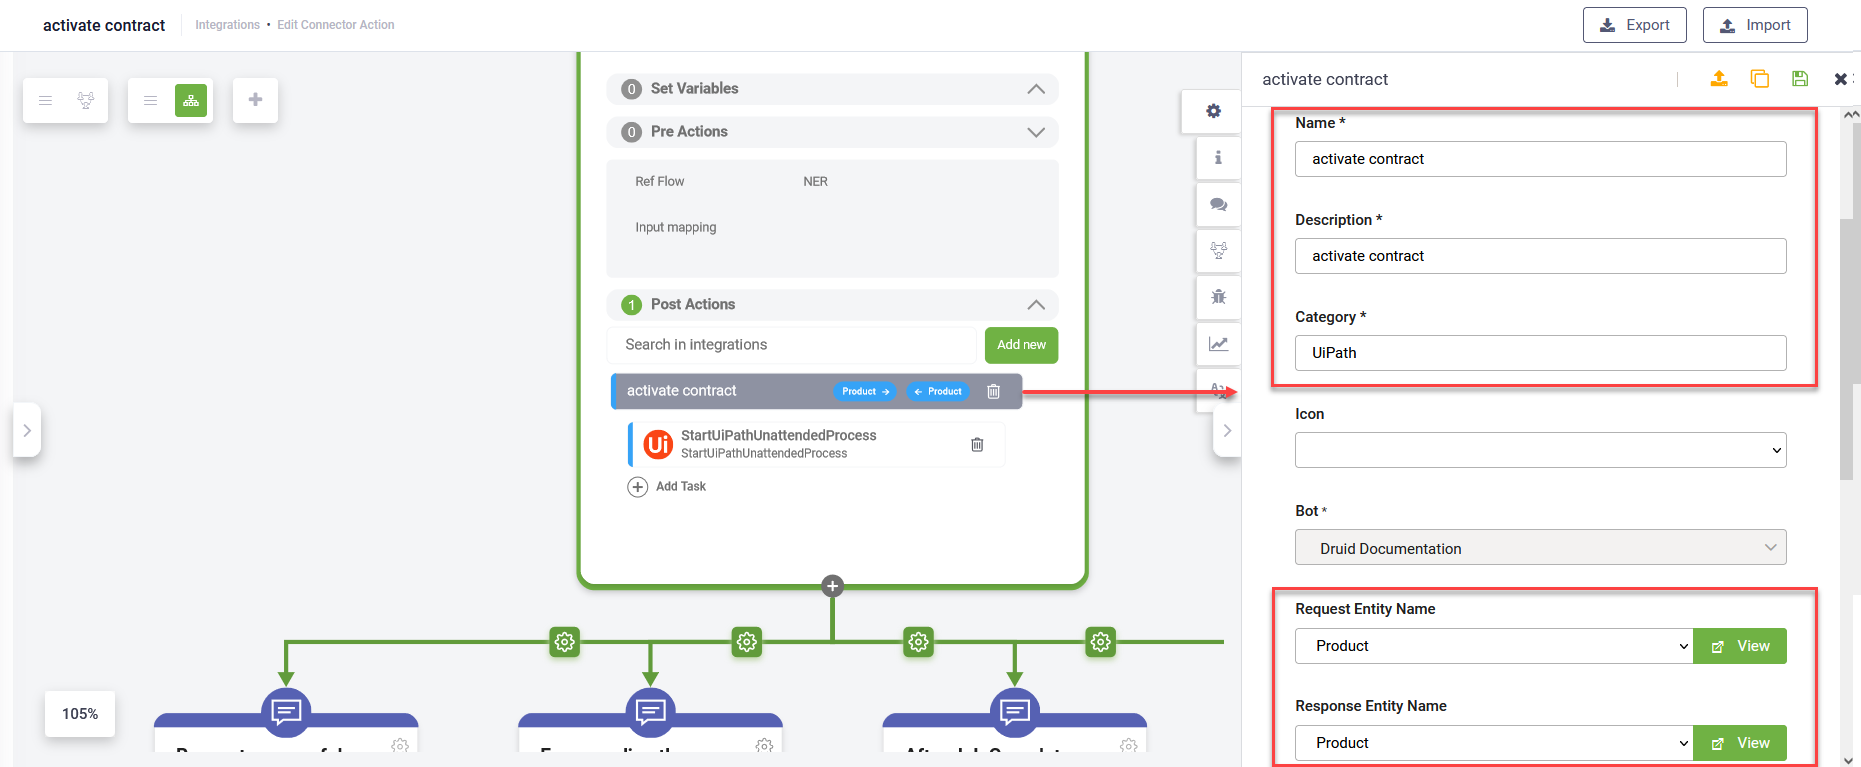
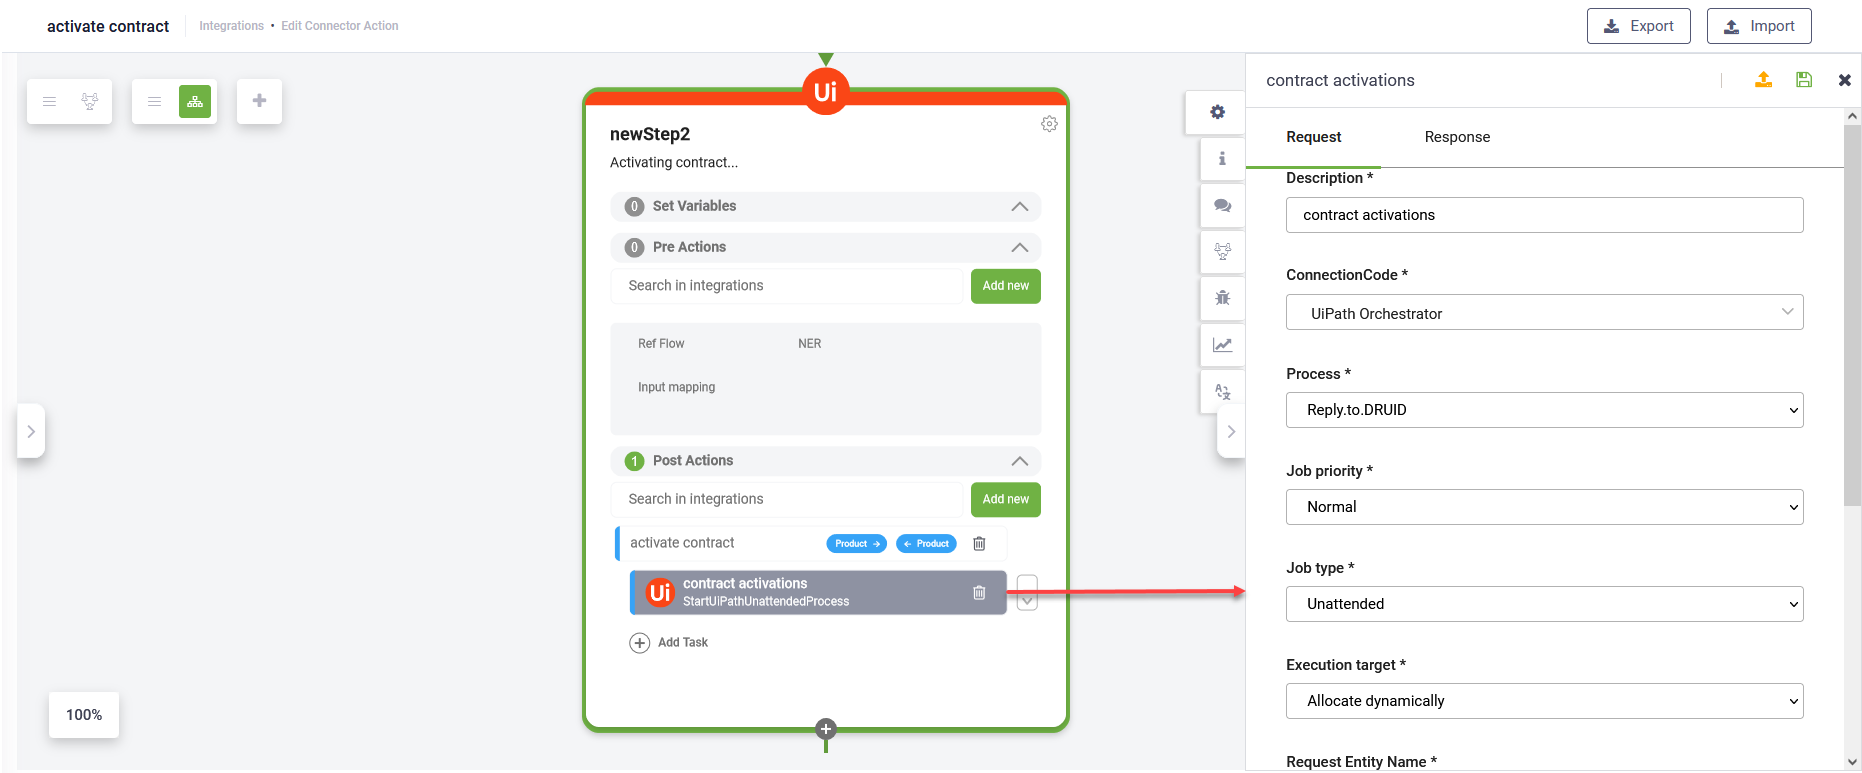
A new connector action appears in the Post Actions section and the right-side editor appears allowing you to configure the connector action.
).
A new connector action appears in the Post Actions section and the right-side editor appears allowing you to configure the connector action. - In the Connector Action editor, provide the mandatory information (Name, Description and Category), select the entity which will be both request and response entity and mark the action as being active (tick Is Active option).
- Optionally, from the Icon field, select the icon that best describes the integration. It helps you easily identify the integration action in the list of integrations. If no icon is selected, DRUID default icon per selected app type will be shown in the apps list.
- To save the configuration, at the top-right corner of the right-editor, click the Save icon (
 ).
).
Step 3: Add integration task
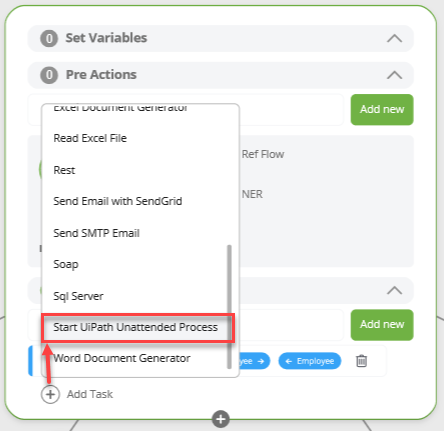
- In the Post Actions section, below the connector action, click the Add task icon (
 ).
A drop-down appears.
).
A drop-down appears. - Scroll down and select Start UiPath Unattended Process.
- Provide a suggestive Description for the integration task.
- From the ConnectionCode field, select the Uipath connector app. You can use the same connector app for both adding an item to queue and starting unattended UiPath processes.
- The Process field lists all active processes in the Orchestrator folder associated to the connector app (connector app specified in the ConnectorCode field). Select the desired process you want to start.
- Select the Job priority to control which job has precedence over other competing jobs. A job can have one of the following priorities: Normal, Low and High.
- Select the Job type. Note that the list of job types is the one provided by the Orchestrator based on the user allocated in the Orchestrator for the DRUID integration and the configuration of your tenant, robots and folders.
- The Execution target options depend on the type of Orchestrator folder is associated to the UiPath connector app, as follows:
- For Orchestrator modern folders, the Execution target field automatically fills in with Allocate dynamically, which means that the Orchestrator automatically allocates the job on the available robot(s).
IMPORTANT! From DRUID you can start a process only once. If you want to run the process several times, then go through the flow again.
- For Orchestrator default / classic folders, two Execution targets are available: Specific robots and Allocate dynamically.
Figure: Modern Orchestrator Folder

Figure: Classic Orchestrator Folder
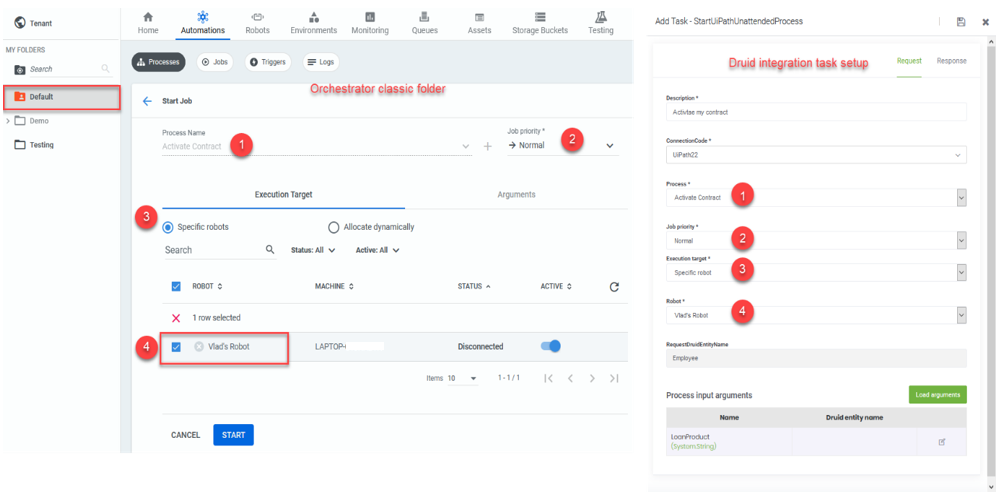
If you have a classic folder and you want to select a specific robot to execute your process, from the Execution target field, select Specific robots. From the Robot field, select the desired robot.
NOTE:- The Robot field lists the robots that are active. In order for a process to be executed at job runtime, the specified robot needs to be available.
- Please note that at design time (that is, the time when you configure the integration task, the robot might be active but not available; at job start time (that is, the time when the job executes the process on the specified robot) the robot needs to be available.
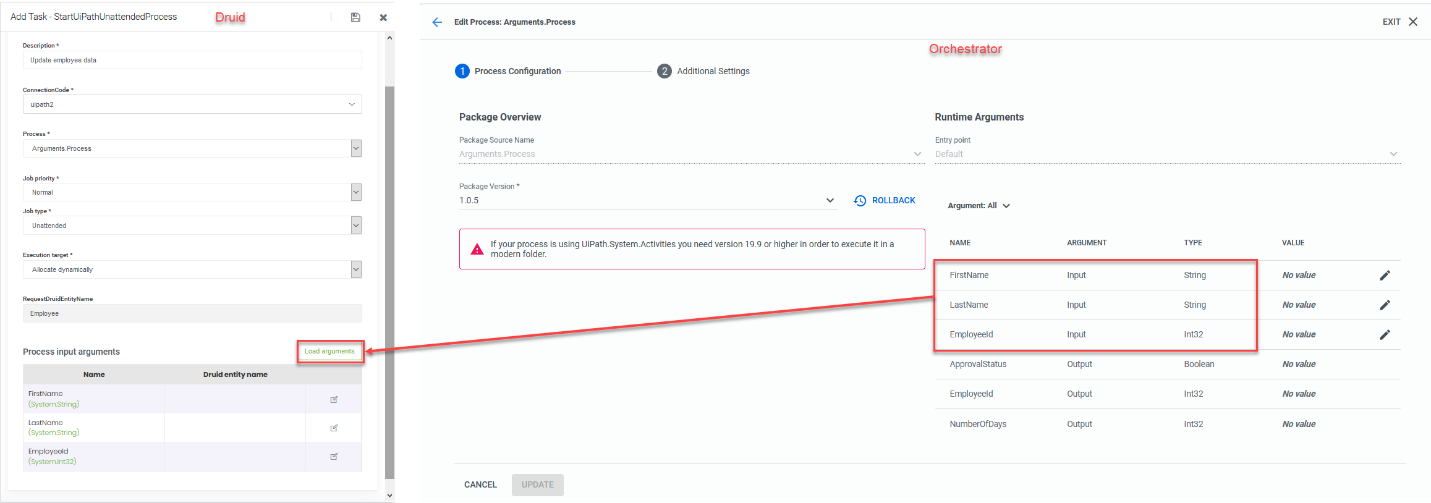
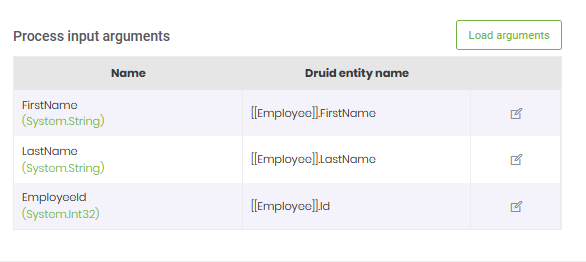
- Click the Load arguments button. The input arguments of the UiPath process are loaded and appear in the Process input arguments table.
- Map the Process input parameters to DRUID entity fields.
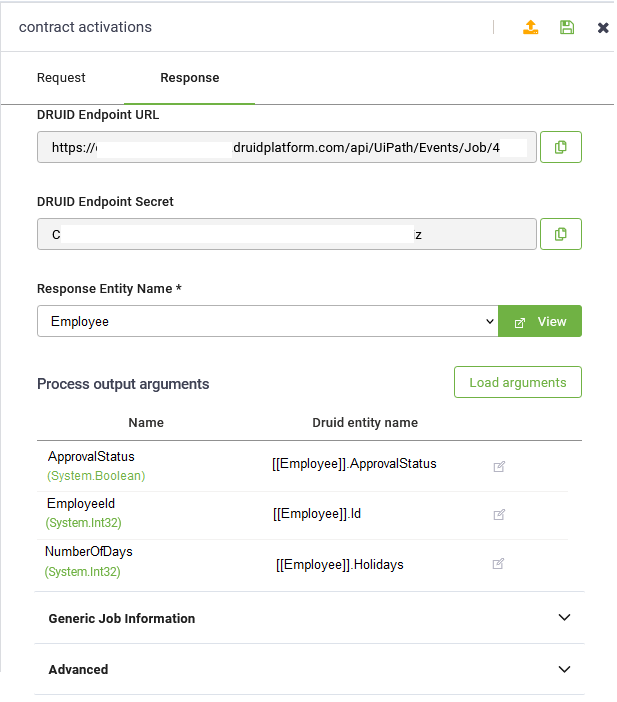
- Click the Response tab and click the Load arguments button. The process output arguments are loaded and appear in the Process output arguments table.
- Map the Process output parameters to DRUID entity fields.
- To save the integration task, at the top-right corner of the right-editor, click the Save icon ().
A new integration task appears in the Post Actions section, below the connector action and the right-side editor appears allowing you to configure the integration task. By default, the Request tab displays.
Unlike other UiPath integrations, the Start UiPath Unattended Process integration task allows you to set both the request and response, as DRUID will communicate with the UiPath robots via the Orchestrator.
Step 4. Publish the integrations
You can either publish integrations one by one at creation time by clicking the Publish icon ( ) at the top right-corner of the editor or publish or publish the integrations in bulk. To do so, on the main menu, click Integrations and at the top-right corner of the Integrations page, click the Publish button (
 ).
).
Step 5. Set webhooks to connect Orchestrator events to DRUID
The process runs asynchronously, so you need to define what happens after the job completes. The process needs to call back DRUID.
To do so, in Orchestrator, click Tenant and from the top menu, click Webhooks.
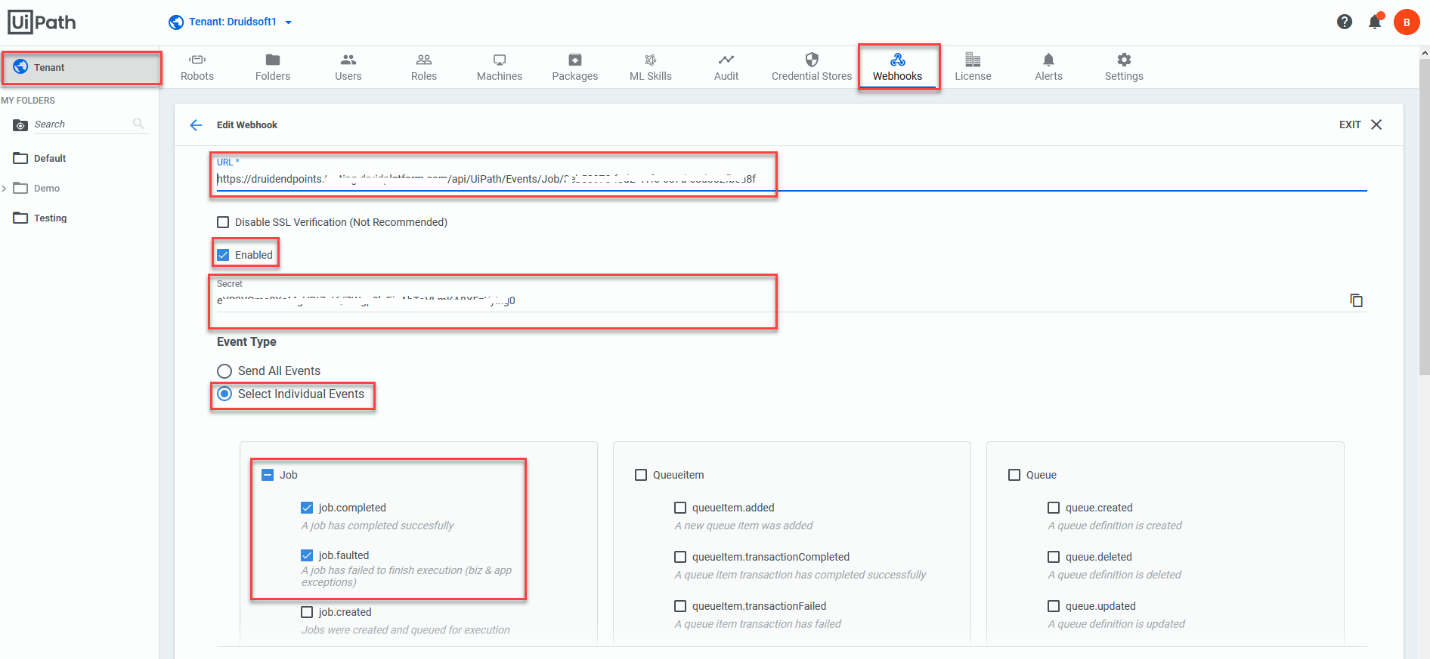
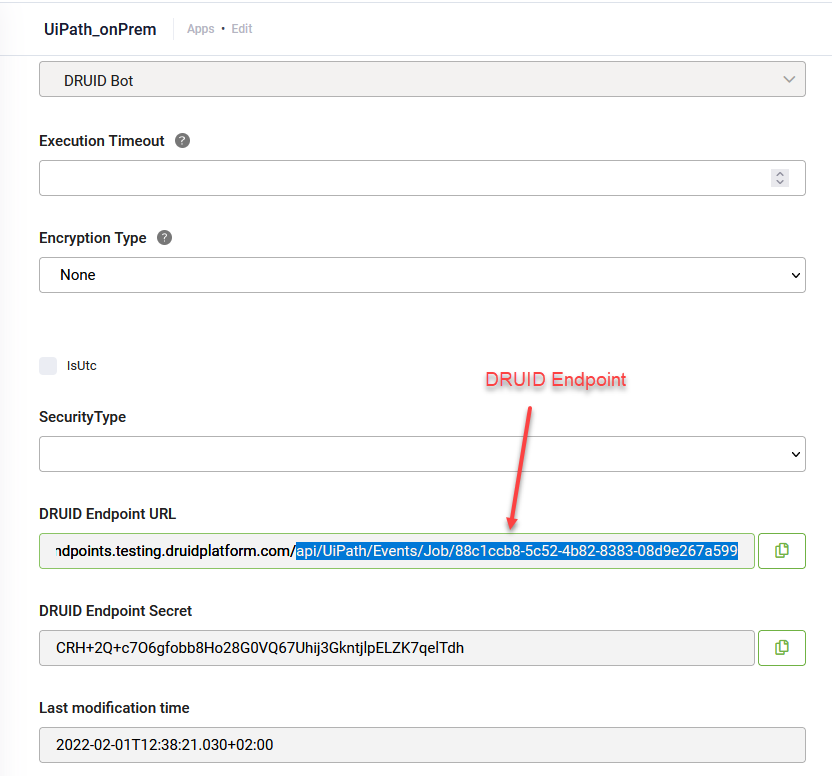
In the URL field, paste the value of the DRUID Endpoint URL and in the Secret field, paste the value of the DRUID Endpoint Secret.
For DRUID hybrid deployments, when you have both the Orchestrator and DRUID Connector Host installed on premise, and orchestrator webhook cannot make calls outside internal network, in the webhook URL field type the URL in the following format: http://localhost:5008/Druidendpoints/{**catchAll}.
Where:
- Localhost is the address of the machine where the DRUID Connector Host is installed and can be accessed from another machine within the intranet.
- {**catchAll} is the DRUID endpoint. To take this endpoint, in the Druid Portal, go to your UiPath connector app and from the DRUID Endpoint URL copy only the endpoint.
- Only DRUID Connector Host version 1.52 or above exposes a local endpoint to receive calls from the on premise UiPath Orchestrator.
- Make sure that UiPath Orchestrator has access to DRUID Connector Host machine, on port 5008.
Tick Enabled.
Select Individual Events as Event Type, select Jobs and from the list, select the first two jobs:
- Job completed. A job has completed successfully. The event is linked to the UiPath child flow step After Job Complete (Success).
- Job faulted. A job has failed to finish execution (incl. app exceptions). The event is linked to the UiPath child flow step After Job Complete (Error).
- We recommend you to select only these two types of events, as at this moment, the Druid AI Platform will ignore all other events. In new DRUID versions, we will add support for more orchestrator events.
- As the Orchestrator allows setting Webhooks on a tenant level, it will send all events on all processes existing in all folders on the tenant, including the ones that are not set up in DRUID; however, DRUID will ignore the events transmitted by the Orchestrator, which are not related to processes DRUID started.
Click the UPDATE button to save the Webhook configuration.