Configuring OAuth v2 Authorization
Configuring OAuth v2 authorization in Druid involves two primary, interdependent processes:
- Registering Druid as an application with your chosen OAuth provider. This step is performed within the external web application's developer console. You'll receive Client ID and Client Secret credentials.
- Configuring an OAuth2 app in ruid. This step uses the credentials obtained from your provider to set up how Druid interacts with that service.
Prerequisites
Before you begin, ensure you have:
- An account with the target web application/service (e.g., Google Cloud, Microsoft Azure).
- Permissions to create and manage applications within that service's developer console or authorization server.
Register Druid with your OAuth provider
This is the most crucial external step, as each OAuth provider (e.g., Google, Microsoft, Salesforce) has a unique process for registering applications. For provider-specific guidance on app registration and permissions, refer to the documentation links below before proceeding:
- Microsoft Azure:
- Google Cloud:
During this process, you will:
- Create a new application. This is often done in a "developer console," "app registration portal," or "API management" section of the external service.
- Provide application details. You'll typically enter:
- Application Name. A user-friendly name for your AI Agent.
- Application Website (Optional). Your organization's website.
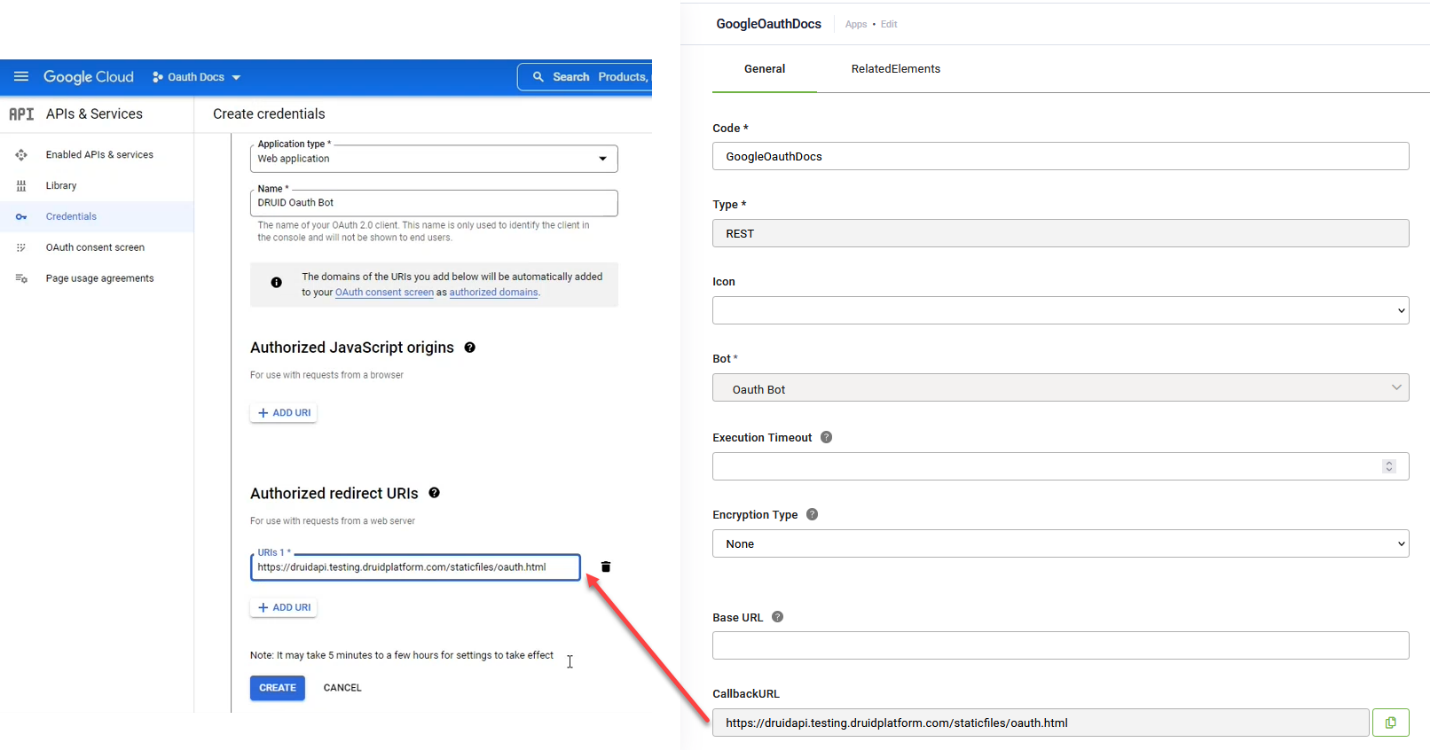
- Redirect URI (or Callback URL). You must copy the Callback URL generated by your Druid OAuth2 App and paste it here. This URL is where the OAuth provider will redirect the user after they grant authorization.
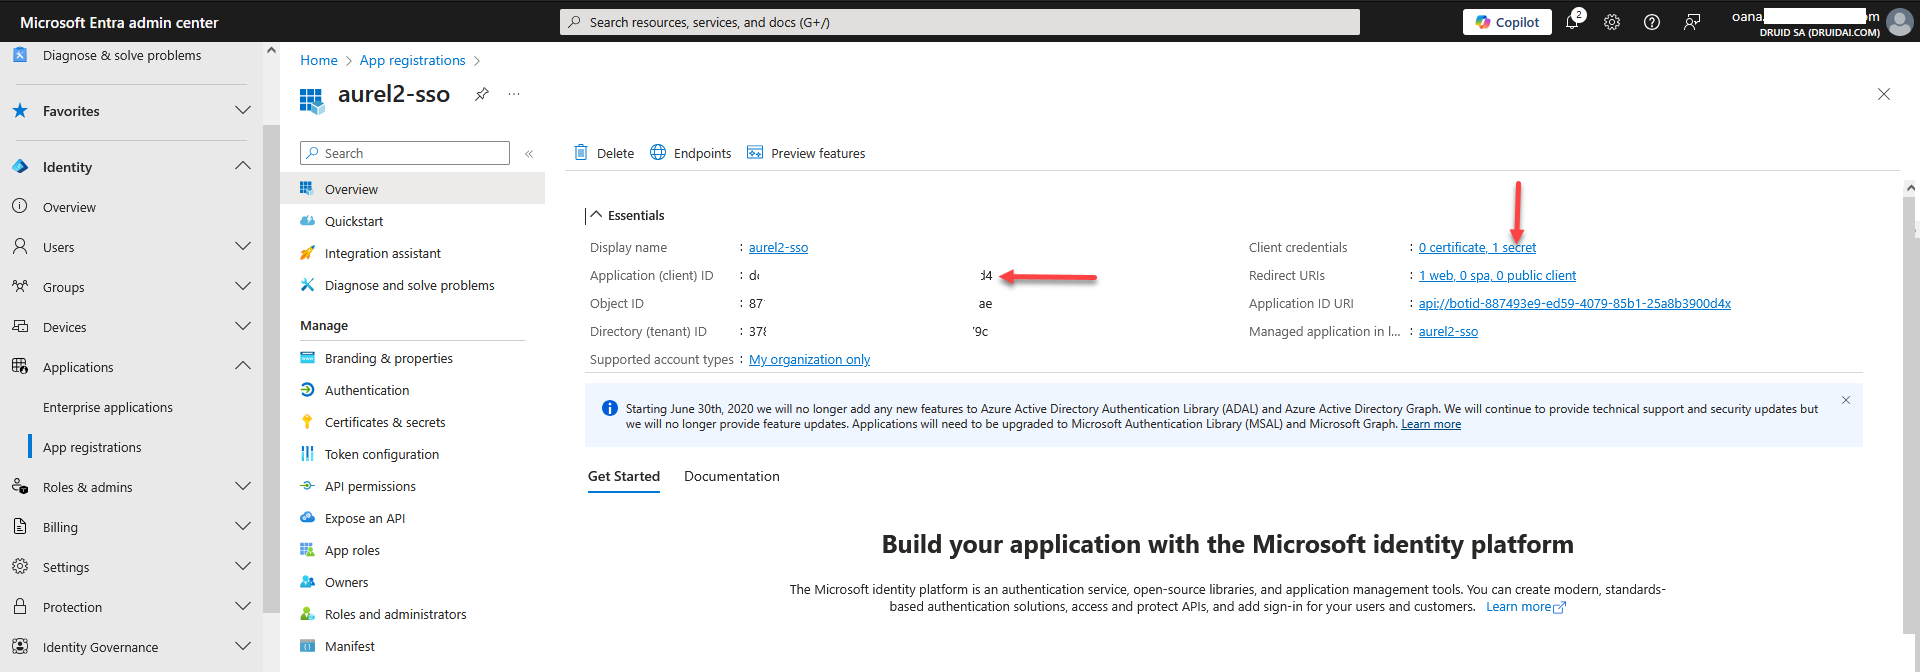
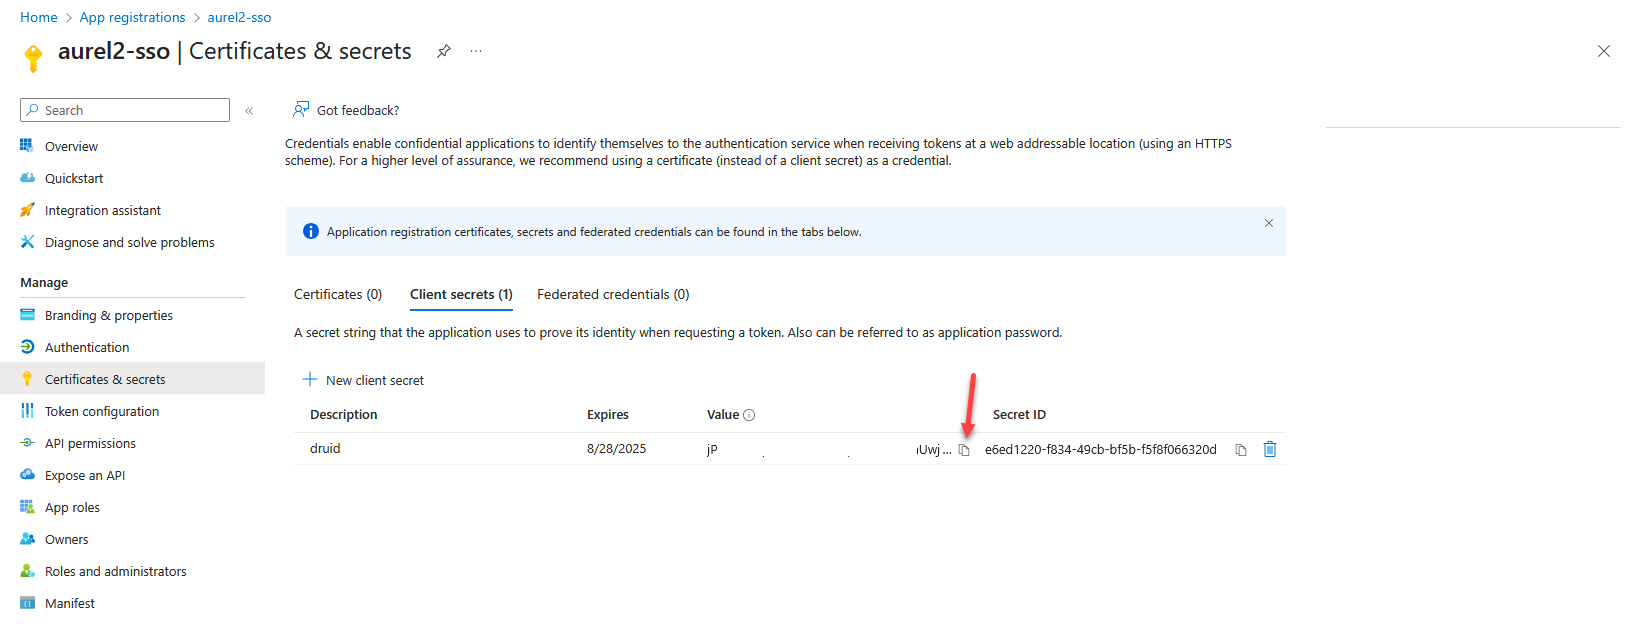
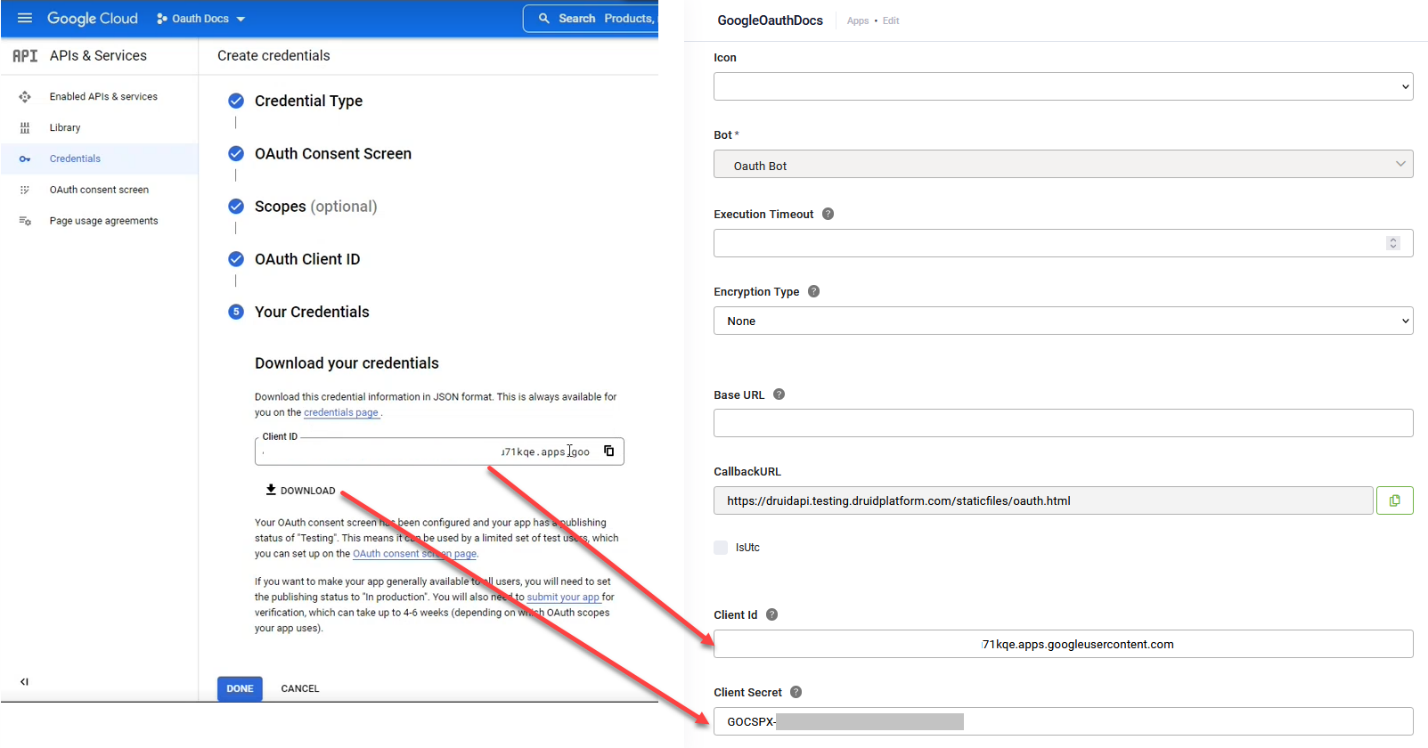
- Copy the client credentials. Upon successful application registration, the service will issue your application's Client ID and Client Secret. If you're registering an application with the Microsoft identity platform, you need to add a client secret and copy its value. Keep these values secure, as you will use them in Druid.
- Define permissions (scopes). You must explicitly define the permissions (often called "scopes" or "API permissions") that your Druid application needs to access within the external service. These permissions dictate what data your AI Agent can read, write, or access (e.g.,
https://www.googleapis.com/auth/calendar.events.readonlyfor Google Calendar access, orUser.Readfor Microsoft Graph).
Example: Microsoft Entra

Example: Google Cloud API Services
Example: Microsoft Entra
Example: Google Cloud API Services
Example: Microsoft Entra
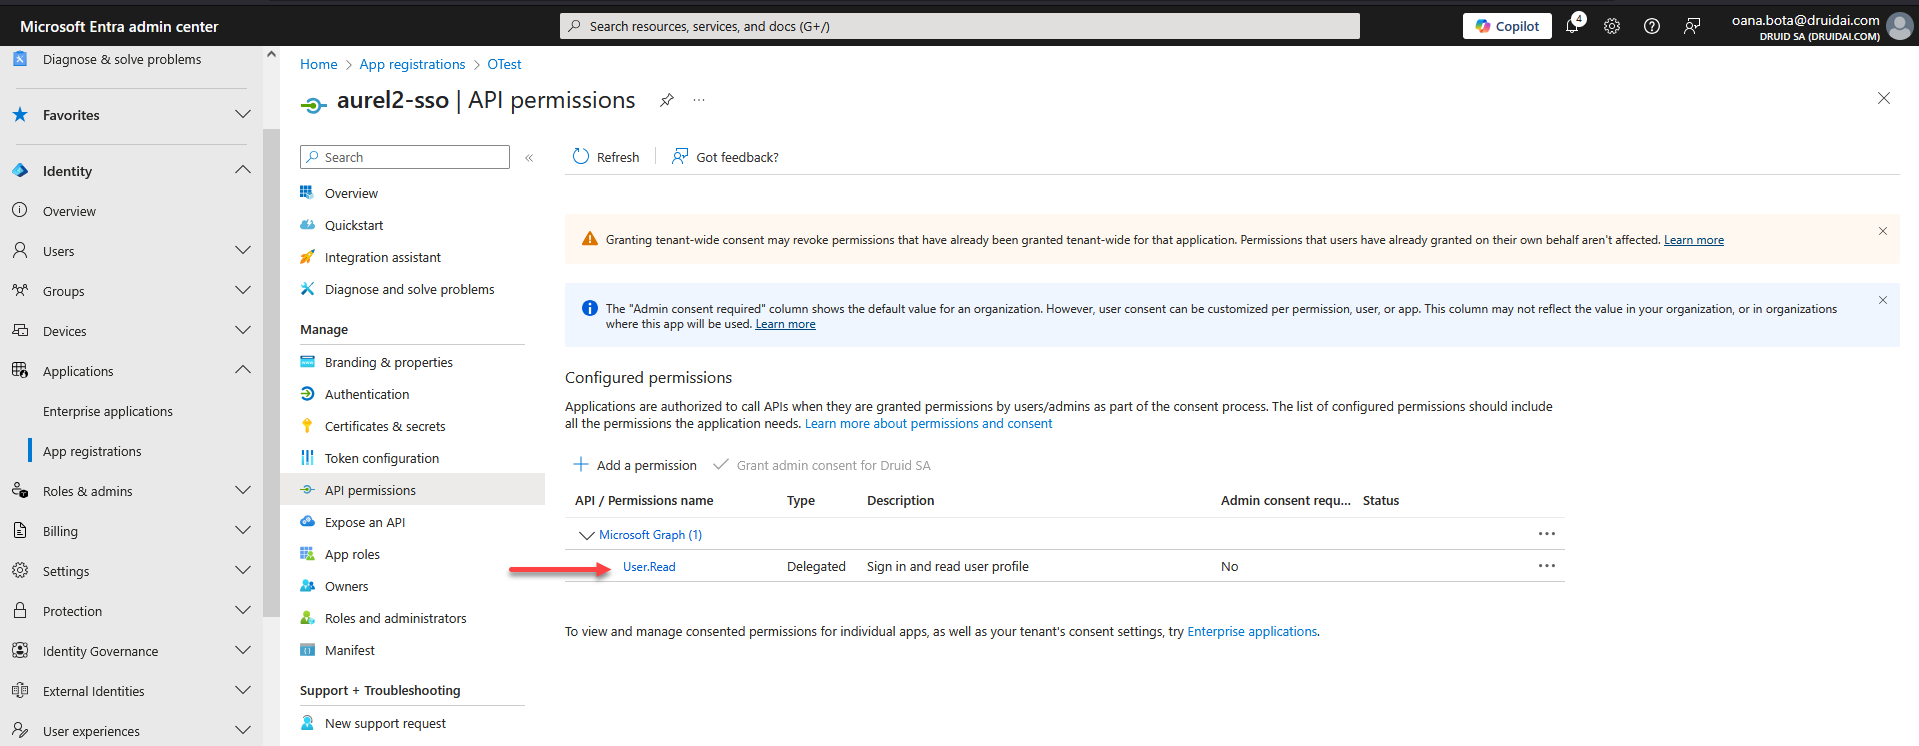
Always follow the principle of least privilege, request only the minimum necessary permissions your Druid application requires to function.
The scopes you grant here must exactly match what you configure later in Druid.
For enterprise applications, ensure the necessary admin consent is granted if required by your organization's policies or the specific permissions you are requesting.
Configure an OAuth2 App in Druid
Once you have your Client ID and Client Secret from your OAuth provider, you can configure the corresponding OAuth2 App in ruid.
Step 1. Create a new OAuth2 App
To create a new OAuth2 app:
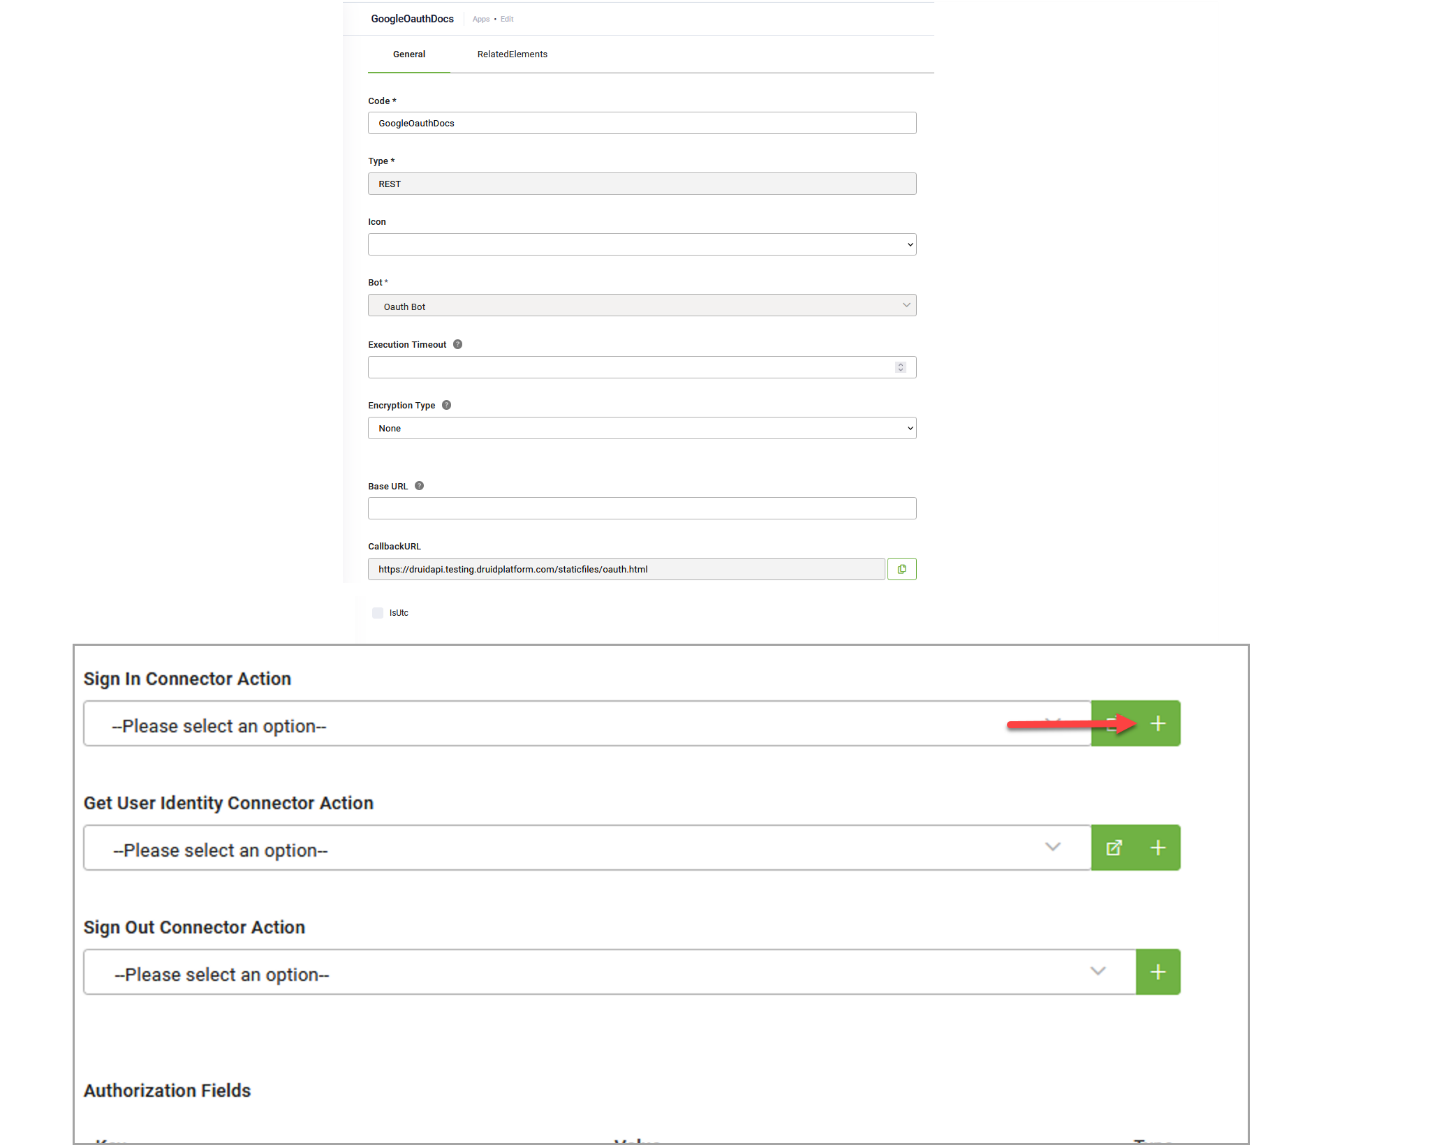
- In the Druid Portal, in the Solution Contents menu, click Apps.
- At the top-right corner of the page, click Create App and select OAuth2.
-
Encryption Key – click the Generate button to generate the key, which will be used by the Encrypt Data task to encrypt the data and by the client / 3rd party application to decrypt the data and use it further.
-
Secure encryption with salt – adds a random 64-bits salt to the data before encrypting it. Please note that using this feature requires the client to develop code for data decryption.
- Save the OAuth2 app.
In the New App page, set the parameters described in the table below.
|
Parameter |
Description |
|---|---|
|
Code |
Unique name to identify the App. You will reference in each method you call from this App. This field is mandatory. |
|
Execution Time |
The maximum number of seconds a request is allowed to execute. By default, the timeout for all connector integrations is 60 seconds. This setting will apply to all connector tasks that use this app. |
|
Encryption Type |
Enables data encryption on the connector using the AES CGM encryption algorithm and allows authors to encrypt specific data before sending it to external REST apps, by using the Encrypt Data integration task as first task in the desired connector action. When you select AES CGM encryption algorithm (the only one currently available), two options are available: For more information, see Encrypt Data. |
| Client Id | Enter the client credentials you copied when registering your application. |
| Client Secret |
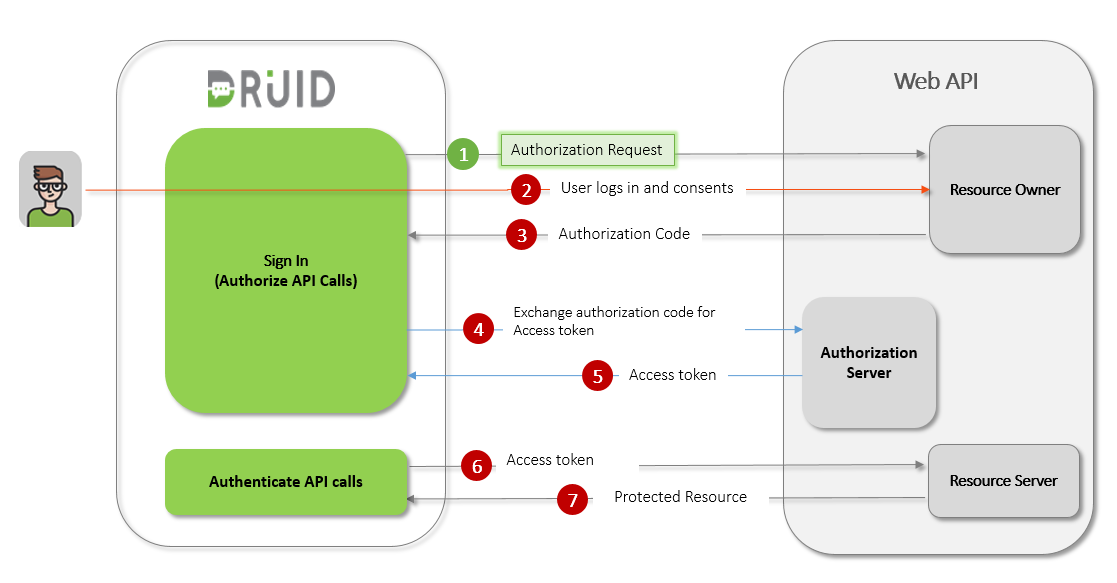
Step 2. Define Sign In integration
The Sign in action is mandatory for authentication and authorization when calling external API services on user’s behalf.
To create a sign in action, follow these steps:
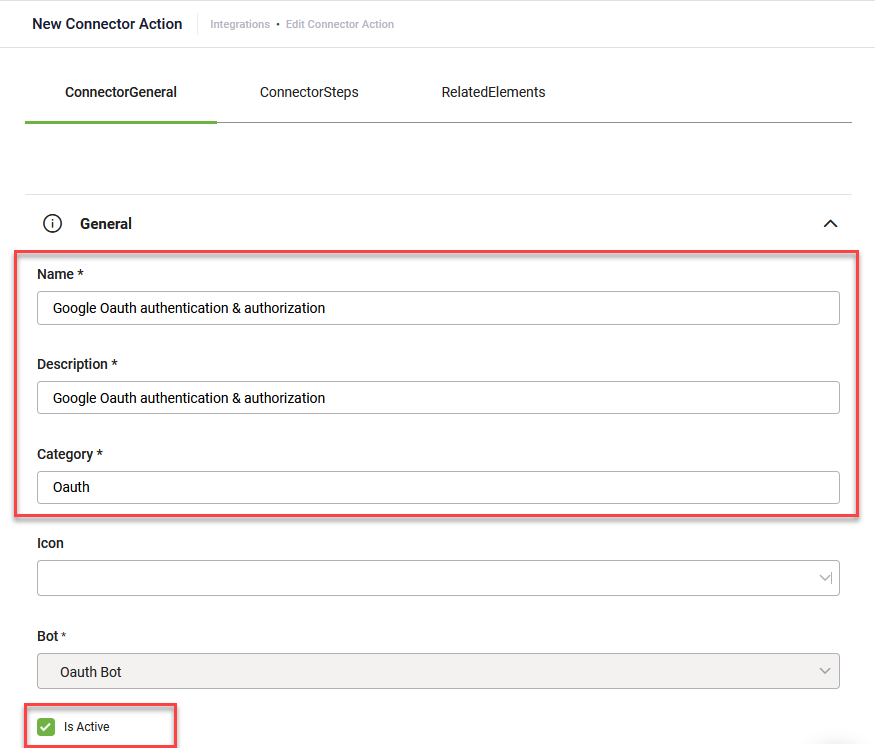
- In the OAuth2 app configuration page, click the add icon next to the Sign in Connector Action field.
- Provide a Name, Description and Category and select Is Active.
- Click Save. The page refreshes and displays on the Connector steps tab.
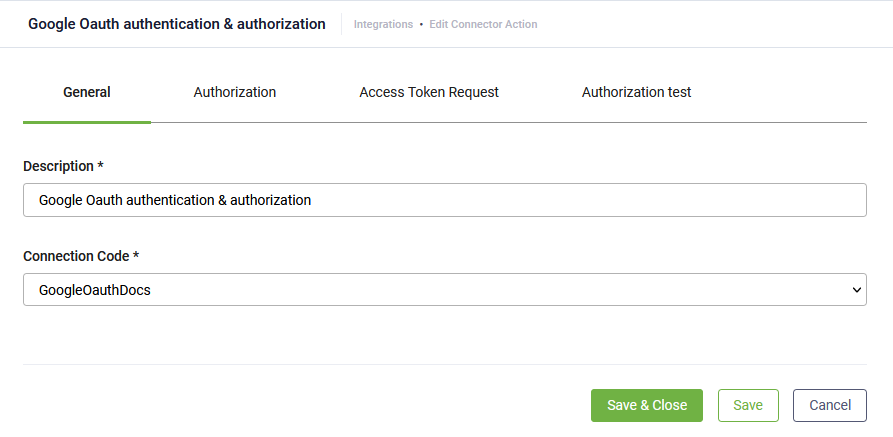
- At the top-right corner of the page, click the Create task button and select Sign In. The Edit Connector Action page appears on the General tab.
- Enter a Description and from the Connection Code drop-down, select the new OAuth2 app you created.
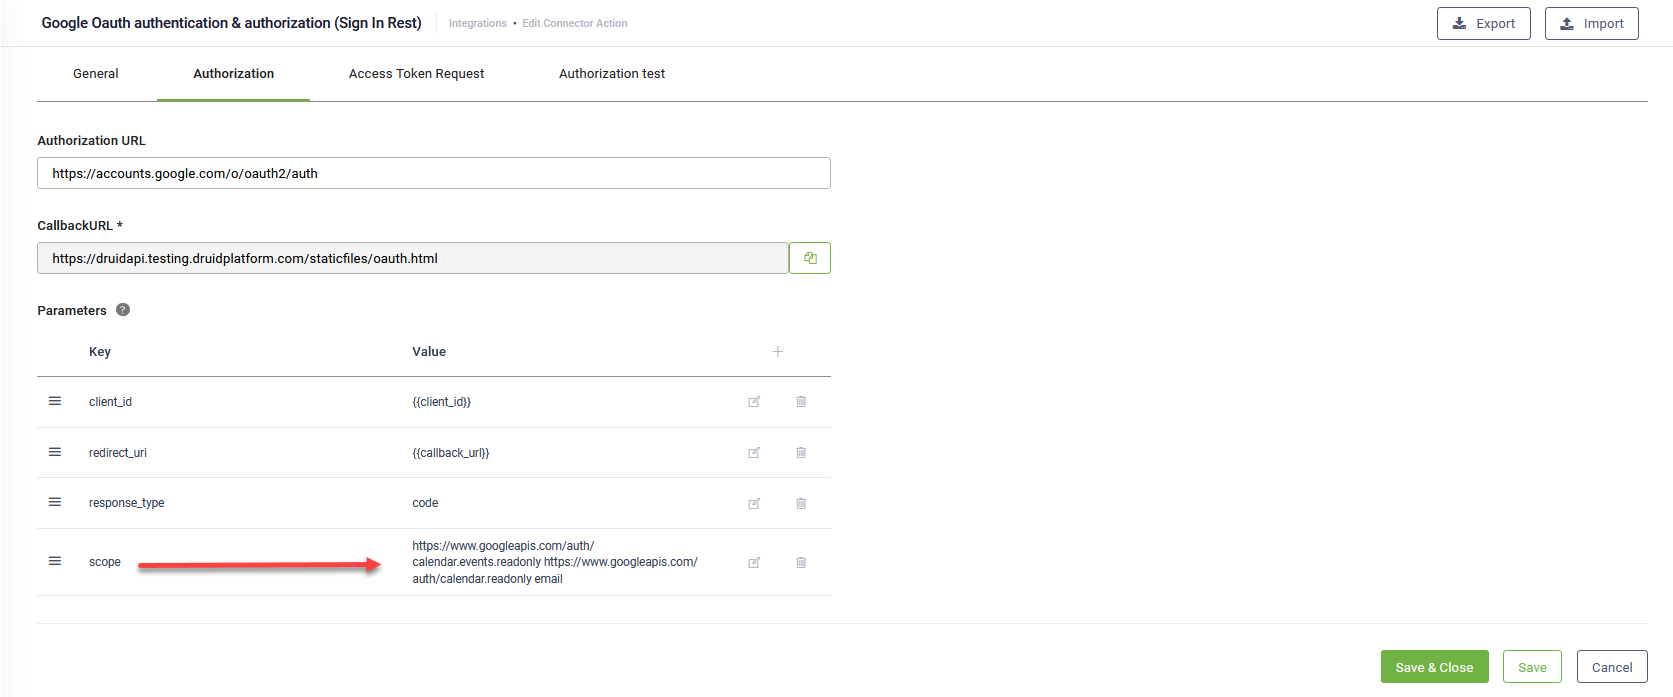
- Click the Authorization tab to configure the authorization request.
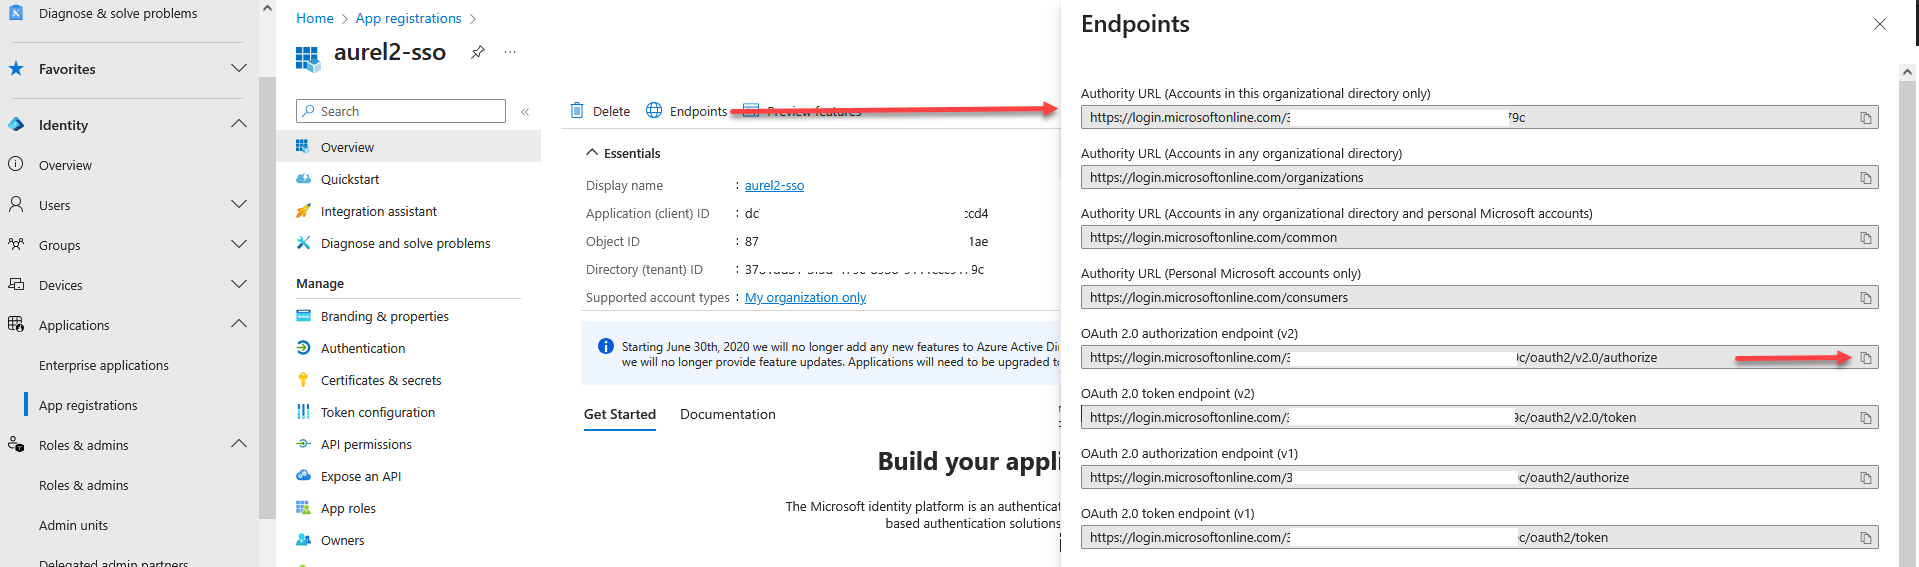
- In the Authorization URL enter the OAuth 2.0 authorization endpoint provided by your identity provider:
- To find the authorization URL in Microsoft Entra ID, go to your app registration, select Endpoints at the top of the Overview page, and copy the OAuth 2.0 authorization endpoint (v2).
- For Google API Services use:
https://accounts.google.com/o/oauth2/v2/auth. - Druid adds by default the following standard parameters (key/value pair) in the authorization request:
client_id,redirect_uriandresponse_type. - You can remove from standard parameters or add others to meet with the requirements of the web application you’re using to be granted with the authorization code.
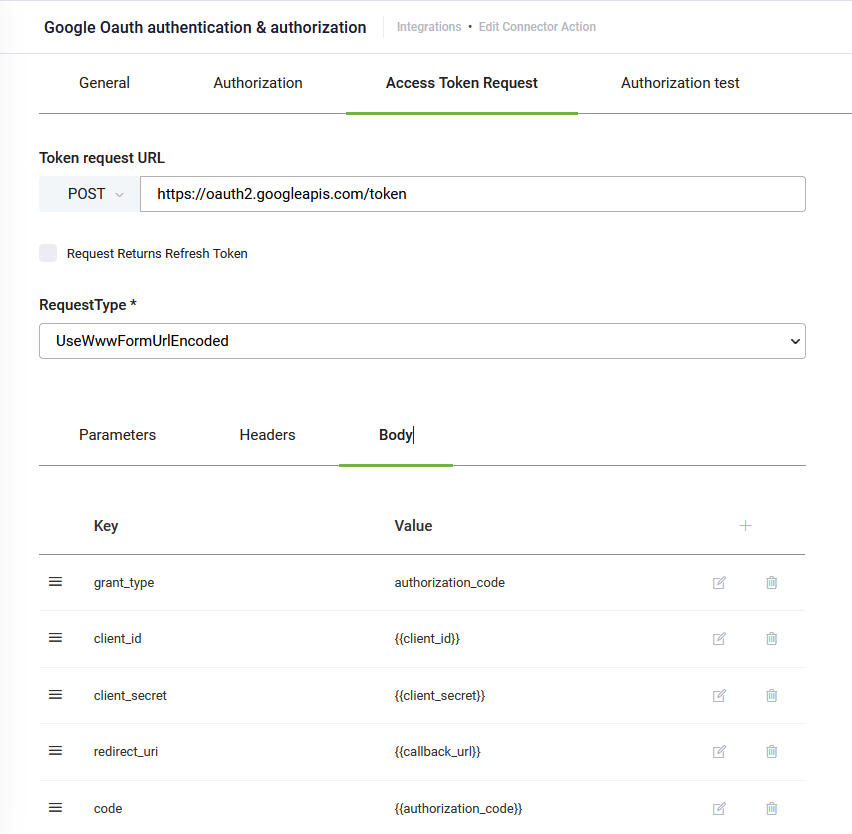
- Click the Access Token Request tab to configure the authorization grant request.
- In the Token request URL field, enter the token_uri Druid will use to obtain authorization from the end-user to obtain an access token. The value of the token_urI is generated when you register Druid in the web application.
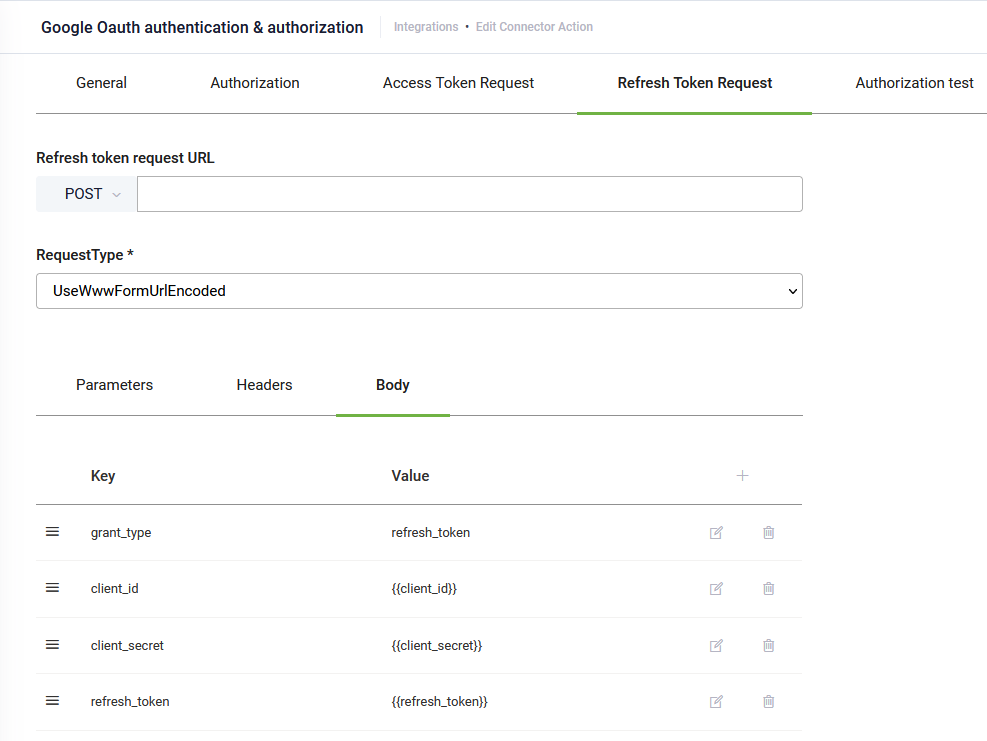
- If the response from the API service provides a refresh token as well, you can also set up refresh token in the access token request. To do so, click Request Returns Refresh Token. A new tab appears, Refresh Token Request. Click on it and in the Refresh token request URL provide the endpoint of the web application, which handles refresh tokens. The Body contains by default the standard parameters necessary to obtain a refresh token.
- Click Save & Close twice to go to the Integrations page. Publish the integration by clicking the Publish button at the top-right corner of the page.
The Connector Action page appears on the Connector general tab.
Example:
You can test the Sign in action. Click the Authorization test tab and click the Test button.
If the testing passes, you will get Success. In a future release, further passed / failed details will be provided.
Step 3. Select Sign in action on the OAuth2 app
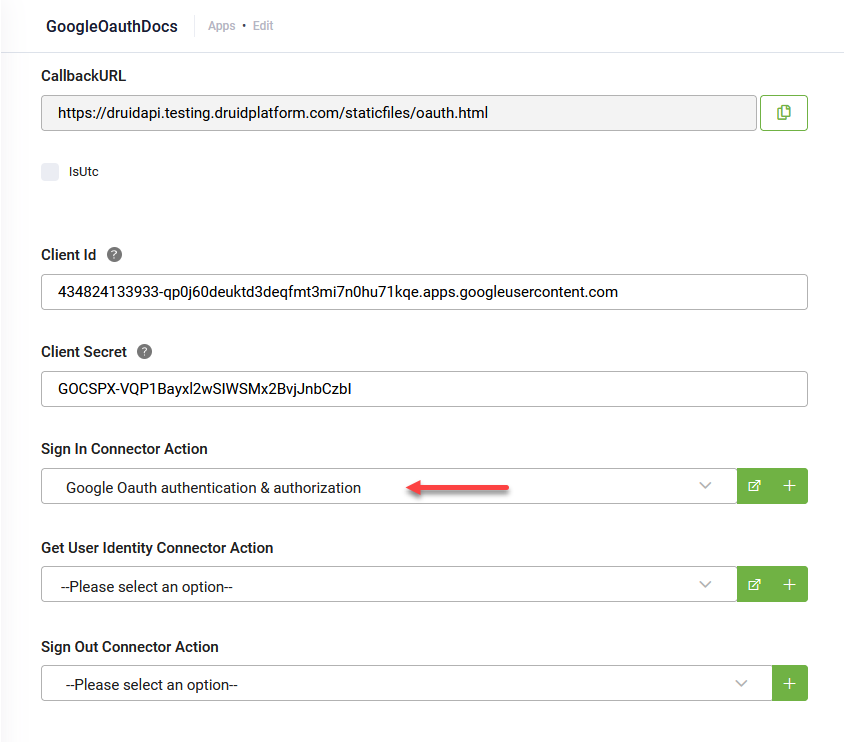
Go to the OAuth2 app configuration page and from the Sign in Connector Action field, select the integration you defined at Step 2.
By default, the access token is configured as part of the header of the request message. If your request requires authorization fields or the expected authorization is not part of the header, add them in the Authorization Fields table as shown in the following figure.

- In the Key field, enter the name of the custom field to specify for authorization.
- In the Value field, enter the value for the Key specified for the authorization.
- From the Type field, select one of the following depending on where in the request message and the type of authorization fields that are required:
- Header – The AI Agent expects the authorization field as part of the header of the request.
- Parameter – The AI Agent expects the authorization field as part of the URL path for the request.
- Click the Save icon displayed inline to save the additional authorization field.
- Save the app.

Step 4. Define the Get user identity action
You can authenticate a user within the conversation by getting user data (through API call) after the Sign in action is performed.
To create the Get user identity action, follow these steps:
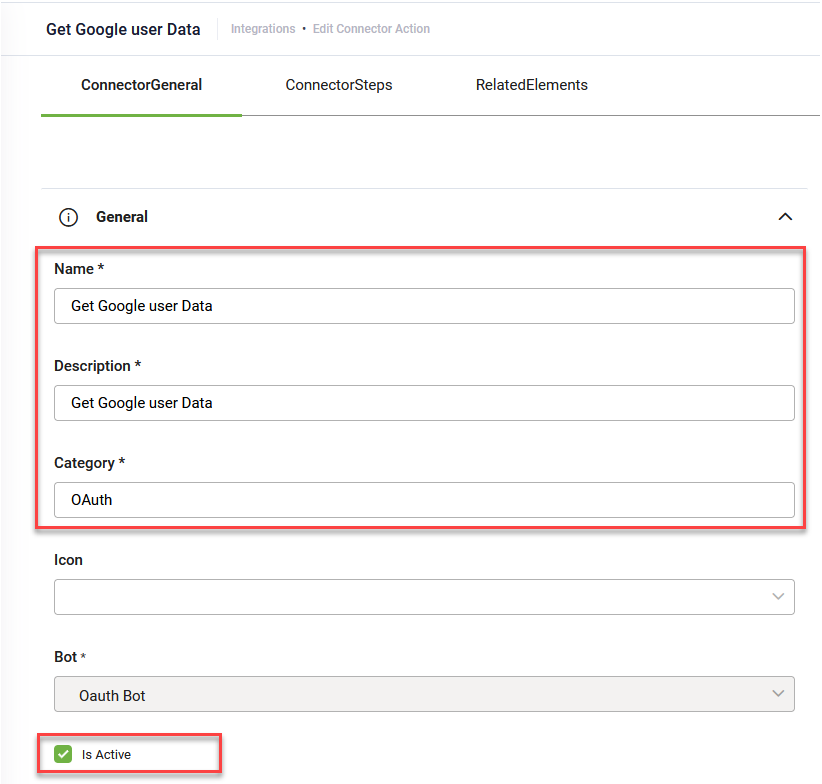
- On the OAuth2 app configuration page, click the add icon next to the Get User Identity Connector Action field. The Connector Action page appears on the Connector general tab.
- Provide a Name, Description and Category and select Is Active.
- Click Save. The page refreshes and displays on the Connector steps tab.
- At the top-right corner of the page, click the Create Task button and select GetUserIdentity. The Edit Connector Action page appears on the General tab.
- Enter a Description and from the Connection Code drop-down, select the OAuth2 app.
- Click the Request tab and provide the API endpoint for getting user metadata (the API endpoint of the target application).
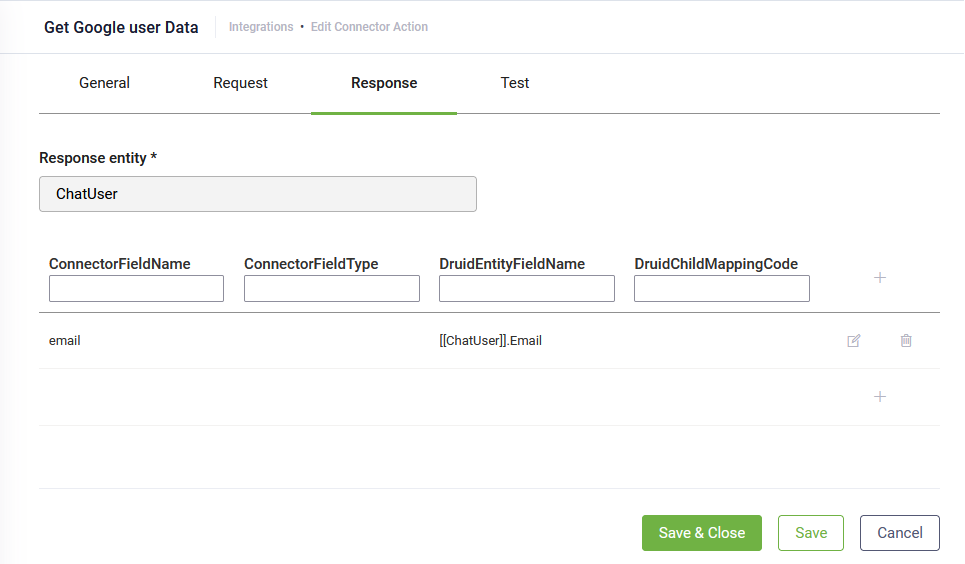
- Click the Response tab and map user metadata (email, first name, last name, other) returned by the API service to Druid [[ChatUser]] fields.
- Click Save & Close twice to go to the Integrations page.
- Publish the integration by clicking the Publish button at the top-right corner of the page.
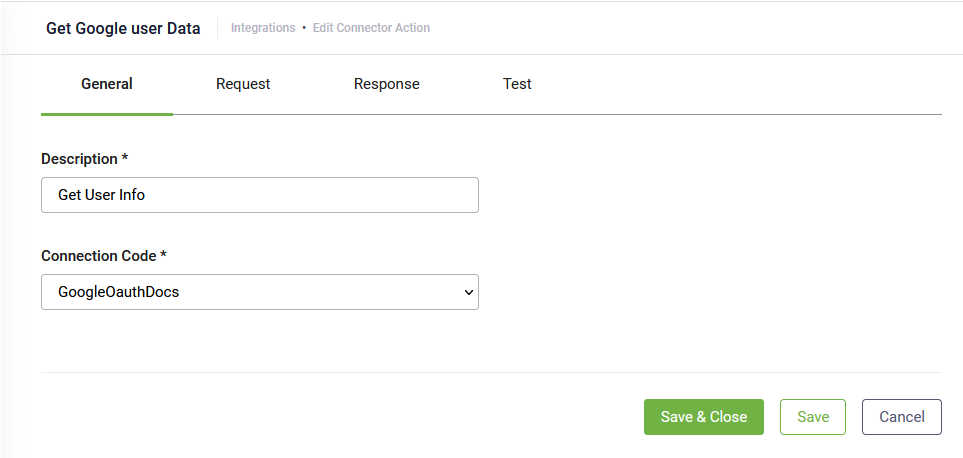
Example: Get user data from Google API
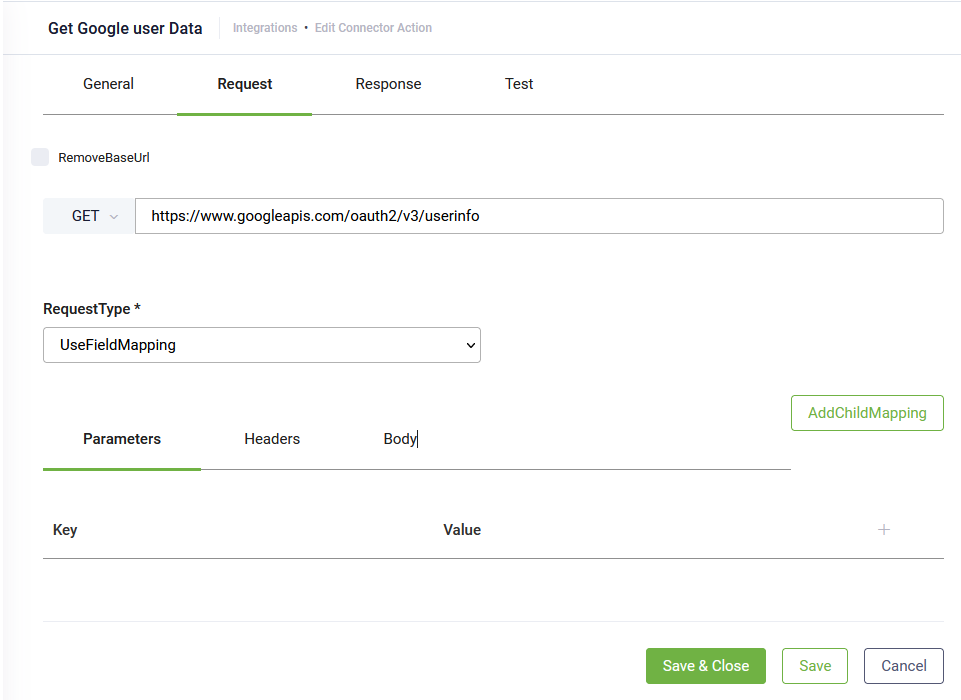
Other request settings are available and you can further configure the request based on what the web API service is expecting.
Example: Get user’s email from Google API
You can test the Sign in action. Click the Test tab and click the Test button. Confirm the authorization in the API hosted page that opens. The Test result, either success or failure, and the response details are displayed in the Test result section.
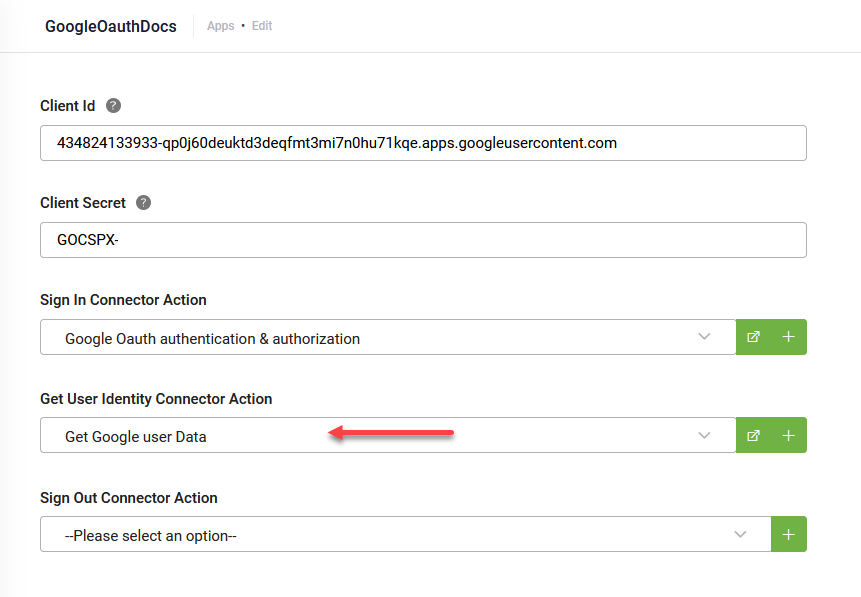
Step 5. Select Get User Identity action on the OAuth2 app
Go to the OAuth2 app configuration page and from the Get User Identity Connector Action field, select the integration you defined at Step 4.
Save the app.
You are now ready to design your flows for signing users in and out.