Custom Code
The Custom Code integration task evolves the DRUID Connector into a business operations layer. Use it to implement business rules that always apply either to the flow engine, web views, forms, and external applications.
To define the business rules, you write custom JavaScript code.
Use cases
- Perform data validations and raise errors when the data validation fails. For example:
- When updating a client account check that it includes valid person ID, first name and last name, regardless of where the save is triggered: flow engine, web form or external applications.
- When creating a new account, check that there is no other account in external system with the same personal identification code regardless of where the save is triggered: flow engine, web form or external applications.
- Do extensive calculations. E.g., perform forecast calculations.
- Transform the data
- Execute conditional tasks.
- Move business logic from the flows into integrations.
Prerequisite
- You should have medium to extensive JavaScript knowledge.
How to use the Custom Code integration task
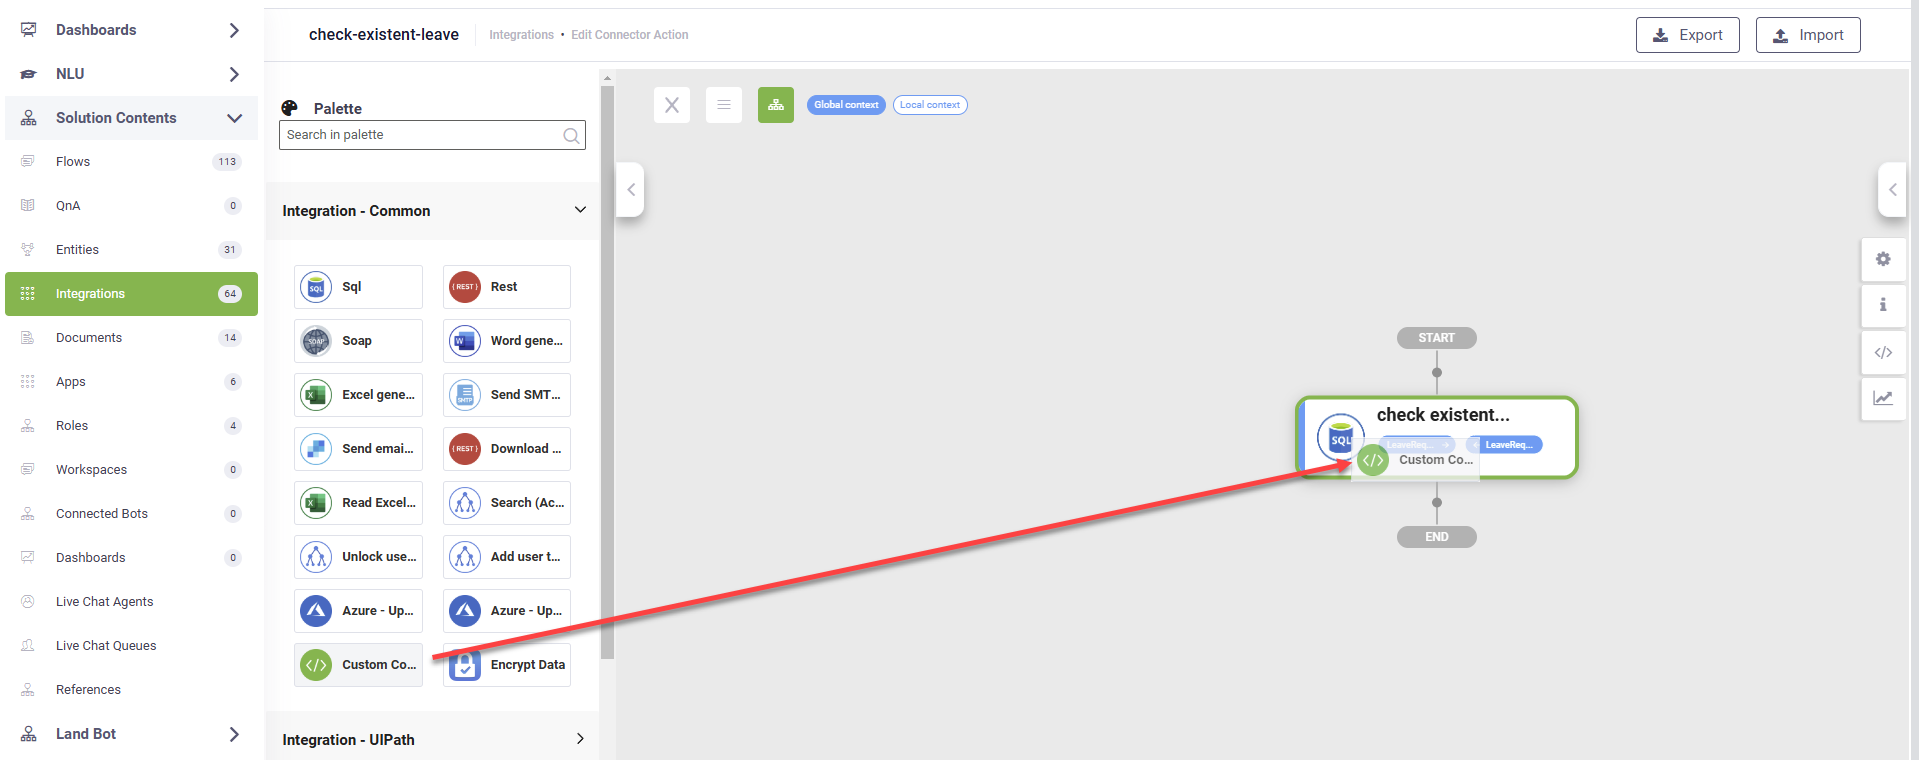
To add a Custom Code task in the Connector Diagram, click the Palette icon, the click on Integration - Common. Drag Custom Code onto the diagram and drop it where you want the integration to be executed.
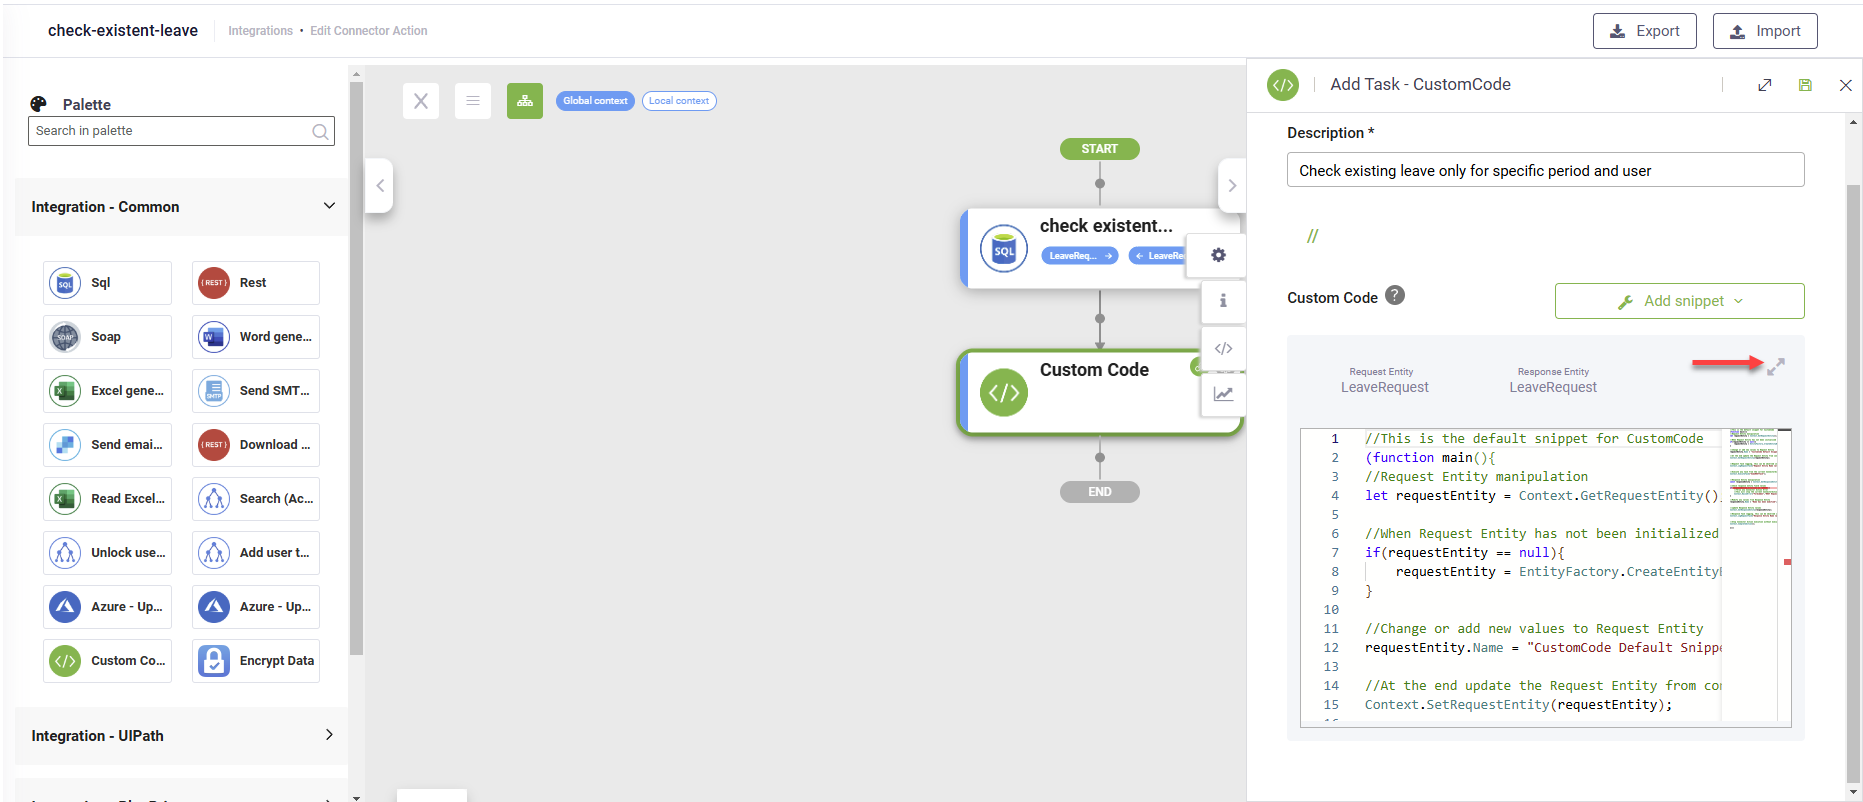
In the Description field, provide a brief, relevant description of the business rule to be implemented.
The Code Extension field contains a default code snippet for the Custom Code task.
To write your own code, we recommend maximizing the code snippet editor for better visibility.
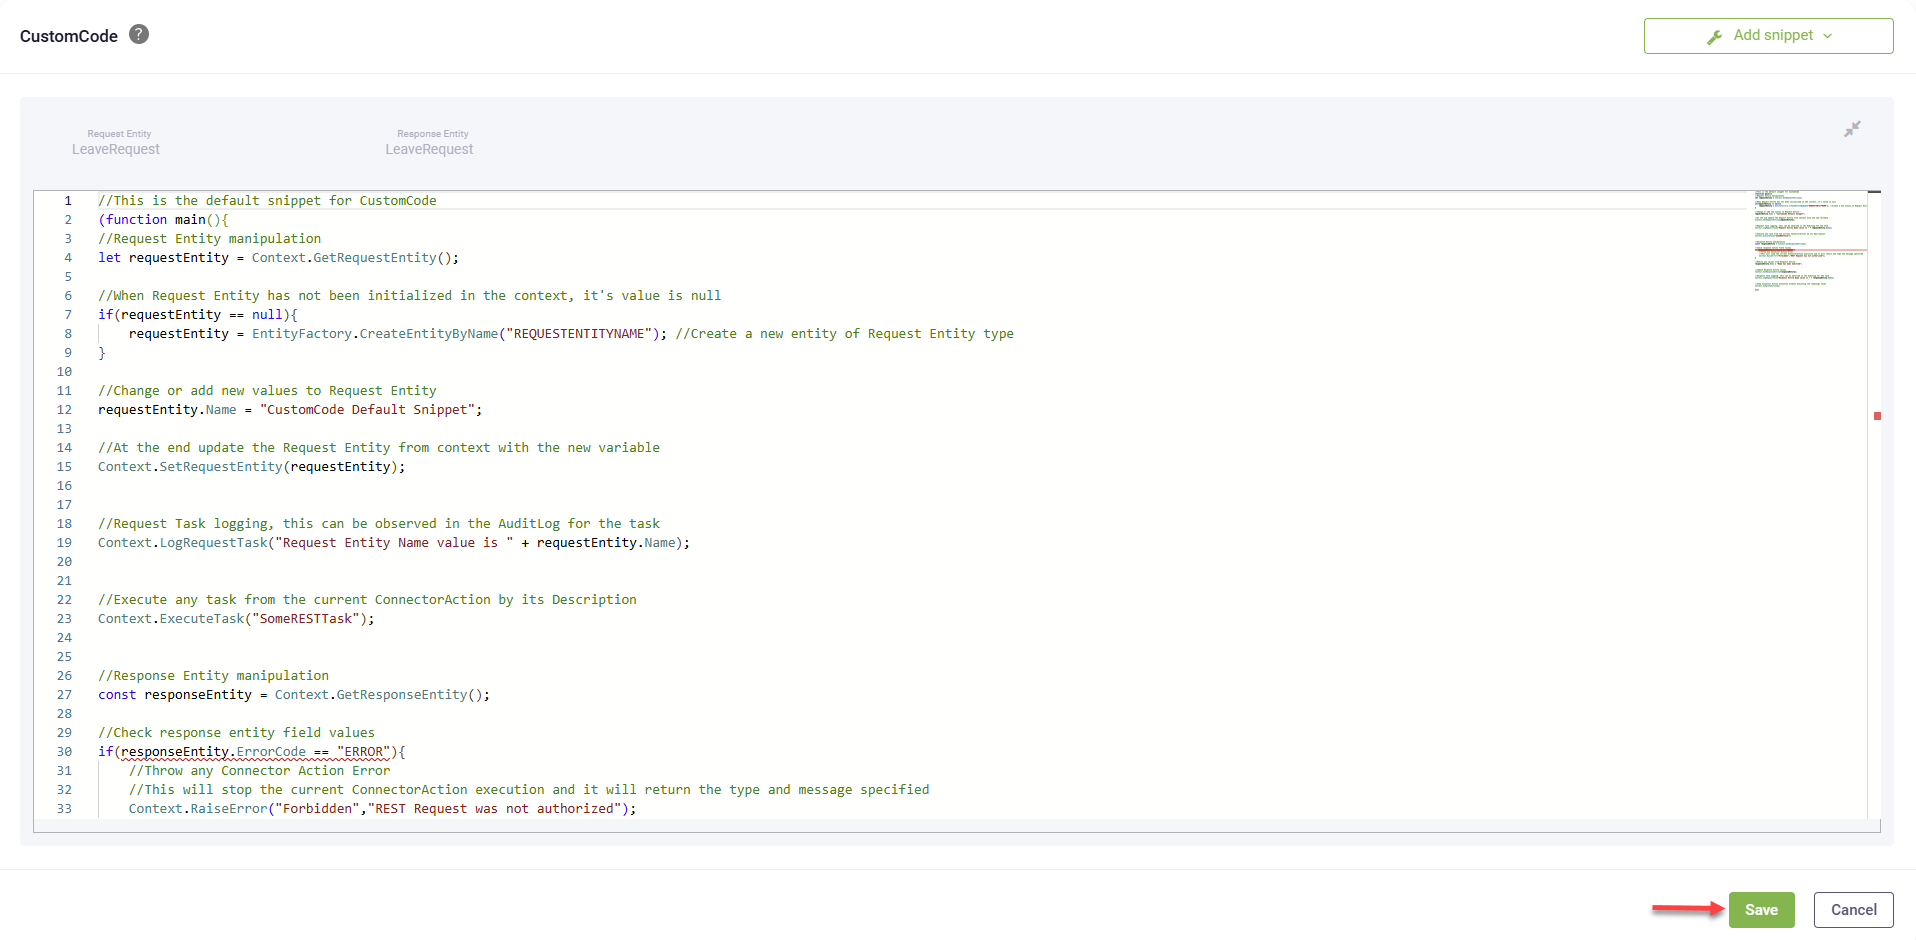
You can either modify the default snippet or use a blank template and function templates, which are categorized under Add snippet. To learn more about available functions and templates, refer to the relevant section in this topic.
![]()
Use JavaScript to implement your business rule. The Request Entity and Response Entity are displayed at the top of the Code Extension field for reference.
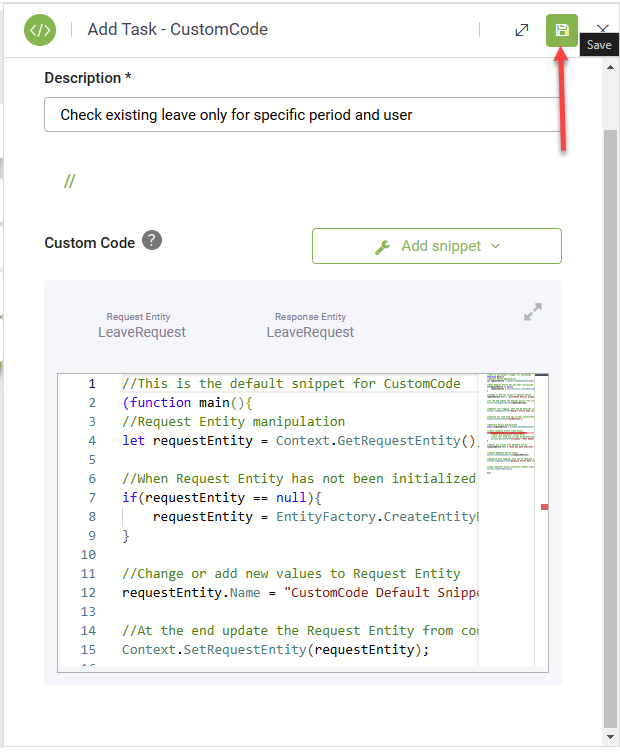
Once your code is complete, save the code snippet.
Save the integration.
The section below provides the different template snippets and function templates you can use to write your business rules in the code snippet.
Templates
The blank template contains an immediately invoked function expression with an empty main function. Use it when you want to create your business rules from scratch. You can use the other function and method templates available.
The Druid default snippet is a JavaScript template for handling request and response entity manipulation within a connector action. It initializes or modifies the request entity, logs task details, executes predefined tasks, processes the response entity, and handles errors. The snippet ensures smooth data flow and task execution while allowing for customization.
Default snippet
//This is the default snippet for CustomCode
(function main(){
//Request Entity manipulation
let requestEntity = Context.GetRequestEntity();

//When Request Entity has not been initialized in the context, it's value is null
if(requestEntity == null){
    requestEntity = EntityFactory.CreateEntityByName("REQUESTENTITYNAME"); //Create a new entity of Request Entity type
}

//Change or add new values to Request Entity
requestEntity.Name = "CustomCode Default Snippet";

//At the end update the Request Entity from context with the new variable
Context.SetRequestEntity(requestEntity);


//Request Task logging, this can be observed in the AuditLog for the task
Context.LogRequestTask("Request Entity Name value is " + requestEntity.Name);


//Execute any task from the current ConnectorAction by its Description
Context.ExecuteTask("SomeRESTTask");


//Response Entity manipulation
const responseEntity = Context.GetResponseEntity();

//Check response entity field values
if(responseEntity.ErrorCode == "ERROR"){
    //Throw any Connector Action Error
    //This will stop the current ConnectorAction execution and it will return the type and message specified
    Context.RaiseError("Forbidden","REST Request was not authorized");
}

//Modify any values from Response Entity
responseEntity.Name = "Name has been modified";


//update Response Entity values
Context.SetResponseEntity(responseEntity);

//Response Task logging, this can be observed in the AuditLog for the task
Context.LogRequestTask("Response Entity Name value is " + responseEntity.Name);


//Stop Connector Action execution without executing the remainign tasks
Context.CompleteAction();

})()
Context
The Request Entity template provides a structure for retrieving, creating, and modifying request entity values within a connector action. It ensures the request entity is initialized, updates its fields as needed, and saves the changes back to the context. Use this template when you need to manipulate request data before processing further actions.
Request entity Template
const requestEntity = Context.GetRequestEntity();
/*
 Change Request Entity Values here
*/

Context.SetRequestEntity(requestEntity);Use DRUID custom functions EntityFactory.CreateCollection("entity name") and EntityFactory.CreateEntityByName("entity name") to create entity objects.
(function main(){

Context.SetRequestEntity(requestEntity);
const requestEntity = Context.GetRequestEntity();
/*
 Change Request Entity Values here
*/

//Request Entity manipulation
let requestEntity = Context.GetRequestEntity();

//When Request Entity has not been initialized in the context, it's value is null
if(requestEntity == null){
    requestEntity = EntityFactory.CreateEntityByName("RequestEntityName"); //Create a new entity of Request Entity type
}

//Change or add new values to Request Entity
requestEntity.Name = "CustomCode Default Snippet";

//At the end update the Request Entity from context with the new variable
Context.SetRequestEntity(requestEntity);

}) ()The Response entity template provides a structure for modifying and updating response entity values within a connector action. It retrieves the response entity, updates its fields, and saves the changes back to the context. Use this template when you need to manipulate response data before it is returned.
Response entity Template
const responseEntity = Context.GetResponseEntity();
/*
 Change Response Entity Values here
*/

Context.SetResponseEntity(responseEntity);
The Chat User template provides a way to retrieve the authenticated chat user as a constant within your custom code. This allows you to apply specific business rules based on the user's details. The [[ChatUser]] entity is read-only, meaning you can access its information but cannot modify, delete, or create new records. Use this template when you need to personalize logic based on the chat user.
This template enables server-side pagination by defining the total number of records available for web views displaying data from non-Druid Data Service databases. By retrieving the totalCount variable from the context and converting it to an integer, this template ensures efficient handling of large data sets, improving performance and responsiveness. Use this template to optimize data loading and enhance the user experience in paginated views.
Set PageInfo TotalCount Template
    let totalCount = Context.GetContextVariable("totalCount");
    Context.SetPageInfoTotalCount(parseInt(totalCount));
Operational
This method allows you to execute a specified integration task within the current connector action. You can trigger tasks like REST API calls, data processing, or other operations as part of the workflow. Use this template when you need to run a specific task dynamically within your custom code.
This method enables you to log key details about the request in the task's Audit Log, such as entity values, during the execution of the connector action. It’s useful for auditing and troubleshooting by documenting request-related activities.
Log request task Template
//Request Task logging, this can be observed in the AuditLog for the task
Context.LogRequestTask("Request Entity Name value is " + requestEntity.Name);This method enables you to log key details about the response in the task's Audit Log, such as entity values, during the execution of the connector action. It’s useful for auditing and troubleshooting by documenting response-related activities.
//Response Task logging, this can be observed in the AuditLog for the task
Context.LogRequestTask("Response Entity Name value is " + responseEntity.Name);This method allows you to validate data consistency or halt execution when business conditions are not met. You can trigger an error, stop the current connector action execution, and return a specific error type and message. This method is helpful for enforcing business rules and ensuring data integrity during processing.
Example:
In this example, if the ErrorCode is equal to "ERROR", the execution of the current connector action stops and returns the specified error type ("Forbidden") and message ("REST Request was not authorized"). This ensures that further actions in the process are halted when the response indicates an error.
Raise error Example
(function main(){

//Check response entity field values
if(responseEntity.ErrorCode == "ERROR"){
    //Throw any Connector Action Error
    //This will stop the current ConnectorAction execution and it will return the type and message specified
    Context.RaiseError("Forbidden","REST Request was not authorized");
}

})()This method stops the current connector action execution without running any subsequent integration tasks. It is used to prematurely terminate the workflow when no further processing is needed, ensuring that the remaining tasks are skipped. This is useful when you want to end the action early based on specific conditions or logic.
This method introduces a delay before executing a task. You can specify a wait time of up to 5000 ms (5 seconds). The Wait() method can be called a maximum of 3 times per task.
Example
Context.LogRequestTask("hello");
Context.Wait(2000); // Waits for 2 seconds
Context.LogRequestTask("hello after the first wait");
Context.Wait(3000); // Waits for 3 seconds
Context.LogRequestTask("hello after the second wait");
In this example, the Wait() method pauses execution twice, first for 2000 ms (2 seconds) and then for 3000 ms (3 seconds), allowing better control over task timing within integration tasks.
Entity
This method creates a new entity of the request entity type if it has not been initialized in the context. It ensures that an entity is available for manipulation or further processing.
Create entity Template
//Request Entity manipulation
let requestEntity = Context.GetRequestEntity();

//When Request Entity has not been initialized in the context, it's value is null
if(requestEntity == null){
    requestEntity = EntityFactory.CreateEntityByName("REQUESTENTITYNAME"); //Create a new entity of Request Entity type
}
In the provided template, if the requestEntity is null (not initialized), it is created using EntityFactory.CreateEntityByName("REQUESTENTITYNAME"). This allows you to work with a new entity when needed.
Example: create an opportunity
The following example creates an opportunity when it has a Name and an Estimated Value greater than 50. Specific business errors will inform the user why opportunity creation has failed.
(function main(){
//Request Entity manipulation
let requestEntity = Context.GetRequestEntity();

// Check if Request Entity has been initialized in the context
if(requestEntity == null){
        Context.RaiseError("Error","You cannot add an empty Opportunitiy!");
}

// Validate that the Name field is not empty
if(requestEntity.Name == null){
        Context.RaiseError("Error","The Name is mandatory for the Opportunitiy!");
}

// Validate that the Estimated Value is greater than 50
if(requestEntity.EstimatedValue <=50 ){
    Context.RaiseError("Error","The Estimated Value should be greater than 50.");
}

})()This method creates a new collection of the request entity type if it has not been initialized in the context. It is useful when you need to initialize a collection for further manipulation or processing.
Create entity list Template
//Entity Collection manipulation
let entityCollection = Context.GetRequestEntityList;

//When Entity Collection has not been initialized in the context, it's value is null
if(entityCollection == null){
        entityCollection = EntityFactory.CreateCollection("ENTITYNAME"); //Create a new collection / entity list
}
In the provided template, if the request entity list is null (not initialized), it is created using EntityFactory.CreateCollection("REQUESTENTITYNAME"). This allows you to work with a new entity list / collection.
This function creates a clone of an entity to ensure that any modifications to the clone do not affect the original entity. This is useful when you need to work with multiple instances of an entity while preserving the integrity of the original data.
Example: Cloning Entities to Avoid Overwriting
Imagine you have an entity representing a user account, and you want to create a list of accounts with different names but keep the original account unchanged.
// Create an initial 'Account' entity using the EntityFactory
let MyAccount = EntityFactory.CreateEntityByName("Account");

// Create a collection to store multiple 'Account' entities
let myAccountList = EntityFactory.CreateCollection("Account");

// Clone the 'MyAccount' entity and modify the clone in each loop iteration
for (let i = 0; i < 10; i++) {
    let clonedAccount = EntityUtils.Clone(MyAccount);  // Clone the original account
    clonedAccount.Name = "User " + i;  // Modify the 'Name' property of the clone
    myAccountList.Add(clonedAccount);  // Add the cloned account to the list
}

// After the loop, the original 'MyAccount' entity remains unchanged
MyAccount.Name = "Admin";  // Update the original entity's name to "Admin"

// The list of cloned accounts still holds their individual names, like "User 0", "User 1", etc.
In this example:
- Inside the loop,
EntityUtils.Clone(MyAccount)creates a new instance (clone) of the original MyAccount entity for each iteration. - The Name property of each cloned account is changed to "
User " + i.toString(), creating unique names for each cloned account. - After the loop, when
MyAccount.Nameis set to "Admin", it only affects the original entity, not the clones stored inmyAccountList. The cloned accounts in the list retain their original names, like "User 0", "User 1", etc.
By using cloning, you prevent any accidental changes to the original entity, allowing you to manage multiple versions of it independently.
This method converts the given entity into a JSON-formatted string. This is useful when you need to log, debug, or send entity data as a string in API requests, integrations, or other custom logic.
Example
(function main(){
    let requestEntity = Context.GetRequestEntity();

    // Convert entity to JSON string
    let entityString = EntityUtils.Stringify(requestEntity);

    // Log the stringified entity
    Context.LogRequestTask("Entity Data: " + entityString);
})();
If requestEntity has the following structure:
The EntityUtils.Stringify(requestEntity); method will return:
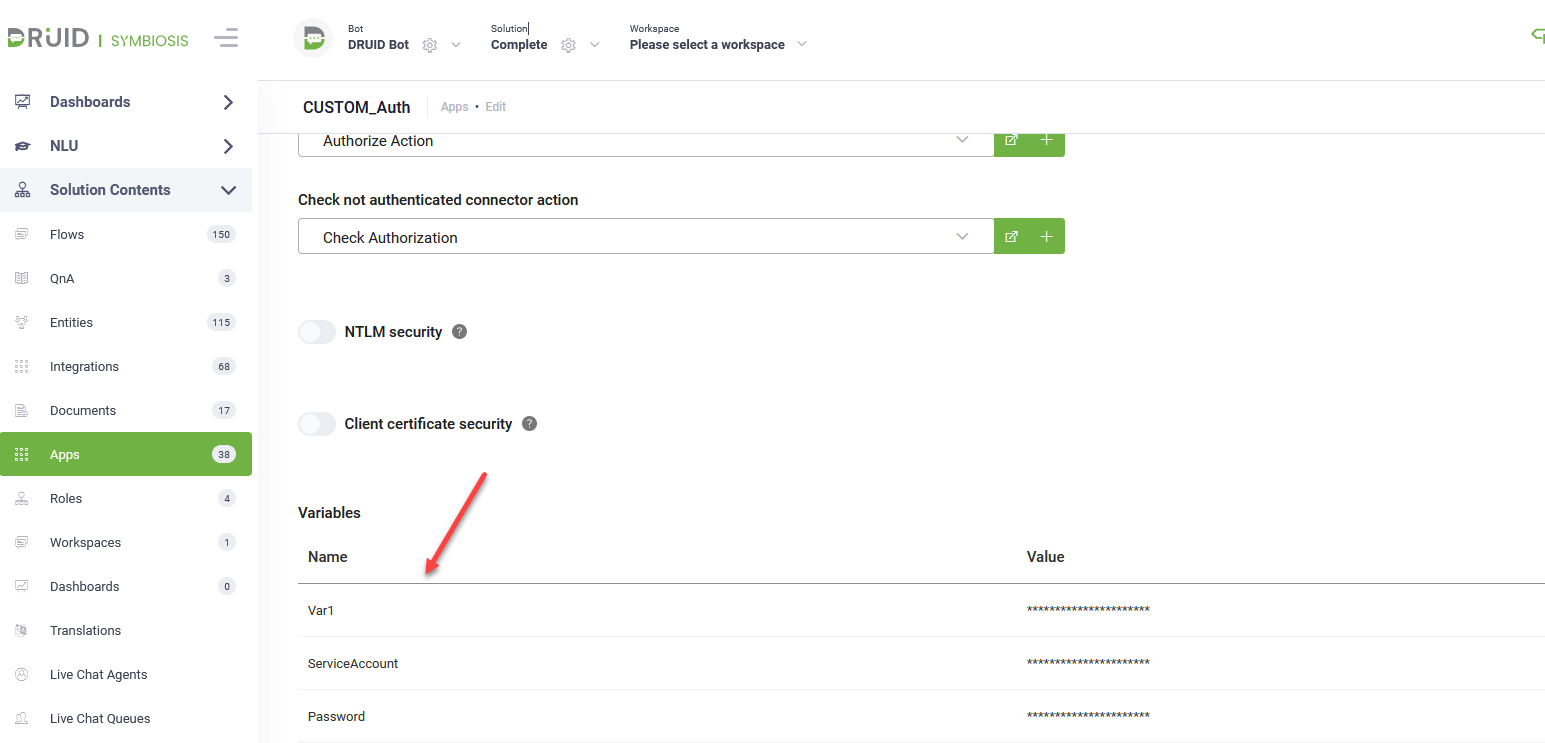
Variables
This method retrieves the value of a local variable within the current connector integration. It allows you to access and use variables that are defined during the execution of the connector action. This method is useful for referencing values stored in the context for use in your custom logic.
var variableName= Context.GetContextVariable("variableName");. For more information, see Using Connector Local Variables.This method retrieves a connector integration variable from the context, which stores REST application credentials. It provides access to application-specific credentials or parameters for authentication or configuration within your custom logic.
Context.GetConnectorApplicationVariable("variableName","appName");This method sets a local variable within the connector integration context. It allows you to store values that can be accessed and used later in the execution of your custom logic.
Local scope
This method sets an entity within the local scope of the connector action, allowing you to perform operations on data directly within the action, rather than relying on external context. Use this when you need to define and manipulate a specific entity within the current execution without affecting the global context.
This method retrieves an entity from the local scope defined within the connector action. You can access previously set entities within the local scope to perform further operations. This avoids the need to query external data sources or manage a larger context.
This method sets a collection of records within the local scope. It allows you to store and work with multiple records directly within the connector action, eliminating the need to manage external queries or larger contexts. Use this when you want to work with a group of related entities during the integration task.
This method retrieves a collection of records from the local scope, allowing you to access entity records you previously set. This makes it easier to perform operations on multiple records within the current connector action without needing to reference external contexts.
Encryption
Encrypts the request body or only specific request data using the AES256CBC algorithm.
Where:
- plainText is the request data to be encrypted.
- key is the encryption key you get from the connector app, Variables section.
Example - Encrypt the request ExecutionId
//This is the default snippet for CustomCode
(function main(){
//Request Entity manipulation
    let requestEntity = Context.GetRequestEntity();
    let encrKey = Context.GetConnectorApplicationVariable(encryptionKey);
    EncryptionUtils.AES256CBC.Encrypt(requestEntity.ExecutionId,encrKey);
    }
)Decrypts the encrypted request body or only specific request data using the AES256CBC algorithm.
Where:
- plainText is the encrypted string that includes the Initialization Vector (IV) at the beginning, followed by the actual encrypted payload.
- key is the encryption/decryption key retrieved from the Variables section in the connector app.
//This is the default snippet for CustomCode
(function main(){
//Request Entity manipulation
    let requestEntity = Context.GetRequestEntity();
    let encrKey = Context.GetConnectorApplicationVariable(encryptionKey);
    EncryptionUtils.AES256CBC.Decrypt(requestEntity.ExecutionId,encrKey);
    }
)The JWT custom code template simplifies generating and encrypting JWTs for secure client authentication involving a double JWT exchange.
JWT Template
/*
Default values for GetOptions:
Algorithm: HS256,
ExpirationTime: DateTime.UtcNow.AddHours(1),
IssuedAt: DateTime.UtcNow
*/
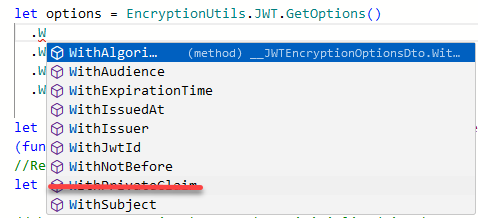
let options = EncryptionUtils.JWT.GetOptions()
.WithAlgorithm("HS256")
.WithIssuer("issuer")
.WithSubject("subject")
.WithPrivateClaim("privateClaimKey", "value")
let jwt = EncryptionUtils.JWT.GenerateJWT(options, "MySuperSecretKeyForHS256Encryption");
Context.LogRequestTask(jwt);
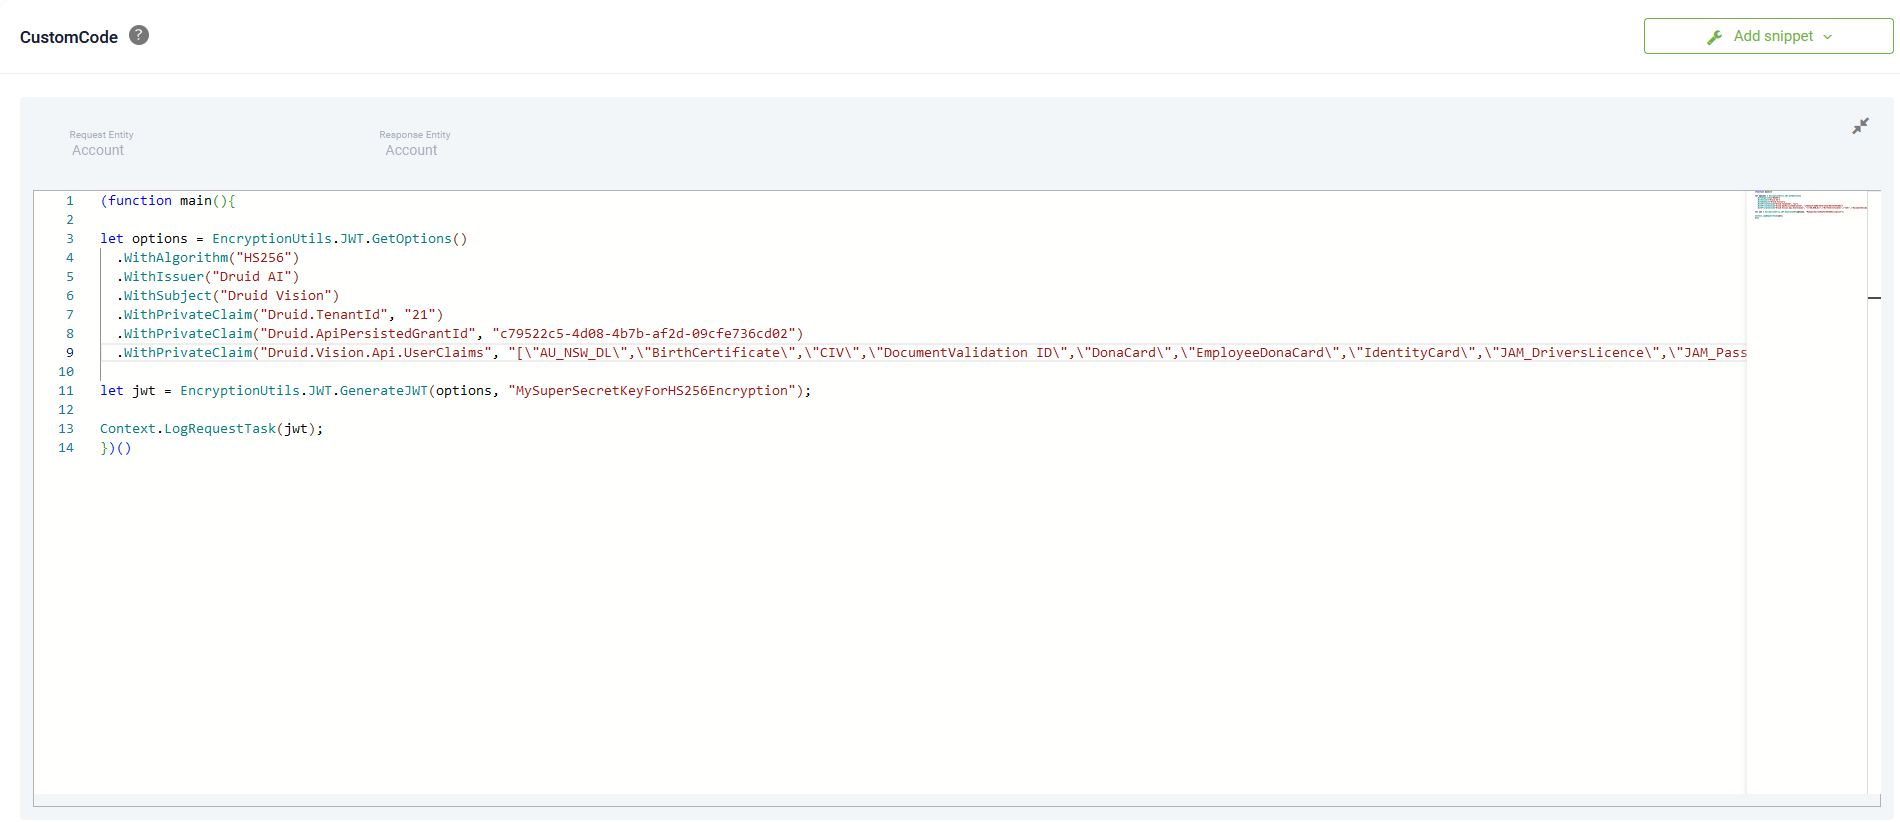
})()Use case for double JWT exchange
- A client (third-party system) transmits a token to your application.
- Your application generates a new JWT containing specific claims (default and private claims). This JWT acts as an authentication key.
- The application sends the generated JWT to a designated endpoint (third party system).
- The endpoint validates the JWT's signature and returns a separate JWT, which is the actual access token you will use in integrations.
(function main(){

let options = EncryptionUtils.JWT.GetOptions()
  .WithAlgorithm("HS256")
  .WithIssuer("Druid AI")
  .WithSubject("Druid Vision")
  .WithPrivateClaim("Druid.TenantId", "21")
  .WithPrivateClaim("Druid.ApiPersistedGrantId", "c79522c5-4d08-4b7b-af2d-09cfe736cd02")
  .WithPrivateClaim("Druid.Vision.Api.UserClaims", "[\"AU_NSW_DL\",\"BirthCertificate\",\"CIV\",\"DocumentValidation ID\",\"DonaCard\",\"EmployeeDonaCard\",\"IdentityCard\",\"JAM_DriversLicence\",\"JAM_Passport\",\"JAM_VotersId\",\"mrz\",\"MRZ_GetRequestData\",\"New_IdentityCard\",\"Promissory_Note\",\"QRCode\",\"RO_DriverLicense\",\"RO_LivingPermit\",\"RO_Passport\",\"RO_RegistrationCertificate\",\"RO_ResidenceCard\",\"RO_VehicleIdentityCard\",\"UAE_IdentityCard\",\"UK_DrivingLicence\",\"VirtualTemplate\"]")

let jwt = EncryptionUtils.JWT.GenerateJWT(options, "MySuperSecretKeyForHS256Encryption");

Context.LogRequestTask(jwt);
})()
Example: HMAC SHA1 algorithm
(function main(){

var message = "Hello, World!";
var key = "secretkey";
var hash = CryptoJS.HmacSHA1(message, key);

var hashString = hash.toString(CryptoJS.enc.Hex);

Context.LogRequestTask(hashString);
})()Uses standard asymmetric RSA encryption powered by your certificate private key string.
Custom Code Example
// Retrieve the securely stored certificate private key string from the connector application variable table
let a = Context.GetConnectorApplicationVariable("privateKey", "JWT_RSA");

// Initialize and configure the JSON Web Token (JWT) options payload builder
let options = EncryptionUtils.JWT.GetOptions()
  .WithIssuer("issuer-custom")                    // Set the explicit token issuer claim
  .WithSubject("subject-custom")                  // Set the target token subject claim
  .WithPrivateClaim("privateClaimKey", "value");  // Append a custom key-value pair as a private claim

// Sign the configured options payload using standard asymmetric RSA encryption and your private key
let jwt = EncryptionUtils.JWT.GenerateJWTRSA(options, a);

// Persist the generated token assertion string into a Druid context variable ("jwt")
// so it can be referenced in the next Authenticate Client integration task
Context.SetContextVariable("jwt", jwt);Provides explicit control over your asymmetric signing algorithm and padding style configurations.
// Retrieve the securely stored certificate private key string from your connector application variable table
let a = Context.GetConnectorApplicationVariable("privateKey", "JWT_RSA_Custom");

// Initialize and configure the JSON Web Token (JWT) options payload builder
let options = EncryptionUtils.JWT.GetOptions()
  .WithIssuer("issuer-custom")                    // Set the explicit token issuer claim
  .WithSubject("subject-custom")                  // Set the target token subject claim
  .WithPrivateClaim("privateClaimKey", "value");  // Append a custom key-value pair as a private claim

// Sign the options payload using asymmetric RSA encryption with explicit overrides
// for the hashing algorithm (SHA512) and the cryptographic padding style (Pss)
let jwt = EncryptionUtils.JWT.GenerateJWTRSACustom(options, a, "SHA512", "Pss");

// Persist the generated custom RSA token assertion string into a Druid context variable ("jwt")
// so it can be mapped into the request body of the subsequent Authenticate Client integration task
Context.SetContextVariable("jwt", jwt);Provides explicit control over your asymmetric signing algorithm and padding style configurations.
// Retrieve the securely stored certificate private key string from your connector application variable table
let a = Context.GetConnectorApplicationVariable("privateKey", "JWT_RSA_with_Header");

// Initialize and configure the JSON Web Token (JWT) options payload builder
let options = EncryptionUtils.JWT.GetOptions()
  .WithIssuer("issuer-custom")                    // Set the explicit token issuer claim
  .WithSubject("subject-custom")                  // Set the target token subject claim
  .WithPrivateClaim("privateClaimKey", "value");  // Append a custom key-value pair as a private claim

// Sign the options payload and inject mandatory metadata directly into the token header area.
// Parameters passed:
// - options: The configured payload claims builder
// - a: The certificate private key used for signing
// - "test-key-1": The Key ID ("kid") parameter to specify which public key verifies this signature
// - "HCO1x4FLUwRqpAcA8UnR_E_0ZrE": The X.509 SHA-1 Thumbprint ("x5t") base64url string of the certificate
// - "SHA384": Explicit hashing algorithm override
// - "Pss": Explicit cryptographic padding style override
let jwt = EncryptionUtils.JWT.GenerateJWTRSAWithHeader(options, a, "test-key-1", "HCO1x4FLUwRqpAcA8UnR_E_0ZrE", "SHA384", "Pss");

// Persist the generated header-enriched RSA token assertion string into a Druid context variable ("jwt")
// so it can be mapped into the request body of the subsequent Authenticate Client integration task using {jwt}
Context.SetContextVariable("jwt", jwt);The Decrypt JWT method allows you to decode a JSON Web Token (JWT) and validate its authenticity. This functionality is helpful in two key scenarios:
- Verifying Secret Key: By decrypting the JWT with a known secret key, you can confirm if the key you possess is indeed the correct one used to sign the token.
- Extracting Conversation-Level Information: Once decrypted, the JWT token reveals valuable information embedded within it. This information can be used to understand the context of a conversation, such as user identities and access permissions.
let token = "eyJhbGciOiJIUzUxMiIsInR5cCI6IkpXVCJ9.eyJzdWIiOiIxMjM0NTY3ODkwIiwibmFtZSI6IkpvaG4gRG9lIiwiYWRtaW4iOnRydWUsImlhdCI6MTUxNjIzOTAyMn0.VFb0qJ1LRg_4ujbZoRMXnVkUgiuKq5KxWqNdbKq_G9Vvz-S1zZa9LPxtHWKa64zDl2ofkT8F6jBt_K4riU-fPg";
let secret = "your-512-bit-secret";
//"hs256" or "hs512" supported
let jwt = EncryptionUtils.JWT.DecryptJWT(token, secret, "hs512");

let user = JSON.parse(jwt.Payload);
let logData = '';
Object.keys(user).forEach(key => {
   logData += `Key: ${key}, Value: ${user[key]}
   `;
})
Context.LogRequestTask(logData);
if(!!user.admin){
    Context.LogRequestTask('user is admin');
}
The provided template demonstrates how to decrypt a JWT token using the DecryptJWT method and log every element from the JWT payload. Here's a breakdown of the steps involved:
Replace placeholders: Fill in the following placeholders within the template:
-
token: The JWT token you intend to decode.
-
secret key: The secret key used to sign the token (required for decryption).
-
Specify decryption algorithm in
EncryptionUtils.JWT.DecryptJWT(token, secret, "<decryption algorithm>"). DRUID currently supports three algorithms for JWT decryption: HS256, HS512 and RS256. Choose the appropriate algorithm based on the token's encryption method.
Encoding
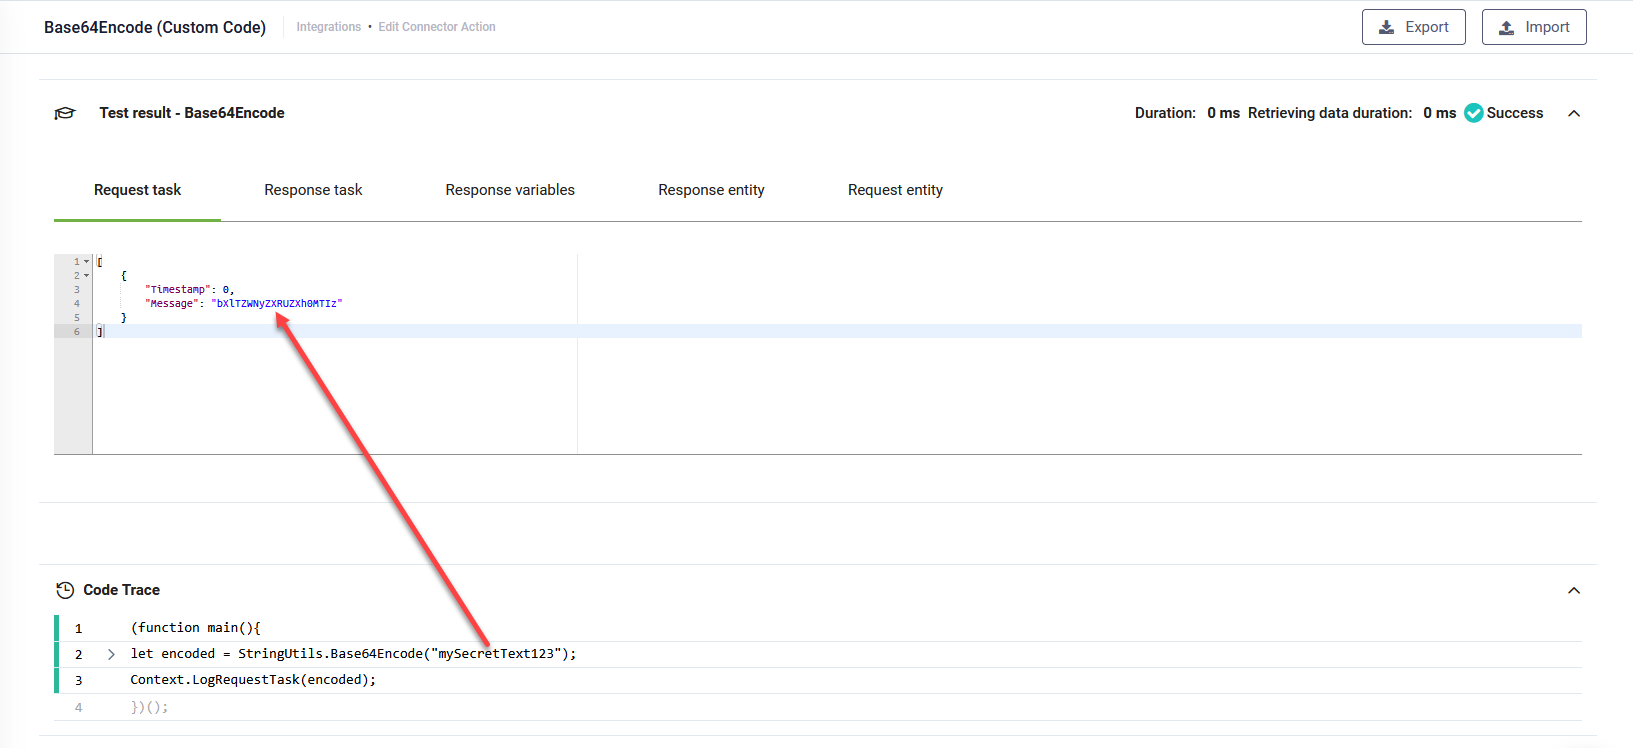
Encodes a string to Base64 using UTF-8. Use this to safely transmit plain text (e.g., credentials or binary content) in headers, URLs, or other parts of a request.
Where:
plainTextis the string you want to encode in Base64 format.
Example
(function main(){
let encoded = StringUtils.Base64Encode("mySecretText123");
Context.LogRequestTask(encoded);
})();
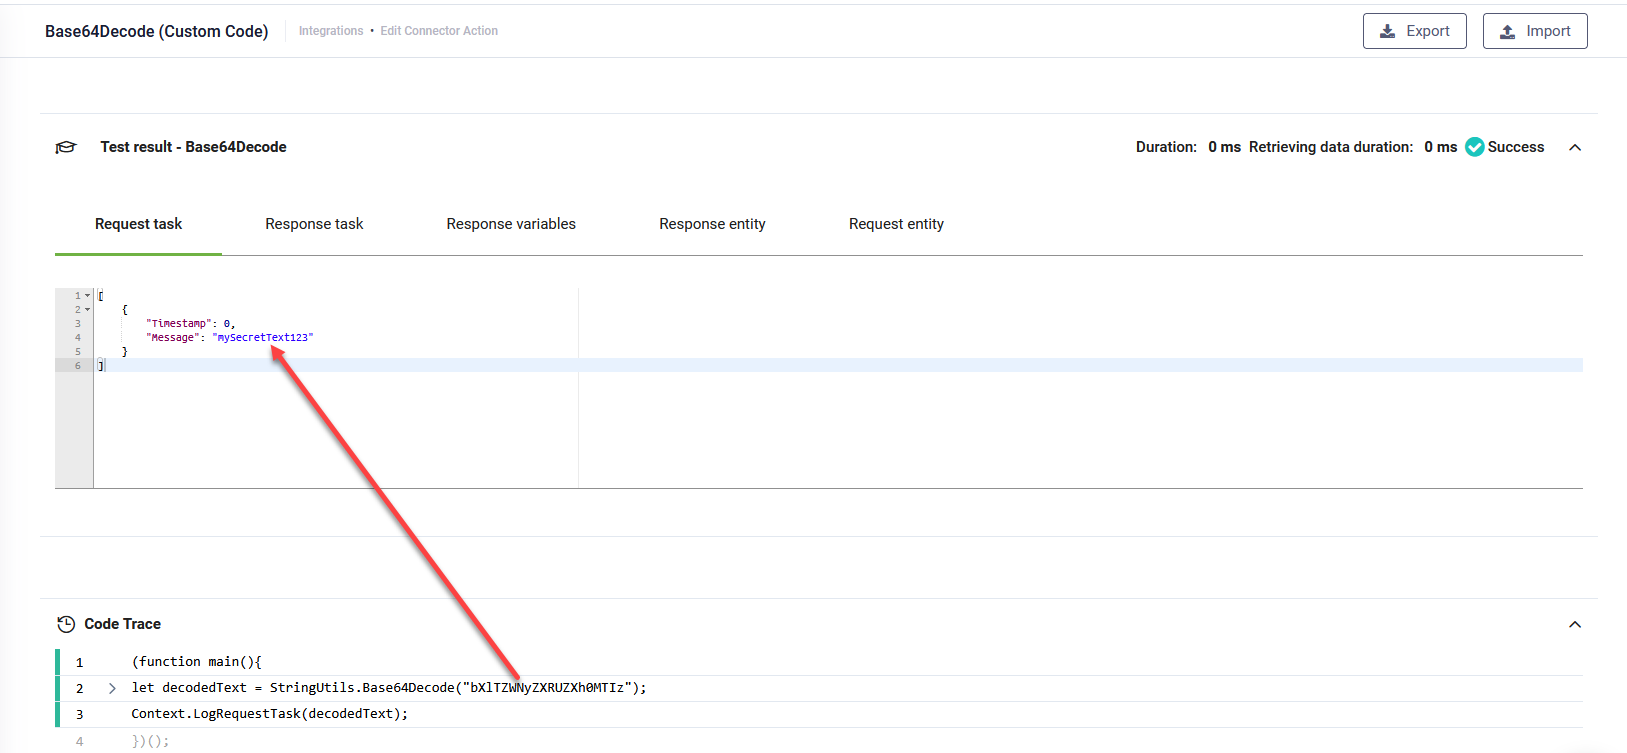
Decodes a Base64-encoded string back into its original format.
Where:
encodedTextis the Base64 encoded string you want to decode into its original format.
Example
(function main(){
let decodedText = StringUtils.Base64Decode("bXlTZWNyZXRUZXh0MTIz");
Context.LogRequestTask(decodedText);
})();
XML
/* Sample XML with multiple lists and nodes */
const xml = `<root>
    <title>This is a title</title>
    <body>
        <item>  <info> This is the first item </info> </item>
        <item>  <info> This is the second item </info> </item>
        <item>  <info> This is the third item </info>  </item>
        <list>
            <l>
                <desc>List first element</desc>
            </l>
            <l>
                <desc>List second element</desc>
            </l>
        </list>
        <outer>
            <inner>
                <val>Nested value</val>
            </inner>
        </outer>
    </body>
</root>`;

let reqEntity = Context.GetRequestEntity();

/* In this example the Request Entity contains a field with EntityList data type and name ListField */
let mappingArray =
[
    "ListField.Name, body.list.l[*].desc",
    "ListField.Id, body.item[*].info",
    "Name, title",
    "Id, body.outer.inner.val"
];
let result = Context.ParseXMLToEntityFields(reqEntity, xml, mappingArray);

Context.SetRequestEntity(result);XML Example
const xml = `<DataSet xmlns="http://www.bnr.ro/xsd" xmlns:xsi="http://www.w3.org/2001/XMLSchema-instance" xsi:schemaLocation="http://www.bnr.ro/xsd nbrfxrates.xsd">
<Header>
<Publisher urrency="AEddD">National Bank of Romania</Publisher>
<PublishingDate>2024-09-18</PublishingDate>
<MessageType>DR</MessageType>
</Header>
<Body>
<Subject>Reference rates</Subject>
<OrigCurrency>RON</OrigCurrency>
<Cube date="2024-09-18">
<Rate currency="AED">1.2158</Rate>
<Rate currency="AUD">3.0299</Rate>
<Rate currency="BGN">2.5434</Rate>
<Rate currency="BRL">0.8144</Rate>
<Rate currency="CAD">3.2874</Rate>
<Rate currency="CHF">5.3003</Rate>
<Rate currency="CNY">0.6303</Rate>
<Rate currency="CZK">0.1985</Rate>
<Rate currency="DKK">0.6667</Rate>
<Rate currency="EGP">0.0920</Rate>
<Rate currency="EUR">4.9746</Rate>
<Rate currency="GBP">5.9056</Rate>
<Rate currency="HUF" multiplier="100">1.2615</Rate>
<Rate currency="INR">0.0533</Rate>
<Rate currency="JPY" multiplier="100">3.1538</Rate>
<Rate currency="KRW" multiplier="100">0.3378</Rate>
<Rate currency="MDL">0.2558</Rate>
<Rate currency="MXN">0.2339</Rate>
<Rate currency="NOK">0.4222</Rate>
<Rate currency="NZD">2.7796</Rate>
<Rate currency="PLN">1.1644</Rate>
<Rate currency="RSD">0.0425</Rate>
<Rate currency="RUB">0.0486</Rate>
<Rate currency="SEK">0.4395</Rate>
<Rate currency="THB">0.1343</Rate>
<Rate currency="TRY">0.1309</Rate>
<Rate currency="UAH">0.1077</Rate>
<Rate currency="USD">4.4657</Rate>
<Rate currency="XAU">368.9924</Rate>
<Rate currency="XAU">6.0359</Rate>
<Rate currency="ZAR">0.2542</Rate>
</Cube>
</Body>
</DataSet>`;
Mapping XML array to DRUID entity list
let reqEntity = Context.GetRequestEntity();

/* In this example the Request Entity contains a field with EntityList data type and name ListField */
let mappingArray =
[
   "Name,Header.Publisher{currency}",
   "apicodes.Name,Body.Cube.Rate[*]",
   "apicodes.code,Body.Cube.Rate[*]{currency}"

];
let result = Context.ParseXMLToEntityFields(reqEntity, xml, mappingArray);

Context.SetRequestEntity(result);
FileUtils
The FileUtils.ReadXMLFromFile(filename) method allows you to read the content of an XML file and save it as a string in a DRUID entity field. The filename parameter corresponds to the entity field that stores the content of an XML file uploaded by the user during the chat. Below is an example script demonstrating how to use this method:
Example
(function main() {
    let requestEntity = Context.GetRequestEntity();

    // Read XML content from the uploaded file and store it in the 'ExtractedString' field.
    requestEntity.ExtractedString = FileUtils.ReadXMLFromFile(requestEntity.InputFile.Name);

    // Save the updated entity.
    Context.SetResponseEntity(requestEntity);
})();
The uploaded XML file's content is extracted and stored in a DRUID entity for further processing.
You can further use the 'Map XML String to Entity Fields' feature to map the extracted XML string to specific DRUID entity fields, enabling you to manipulate the data as needed.
After making your updates, you can generate an updated XML file using the method: FileUtils.WriteXMLToFile(XMLContent: string, fileName: string).
The FileUtils.WriteXMLToFile(XMLContent: string, fileName: string) method allows you to generate an XML file from a string and save it for further use.
Example
(function main() {
    let requestEntity = Context.GetRequestEntity();

    // Define the XML content.
    let myXML = '<CNP>123456789</CNP>';

    // Write the XML content to a file and store the result in the 'OutputFile' field.
    requestEntity.OutputFile = FileUtils.WriteXMLToFile(myXML, 'YourXMLfile.xml');

    // Save the updated entity.
    Context.SetResponseEntity(requestEntity);
})();
This method is particularly useful for generating and providing an XML file to the user during a chat interaction.
The FileUtils.ReadTxtFromFile(filename) method enables you to read the content of a TXT file and store it as a string in a DRUID entity field. The filename parameter refers to the entity field where the content of the TXT file, uploaded by the user during the chat, will be saved.
Below is an example script demonstrating how to use this method:
Example
(function main() {
    let requestEntity = Context.GetRequestEntity();

    // Read content from the uploaded txt file and store it in the 'ExtractedString' field.
    requestEntity.ExtractedString = FileUtils.ReadTxtFromFile(requestEntity.InputFile.Name);

    // Save the updated entity.
    Context.SetResponseEntity(requestEntity);
})();
The FileUtils.WriteTxtToFile(txtContent, fileName) method allows you to create a TXT file from a string and save it for future use. This provides an easy way to generate and manage text files dynamically within DRUID.
(function main() {
    let requestEntity = Context.GetRequestEntity();

    // Define the content to be written to the TXT file.
    let txtContent = "My CNP is 123456789";

    // Generate the TXT file from the content and store the resulting file in the 'OutputFile' field.
    requestEntity.OutputFile = FileUtils.WriteTxtToFile(txtContent, "GeneratedFile.txt");

    // Save the updated entity with the new file.
    Context.SetResponseEntity(requestEntity);
})();
This method is particularly useful for generating and providing a txt file to the user during a chat interaction or sending it to a third-party system via an API call.
The FileUtils.ReadJSONFromFile(filename) method enables you to read the content of a JSON file and store it as a string in a DRUID entity field. The filename parameter refers to the entity field where the content of the json file, uploaded by the user during the chat, will be saved.
Below is an example script demonstrating how to use this method:
Example
(function main() {
    let requestEntity = Context.GetRequestEntity();

    // Read content from the uploaded JSON file and store it in the 'ExtractedString' field.
    requestEntity.ExtractedString = FileUtils.ReadJSONFromFile(requestEntity.InputFile.Name);

    // Save the updated entity.
    Context.SetResponseEntity(requestEntity);
})();
The FileUtils.WriteJSONToFile(jsonContent, fileName) method allows you to generate a JSON file from a JSON object (converted to a string) and save it for further use.
This method is particularly useful for creating JSON files that can be shared with users during a chat interaction or sent to a third-party system via an API call.
(function main() {
    let requestEntity = Context.GetRequestEntity();

    // Define the JSON content as a JavaScript object.
    let myJObject = { "CNP": 123456789 };

    // Convert the object to a JSON string and write it to a file. Store the file in the 'OutputFile' field.
    requestEntity.OutputFile = FileUtils.WriteJSONToFile(JSON.stringify(myJObject), "GeneratedJSONFile.json");

    // Save the updated entity with the generated file.
    Context.SetResponseEntity(requestEntity);
})();
DateTimeUtils
The JavaScript toLocaleString() method is not supported in the Custom Code. To achieve similar functionality, use the built-in DateTimeUtils.StringifyDate(date, format) method.
This method lets you convert a Date object into a formatted string that matches your desired display style.
Example
const dateInput = '2025-07-03T14:31:00Z';
const date = new Date(dateInput);

// Format the date as "July 3, 2025"
let formattedDate = DateTimeUtils.StringifyDate(date, "MMMM d, yyyy");

// Log the result to the task log
Context.LogRequestTask(formattedDate);Data Manipulation
The Set() object allows you to store unique values of any type. Use it when you need to filter duplicate data from an entity collection or a list of values.
Syntax
new Set([iterable]);
Parameters
- iterable: An iterable object (such as an Array) whose elements will be added to the new Set. If not specified, a new empty Set is created.
Example
In this example, we use a Set to extract unique categories from a list of products before updating a Request Entity.
Example
(function main() {
    // Example list containing duplicate categories
    const categories = ["Electronics", "Home", "Electronics", "Garden", "Home"];

    // Create a new Set to automatically remove duplicates
    const uniqueCategoriesSet = new Set(categories);

    // Convert the Set back to an array to use it in the <span class="mc-variable General.AI_Agent variable">AI Agent</span> context
    const uniqueCategoriesArray = Array.from(uniqueCategoriesSet);

    // Log the unique count to the Audit Log
    Context.LogRequestTask("Unique categories identified: " + uniqueCategoriesArray.join(", "));

    // Example: Update a field on the Request Entity with the unique count
    let requestEntity = Context.GetRequestEntity();
    if (requestEntity != null) {
        requestEntity.UniqueCategoryCount = uniqueCategoriesSet.size;
        Context.SetRequestEntity(requestEntity);
    }
})();
Testing the custom code integration task and code tracing
You can test the execution of your code and manually verify in the Code Trace that the code works correctly or if there are any logic errors.
Code tracing is an effective tool in debugging efforts at authoring time as it traces the execution of all the lines in the code and enables you to validate your code.
To test the code, click on the Test tab, then click the Test button ( ) at the top-right corner of the page.
The Code Trace traces the execution of your Custom Code integration task and enables you to:
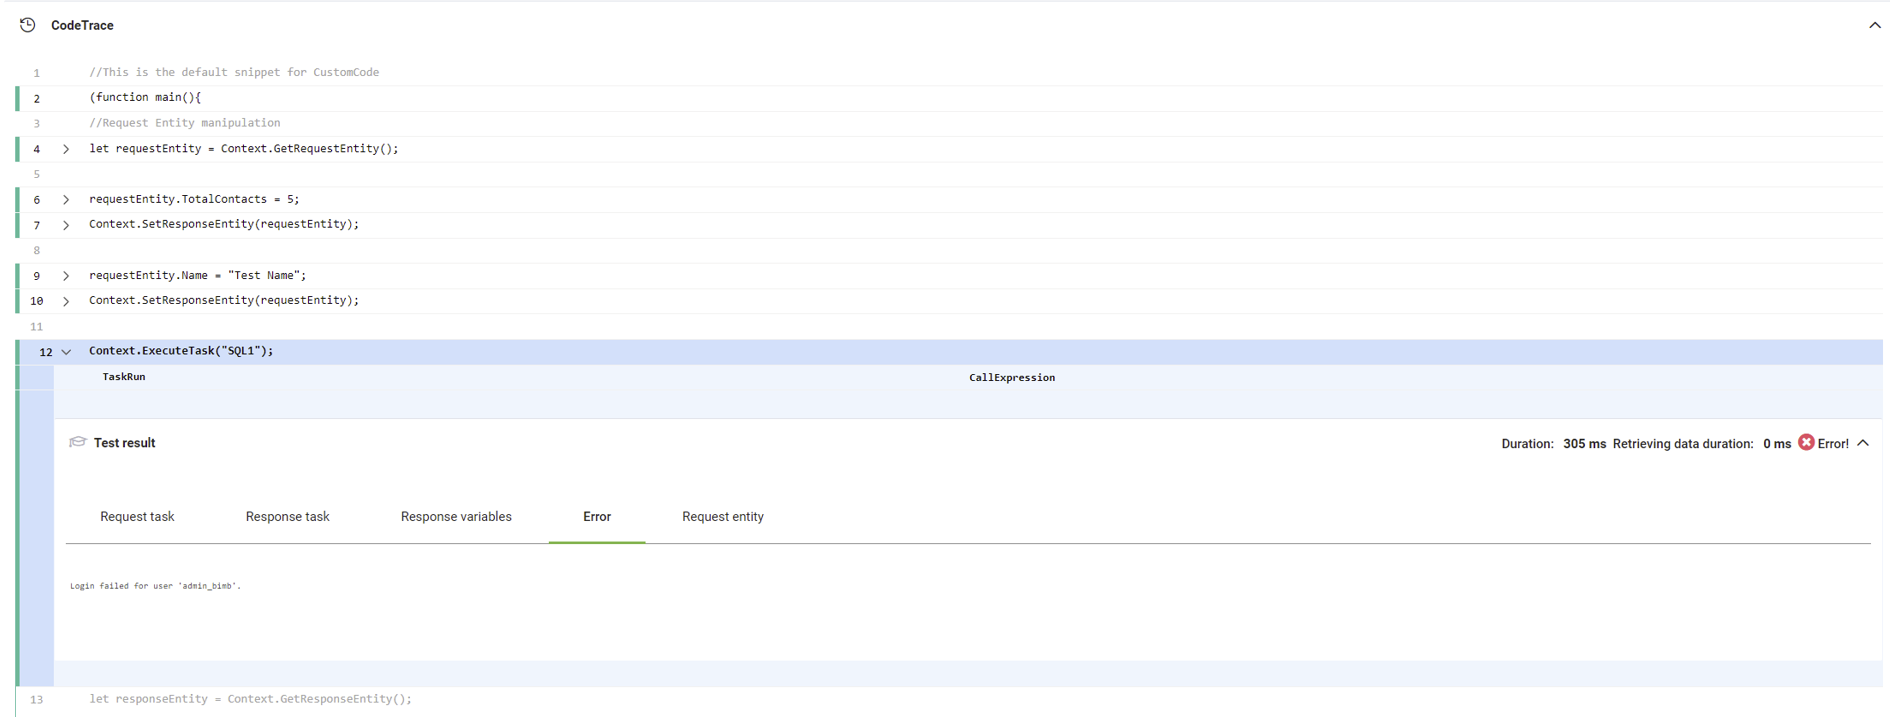
- View the points where the execution has failed (highlighted in red). If the code execution returns errors, you can debug the code by going through the CodeTrace and see what went wrong.
- View the lines of code which were not executed (grayed lines) and the lines that were successfully executed (marked with a green line on the left).
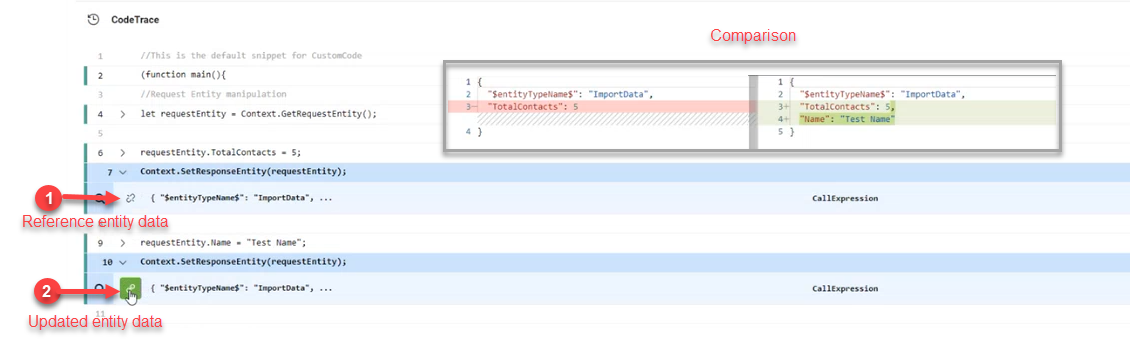
- View what changed in an entity by clicking the compare icon first for the reference entity data and then for the updated entity data. A page opens displaying side-by-side the initial (reference) and the updated entity data.
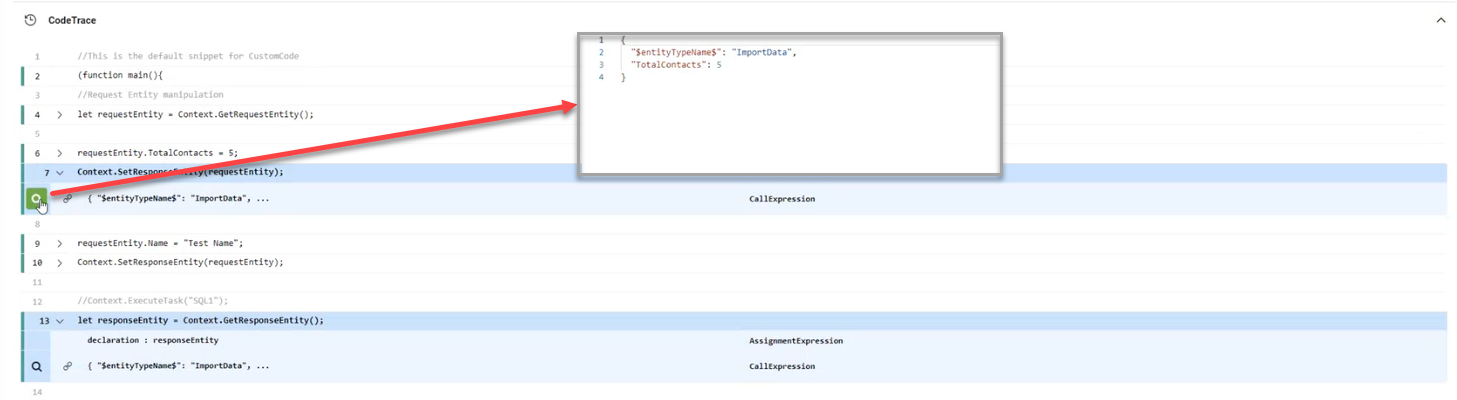
- View an entity as JSON by clicking on the magnifier icon.
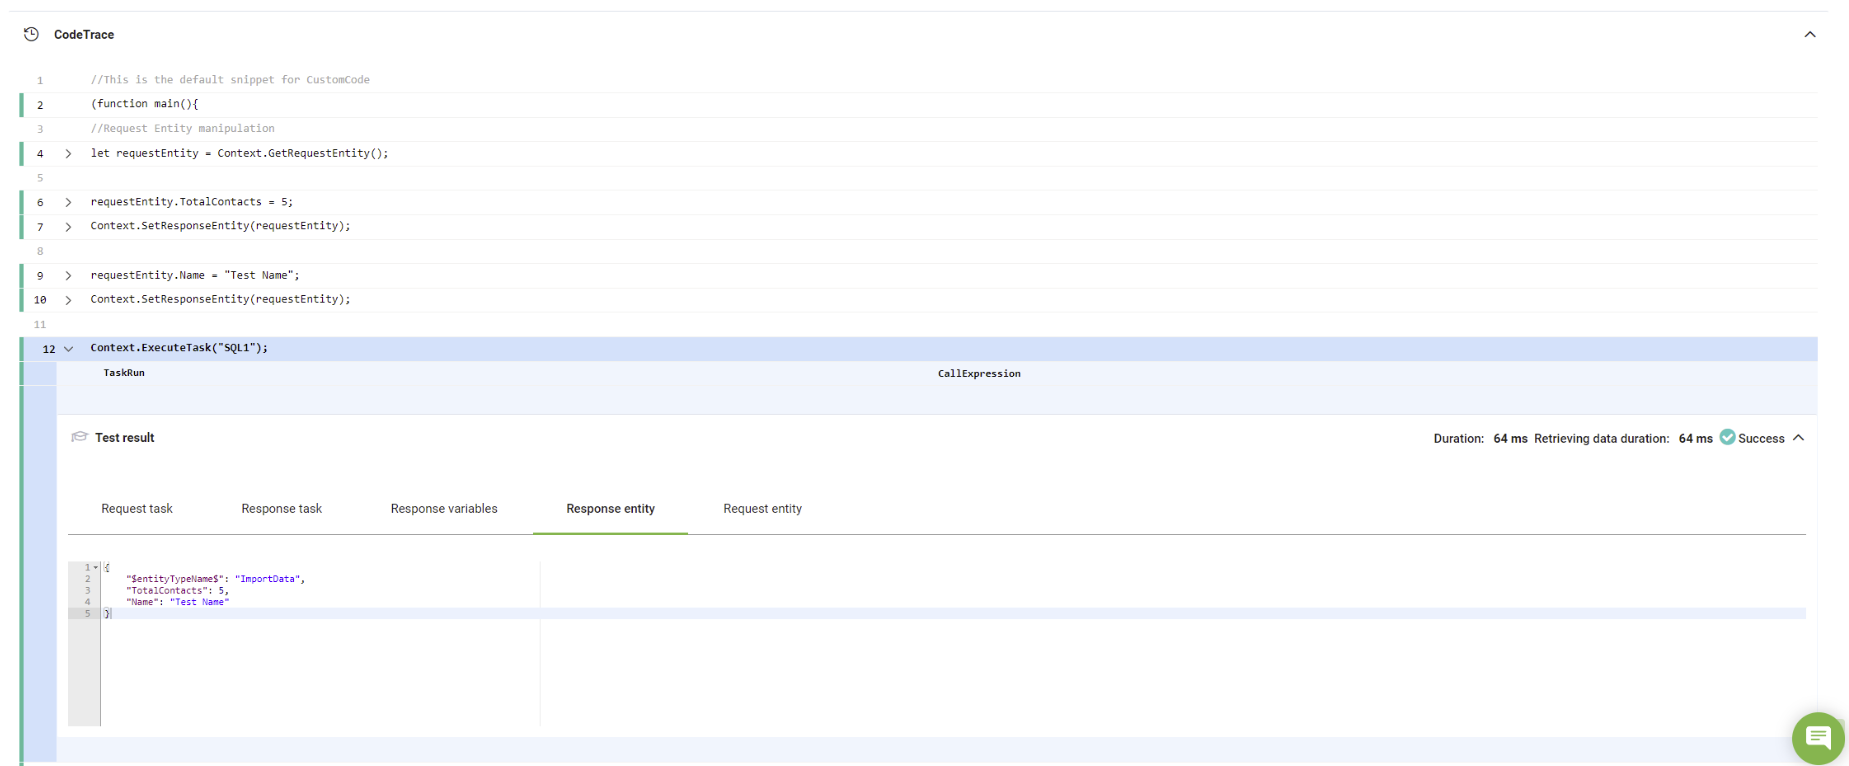
- View the audit log for Context.ExecuteTask and see the values returned from the executed task if it was executed successfully, or the error if the task execution failed.